Semi-DIY Mild Engine Build for FI

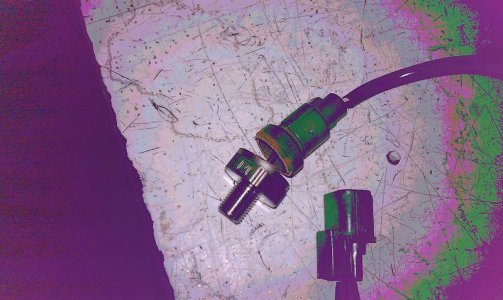
So one of my Knock sensor is broken.

attachment.php


http://www.stockwiseauto.com/produc...ear/1993/Make/Acura/Model/NSX/source/googleps

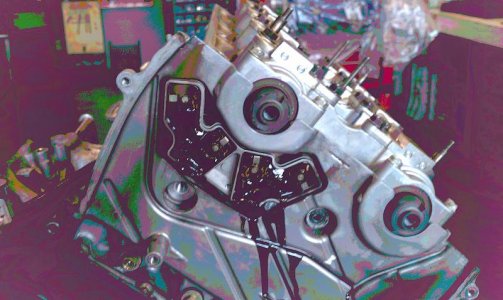
And the other issue that I noticed is what appears to be the crankshaft position sensors are all melted glue/plastics:

attachment.php
 

Attachments

  • IMAG0001.jpg
    IMAG0001.jpg
    65.5 KB · Views: 1,263
  • IMAG0007.jpg
    IMAG0007.jpg
    70.3 KB · Views: 1,437
Last edited:
BTW, does anyone know if I upgrade my injectors from 5500cc - 750cc (to support higher boost) would I be able to drive the car a couple hundred miles so I can have it tuned?

Or will it run rich all the time even at idle or cruising?

It would run rich all the time.
 
And the other issue that I noticed is what appears to be the crankshaft position sensors are all melted glue/plastics:

Thanks for reminding me. I need to buy a new one of these for mine too. I hate those drippings under my car from the melted plastic. Now's the time to replace it!

Dave
 
Mike from Autowave sent me out the new AEM Series2 EMS with the wiring harness adapter, two wideband O2 sensors, and their shop NSX tune.

For now, I removed the older NTK narrow-band O2 sensors and installed the new wideband Bosch's in their place. I have the '97 headers, and these don't have optimal placement for the new ones. First, they're a bit too close to the exhaust ports, and second, they're not angled downward (to allow drainage) according to the AEM instructions. Not ideal, but not catastrophic either. Manifolds will be replaced after the new engine break-in for the turbos anyways.

Mike's instructions were pretty easy to follow. I just had to splice a few wires for the O2 controller powers and pin their outputs into the harness connectors. Uploaded the base map, cranked the engine over and it fired up! Took her gently around the block while data logging. Everything looks good. This thing is so cool. Thanks Mike!

Plan is to play around with the software and do some more data logs. I'll drive it to work in the next few days after the weather clears and then start the engine removal process maybe next weekend!

For now, I stuffed the O2 controller output wires behind the EMS. When everything is set, I'll shorten the controller output wires (not the wires going into the controller!):
IMG_4391.JPG


And here it is covered with my lightweight firewall plastic "mesh." :tongue: My interior has been lightened, but I refuse to drive around with a completely stripped look.
IMG_43931.JPG


Dave
 
Nice progress! It must have been exciting to hear it come alive given all that's going on with installing an EMS.

You know on the WB sensors.. do those 3 or 4 wires connect directly into the EMS harness or is there a "controller" module somewhere in-line before the EMS, similar to how the UEGO kit is like before it connects to the serial gauge?
 
Thanks, it is pretty cool being able to monitor everything and watch the fuel and ignition target the programmed values. I'm fast and furious now baby!

You can keep and input the narrow range OEM O2 sensors through the harness conversion if you want. But there's a lot of benefits going to WR.

If you do the AEM WR O2 kit(s), there is a controller between the Bosch O2 sensor and the EMS. It's about 3" long and an inch or so in diameter. Too big to fit through the firewall so they're still in my engine bay for now (the O2 plugs are freaking huge too). I'll try and put them inside the cabin during the rebuild. You need to run ignition power to the controller (for controller power as well as O2 sesnor heater power), and then you have the signal output and grounded signal out to the EMS. There's another wire for data logging (not necessary with the EMS though since the EMS can log).

Apparently, AEM doesn't make the dual channel O2 UEGO kit anymore, so you have to buy two singles if you want from each bank.

Dave
 
Last edited:
So yesterday they just pulled the engine apart and found something that my builder has never seen in his decades of pulling engines apart.

There were no signs of detonation (no cracked or scarred crowns).

All of the first piston rings were cracked.

2 of the secondary rings were cracked (which explained why 2 of my pistons were showing a 50% leakage on the leak down test and the rest were at 6%)

All of my valves sealed against the valve seat.

Conclusion: Extra dynamic pressures of the forced induction was too great for the OEM piston rings

Rest of the engine is fine and he did note that my journals were almost brand new looking and asked what sorta engine oil I used. I told him Pennzoil Ultra since it has ZDDP.
 
Last edited:
It is re-sleeved. My original motor was a 3.0. Not sure if I have Darton sleeves.
I have the SOS Stage II Forced induction Low compression 3.2.

Did your original engine failure detonate and damaged the piston(s) to warrant the engine rebuild or was it something else?
 
Wow - that is weird Batmans. Usually it's the ringlands that go on the OEM pistons from what I've seen here over the years.


Well, I've been playing around with the AEMTuner software and my base calibration. It's easy to get overwhelmed. I'm no engine expert, and being able to control every parameter of your engine is not a good thing! I've put about 200 miles on it so far, logging every way. Haven't taken it above 6k RPM yet. A/F looks good.

Some things I've noticed:
1) The base cal did not have O2 and knock feedbacks turned on. I looked at the feedback logic (looked reasonable according to the AEMTuner reccomendations) and activated them. Right away, even during idle, the knock sensor was adding fuel and reducing timing. I need to look at the knock sensor input (one of the improved items for the Series 2) and figure out what the correct frequency should be. I've read the knock sensors go bad over time (get noisier), and Batmans even had a broken one (see pic above), so maybe this is the problem.

O2 feedback seems to be OK. I haven't seen it correct anything yet. Base map A/F ratios seem to be OK and within range of others posted here for N/A applications.

2) It's noted VTEC is set to engage at 5000RPM in the base cal. This is easy to change if desired.

3) There's a few issues with a cold engine. This is expected, since it is pretty much trial and error to see how much fuel your engine needs when starting. Therefore, it's pretty hard for a tuner to guess what the settings need to be if they can't experience it. Also, your tuner has limited time available for testing your engine's cold starts. Because I wouldn't be touching the fuel or ignition maps, I felt pretty comfortable trying to tackle this on my own (after extensive internet wading of course beforehand).

There are two cold-engine issues: Engine cold start and cold idle.

Idle Control: It idles pretty well. But, when warming up, the idle would have an occasional 1-second surge. I reduced the idle feedback rate 250milliseconds and that seemed to help. Also, when cold (coolant temp of 60F) and at low throttle (10% TPS or less), suddenly letting off the gas would make the RPM drastically drop to about 500RPM or so. I think making a slight change to the Idle% vs Target% might help this, as well as the RPM Offset vs TPS, but I need to read up on those first. Reducing the idle feedback rate above seemed to help this slightly. Of course, this goes away on a warm engine.

Engine Cold Start: Ah, the AEM tuners common problem and the source of many internet threads. As supplied, the engine started fine on a warm restart. However, after a cold day here (40's), it would take about three separate ignition cranks to get her going trying to leave work.

Now, you need to check your battery first. The AEM doesn't work well below 11V from some reading. I have a newish Odyssey 680 battery. I haven't been able to monitor voltage yet while cranking, but I know it has some droop. I don't think this is my problem since I made some changes below and it starts quicker. Just something to keep in mind if you have a little PC545 or a regular battery in poor condition.

In the "Start" tab, I've changed just about everything. I'm getting closer... it now starts on the first crank during 50F, but after 4 seconds or so. I just make little tweaks here and there and observe the response, so it is a tedious process. Especially when you obviously have to wait for the engine and air temps to cool down. When I get it nailed I'll post the results and my logic(?).
 
Oh, I think I found a local machinist for my block work!

The block boring, honing, and decking will be about $400, and rotating assembly balance to less than 1gram (with fly/clutch and dampener) will only be $300. He builds engines for cars that do the 1/4 mile at 300MPH, and a co-worker has used him for almost 20 subie engine builds :smile:

Some of the tools needed:

IMG_4397.JPG

Don't know if I'm going to need that big brush, but it came in the engine cleaning kit! Also shown are the the fancy rod bolt boots when installing the pistons/connecting rods back into the block where you don't want to scratch your crank, clevite77 bearing guard, crank pulley tool, piston ring grinder (found a GREAT gapping article I'll link later when the time comes), and the awesome piston ring compressor. This is made by ARP to your bore size and is a tapered fit. By far the best way to set the pistons from my research!


<iframe width="420" height="315" src="http://www.youtube.com/embed/W4-wjTfTuwY" frameborder="0" allowfullscreen></iframe>


Also got the engine stand and lift together. Starting to run out of space... there's no turning back now!
IMG_4398.JPG


Dave
 
Awesome to see things coming along! Give me a call when your ready to pull that motor!
 
Thanks Chris,

Got any spare time after next week to do some real-time engine monitoring with me please? I'm going to drop everything and start the cleaning process the week before Christmas. I'll be bugging you for sure :biggrin:

Dave
 
At the risk of falling down the engine-building-slippery-slope have you completely rulled out doing some additional work to get that thing to spin at 9k rpms?

Sorry Regan, didn't see this before.

I'd like to hear my exhaust at 9k RPM's, but it just doesn't make sense for me to go N/A at this point.

I only know of Danny's early build that did this. Too bad he couldn't find the old dyno sheet:
http://nsxprime.com/forum/showthread.php?t=38750
http://nsxprime.com/forum/showthread.php?t=81540

Dave
 
Last edited:
Thanks Chris,

Got any spare time after next week to do some real-time engine monitoring with me please? I'm going to drop everything and start the cleaning process the week before Christmas. I'll be bugging you for sure :biggrin:

Dave

yeah that cool man you know the number. Work has died down a bit so I have oodles of spare time.
 
Some things I've noticed:
1) The base cal did not have O2 and knock feedbacks turned on. I looked at the feedback logic (looked reasonable according to the AEMTuner reccomendations) and activated them. Right away, even during idle, the knock sensor was adding fuel and reducing timing. I need to look at the knock sensor input (one of the improved items for the Series 2) and figure out what the correct frequency should be. I've read the knock sensors go bad over time (get noisier), and Batmans even had a broken one (see pic above), so maybe this is the problem.
Btw... I wonder if Mike normally doesn't tune with the O2 and knock sensor inputs engaged. Perhaps this was a special case with your startup cal?

You're garage looks just like mine.. but much cleaner!
 
No.

Two cyl were off when we check with a leak down test. ~25-30%
Compression was good. 119K miles on the clock.

I had a Comptech high boost kit on the car before the rebuild.

So where was the leakage coming from? accelerated worn or cracked rings?
 
The most important thing I missed were Time serts.
These are tapped into block so your ARP head bolts have a stronger clamp.
After my head gasket started leaking I had to drop the motor and send it to Shad to have them installed. Ken
 
Back
Top