Project: Widebody - 02 Conversion

Juice said:
How is this being sealed from water??

The lamp will be glued (using window urethane) to a stand off tube (a piece of 4" pvc that has been machined). The assembly will mount (screwed from the back) to the taillight bezel with a foam seal tape (similar to what they use to seat truck caps to the truck bed) effectively sealing the inners of the lamp to the outside. The bezel will use the same rubberized seal tape to seal it to the car... Hopefully :smile:
 
VRoooM said:
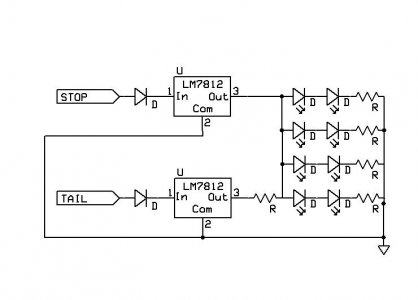
....They are going to run dual intensity. The diodes and resistor on the front end of each input should keep the correct current and voltage across each led... in theory.....

You can usually only go so low (higher resistor value) on the 'tail' function - they are designed to operate in a given regime - to get dimmer w/o them actually going out altogether a PWM is best. You use the same resistor value for both the brake & tail in that case because it is actually same current through the LED in both cases - just in the 'tail' case, it will be turning on & off, but during the 'on' phase the current will be identical. (You can even use PWM for brake too if you like, just a higher on to off ratio). It's pretty easy to change the timing resistor value (or use a pot) in the PWM so you can play with the intensity till you get what you like.

Yes in theory, selecting the 'correct' value of resistor will limit the current at any given voltage - the problem is it will NOT regulate the voltage; you obviously have different conditions for example with just battery & alternator. OK, you can select the resistor using the higher voltage (alternator) as default but this will still do nothing to limit spikes & transients which can actually be quite significant (& what will ultimatley blow your LEDs).
You might also find that you will see quite a different intensity (particularly on the tail function) whether at 12.5V (battery) or vs 15V when car is running.
For a buck & a half this is cheap insurance! (& just too easy to incorporate not to do it) - There's also a 5 V version from RS if the sum of your 2 forward V's is less than that - or get a 7.5V or 9V from alternative on-line source. Especially if you're sealing it up I'd want to be extra cautious you don't lose any LEDs down the road - will spoil a beautiful effect with 'holes' in your array.
 
D'Ecosse said:
You can usually only go so low (higher resistor value) on the 'tail' function - they are designed to operate in a given regime - to get dimmer w/o them actually going out altogether a PWM is best. You use the same resistor value for both the brake & tail in that case because it is actually same current through the LED in both cases - just in the 'tail' case, it will be turning on & off, but during the 'on' phase the current will be identical. (You can even use PWM for brake too if you like, just a higher on to off ratio). It's pretty easy to change the timing resistor value (or use a pot) in the PWM so you can play with the intensity till you get what you like.

Yes in theory, selecting the 'correct' value of resistor will limit the current at any given voltage - the problem is it will NOT regulate the voltage; you obviously have different conditions for example with just battery & alternator. OK, you can select the resistor using the higher voltage (alternator) as default but this will still do nothing to limit spikes & transients which can actually be quite significant (& what will ultimatley blow your LEDs).
You might also find that you will see quite a different intensity (particularly on the tail function) whether at 12.5V (battery) or vs 15V when car is running.
For a buck & a half this is cheap insurance! (& just too easy to incorporate not to do it) - There's also a 5 V version from RS if the sum of your 2 forward V's is less than that - or get a 7.5V or 9V from alternative on-line source. Especially if you're sealing it up I'd want to be extra cautious you don't lose any LEDs down the road - will spoil a beautiful effect with 'holes' in your array.

Perfect Idea. I'm hoping to be able to add the regulator without re-etching my boards. Any ideas?
 
VRoooM said:
Perfect Idea. I'm hoping to be able to add the regulator without re-etching my boards. Any ideas?

Since you will need two regs you will probably need a little piggy back board - you could etch one or just use a small piece of project board.

I don't think you actually really even need the diodes - the regulators should provide isolation anyway. (I've shown 4 strings but obviously you have more)

Select the value of the LED series resistors for 12V and select the tail limit resistor for whatever works out to your fancy for final intensity. Be sure to size the wattage for that one appropriately for the total current through it as it carries current for ALL the leds, unlike the single string ones.

Hope this helps!

attachment.php
 

Attachments

  • stop_tail.JPG
    stop_tail.JPG
    32 KB · Views: 8,465
Last edited:
I just zipped through this entire thread and am amazed at the skill you have...VERY well done. :cool:
 
Yeah

Bump Bump!!!

How we doing on the NSX????

Any update???

any Pix to share with us??? :biggrin:
 
Did you consider using the new 2006 lotus elise LED taillghts?
 
Hey show a naked girl during the buildup process, and this could be the longest thread!!:biggrin:
 
Sorry guys... I had to make the engine hatch hinges from scratch. It took a bit to get them just right. Just ran out to the body shop today. They have all the panels off the car ready for primer (wasn't much to take pictures of). I don't think there was one piece on the body kit that was in some way touched, changed and/or improved. I'm very picky on door gaps, body lines, transitions etc. It's easy to just bolt everything on and paint it. The hard/long part is making everything fit as good ,if not better, than the factory pieces.

The shop I have it at does a lot of boat repair also. A boat dealer from Green Bay brought in a 26 foot Sea Ray that fell off a 16 foot high rack and hit the concrete below. It was all hands on deck (no pun intended :smile: ) to get the boat fixed. They still promissed the car back to me by the end of May. I spoke to the guy doing the work. He expects to have the panels back on the car in white primer by mid next week. I'll run over there to get some updated shots.

"Did you consider using the new 2006 lotus elise LED taillghts?"
I did... A bit spendy and to deep of a housing. They would have stuck out quite a bit.
 
VRoooM said:
"Did you consider using the new 2006 lotus elise LED taillghts?"

I did... A bit spendy and to deep of a housing. They would have stuck out quite a bit.

Just curious how much extra they would have stuck out? How was the diameter compaired to the ones your ended up using?
 
Diameter was close. Just 1/2 smaller diameter than what I have. From my calculations, the Elise/Exige lens would stick out 2 1/2" from the body. The lenses I have.. the inner stick out 1" and the outers about 5/8".
 
Just stopped in at the body shop today. They have all the panels back sides and jams painted. The rest of the panels will get a final sanding on the outer finish surface and the whole car will go in the booth more that likely next week.
DSCF0510sm.jpg


The guys were just finishing the back side of the hood. I told them I wanted all surfaces finished inside and out.
DSCF0511sm.jpg


Hopefully the next picture I have is me driving it...:biggrin:

Jeff
 
The wheels are in the USA!!!!!!!!!!!!!!!!!!!

The tires are coming..... (funky size) probably the ONLY combo in the US that will be running these sizes, and yet still with speedo accuracy, and TCS function. 18/19 Advan Model 5's sitting in front of Tein FLEX, and a custom BBK.

Stay tuned........
:wink:
 
VRoooM said:
For the rear bumper/tailight I'm going to make a mold of the foam form by skimming it with body filler then spraying it with gel coat to get a perfectly smooth finish. I will cast a (negative) mold form that, remove the foam form and recast the finished (positive) from that.

Jeff.


Hello,
I was just wonderin
What is a gel coat, and why would you want to apply on the other side of the mold?
 
supersteve said:
Hello,
I was just wonderin
What is a gel coat, and why would you want to apply on the other side of the mold?

Gell coat is a thicker viscosity than a regular resin. It allows you to produce a "class A" finish / a smooth polished surface. So, when you make the mold you want the surface to be perfectly smooth so you apply the gell coat first and then build up the fiberglass behind it. Same with making the final part. That way, when the part is taken out of the mold the surface is as good as the mold and the original mock up part (or plug).

Gell coat is what is used as a finished surface on fiberglass boats.

Hope that helps,
Jeff
 
RP-Motorsports said:
The wheels are in the USA!!!!!!!!!!!!!!!!!!!

The tires are coming..... (funky size) probably the ONLY combo in the US that will be running these sizes, and yet still with speedo accuracy, and TCS function. 18/19 Advan Model 5's sitting in front of Tein FLEX, and a custom BBK.

Stay tuned........
:wink:

I have a set of 18/19 Advan model 5 as well.
 
supersteve said:
oic,
but you said you already used body filler as the first coat of your mold, why did you use gel behind it?

On the foam/filler mock up part I actually used black Duratec (filler primer) to fill in all the pin holes and give me a bit more build up so I could block sand the piece to make it smooth and true. That then gets waxed and sprayed with PVA ( a release agent) and then the gel coat goes down as the first inner layer of the mold. from there the fiberglass mat is built up. When you release the mold from the original mock up part the mold has the gel coat on the inner surface.

Tire sizes are:
255/30/18 front
275/30/19 rear
 
lol
cool
thank you! now you've completed my puzzle (I hope to make some body parts my self! hope it turns out ok!)

anyways,
I hope your car gets done fast! it was a really awesome buildup which i followed for months!
 
Damn it more photos please!!!! :biggrin:
 
Back
Top