Window regulators upgrade

That could be done, but upper guide would have to be destroyed to remove its passing cable and I don't see how we could make a simple "plug&play" direct replacement part to fit there while being able to put things back to original again one day.

Experience shows that benefits would only be of 33% compared to lower pulley.

For these reasons, I am thinking of definitely give up the idea of an upper pulley...for now :biggrin:
Perhaps that could be a 2nd version of the kit:wink:.

Now all is missing is the cable guiding device to keep cable in pulley's grooves.
 
I have good news, kit is going to be in full stainless steel, except for the aluminium support :biggrin:

I had some difficulty to find 12mm tube (for the sleeve) and 8mm for the pulley axle, usually the only size available is 15mm because is it used for house water plumbing, but finally I found them :smile:

The flat-head screw, nut and washers will also be made of stainless steel

The cable guiding device will probably be a small stainless steel wire welded to pulley washers.. :confused:...I'm still working on it...

In the S2000, they used a small plastic device...

975e.jpg
 
After some weekend "hard thinking":rolleyes: , I found the best solution would be the S2000 pulley washer guiding device but mounted in opposite direction, that is in top of the pulley.

s2000pulleyguiding.jpg


This way, the guide would also prevent the cable from getting away and not just to keep it close to the pulley to avoid coming off its grooves.

Then, instead of plastic I will use 1.5mm thin stainless steel, much more stronger of course

Instead of 1 guiding device, I will use 3 of them placed in 0, 90 and 180º position, so cable could return to pulley grooves simply by reversing the movement.:biggrin:

The welding seems too complicate and delicate job to do, so I will use now a laser cut stainless steel plate! I have already ordered the first ones, they should be ready this Friday.
 
Very nice!
This windows project of your's is the biggest thing since sliced bread!
 
cuz mine is slow yes. but when it gets to the top where the glass meets the rubber its is snail slow.

This is more than likely due to the rubber being of age and dried up a bit. My buddy who is a honda master tech hooked me up with some special grease that you rub into the seals to rejuvenate the rubber. Made a huge difference on my tired passenger window.

With this pulley I think my slow window problem will be cured.

Ive also noticed that when using the actual passenger power switch that it goes up quicker as well. Makes me wonder if there is some resistance in the circuitry when using my drivers switch...
 
movingpart.jpg


The moving part of the NSX regulator is equipped with...RUBBER guides!!! I don't know the reason of this strange idea, to my opinion some plastic guides would have been much better, like the one used in the window tracks!

So my advice is: lube these rubber guides as much as possible to eliminate the natural drag of rubber against aluminium.

Hugo,
Many of my rubber guides are completely disintegrated. From what I can tell, I don't think that these parts can be ordered separately. Any thoughts as to what could be used as a substitute if any of us run into this? Are you up for making something? :smile:
thanks
 
Many of my rubber guides are completely disintegrated.

+1. I have the same problem.

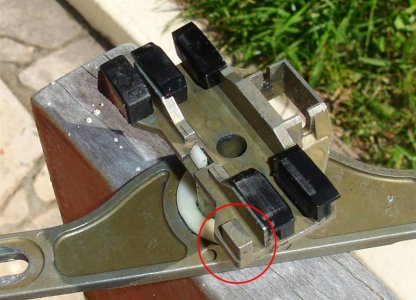
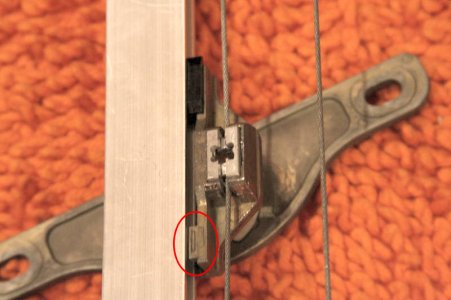
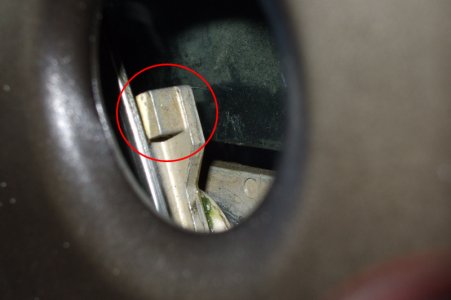
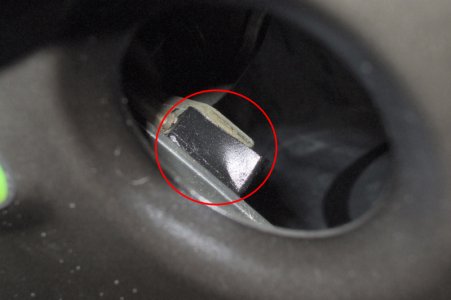
In Hugabuga’s picture above, it looks like there should be six black guides but that the one at the bottom of the picture is missing. In another picture here on Prime, a different black guide is missing – the one that would be at the top in Hugabuga’s picture. In my NSX, some of the black guides are missing and others are deformed.

It would be great to be able to buy those guides separately!
 

Attachments

  • Hugabuga guides.jpg
    Hugabuga guides.jpg
    91.1 KB · Views: 272
  • Missing guide 1.jpg
    Missing guide 1.jpg
    94.2 KB · Views: 251
  • Missing guide 2.jpg
    Missing guide 2.jpg
    96 KB · Views: 263
  • Deformed guide.jpg
    Deformed guide.jpg
    92.1 KB · Views: 243
greenberet: there are actually only 4 guides, the 5th one (top left of the picture) is a "bumpstop" for the window full opening movement.
As the metallic transport part is symmetric, you just need to place this 5th rubber part in the opposite "empty" spot when switching side specificity

These guides are made in rubber, so you can't use all types of grease, specially those who desintegrate rubber over time.

You should not use the regulator with a missing guide as picture n.2, transport part could ruin the track or get blocked and then cable or the thingy part would probably break.
 
Good to know that there should be four guides, one bump stop, and that one spot is supposed to be “empty”!

I can’t remember whose picture that was with the orange background above. The last two pictures looking through a hole are of my car. Here are some more pictures – it looks to me like the older regulator (cable support on two sides) is missing guides while the newer regulator (cable support on four sides) has the guides: http://www.nsxprime.com/forums/showpost.php?p=887893&postcount=1

I haven’t checked anywhere other than Honda, but do you know of any place to buy missing guides? I know I’d be up for buying some.
 
OK guys I just got me Upgrade in the mail today Im am not home yet but I was told its on my kitchen table. I will fully document the act of the upgrade, I dont know what was included in the Package IE. instructions but will post them.

I have some parts to pick up at the stealership today, had to order a SRS clock spring, so first things first, but will start the project this afternoon Eastern standard time. I might video tape it and post on utube soon.

Hugo is the man!!
 
Oh my oh my.... I think I should have had step by step detailed instructions before starting this. I started taking pictures of everything up to the point where the main tension spring, it sprung out like a mad man, and unwound itself, I got that back on it took some time though,

second thing I am having problems with is after the upgrade is complete lining up the cable in the proper order, the cable starts at the bottom, and winds up to the middle, then the other cable winds from the top and ends in the middle,,I think I have it right but when you turn the wheel to advance the window arm there is so much slack and the tension springs at the top of the cables are just dangling,but if you slide the arm up and down it works fine,,, I just need some direction in what i might be doing wrong. or did wrong.

and last my main axle where all these wheels fit into was mint. not the ground out grooves as your pics showed. Mine might have been replaced by the previous owner that might explain that part. but I am back at it, just taking a smoke break. but moving the arm up and down it really shows how much the upgrade works. I still think its the best upgrade. but I went into this thinking it was gonna take me 30 minutes per door.. well will post some more later tonight.. dont get scared its not real rocket science doing this. I just think I could have forced the cable off the original 180` and put the wheel on. will try that on the passenger side tomorrow.. be back soon.

Ok Im back, put it all back together and decided to buy a new regulator LOL. my window will only go up half way now. so much slack in the cables that you could wrap the slack around a bannana 4 times, grinding sounds like im gonna break the glass. its to dark to finish, hope it doesnt rain tonight. but will start over from scratch tomorrow. after work. wish my luck guys. Im the test rabbit.

Ok busted out the Shop Light, finished, I know I did this whole thing wrong, but I refitted the cables, and the window goes up and down like its suppose to but its even slower, I know that the tension is a factor here for this to work, atleast it works till tomorrow, its 10Pm now so Im done. so tomorrow I will start from scatch minus the S2000 wheel,

Also while your in the motor, the connections were real black, so I got some 3200 grit sand paper and polished them back to bright copper color, anyway guys more tomorrow.
 
Last edited:
shawn110975: detailed instructions will be online Sunday, including how to compress the spring, the drilling part and so on....but something tells me you won't wait for that! :biggrin:
Be carefull with the drilling part, you should always first check if the axle is worn or not prior to sleeve it. Any doubt I am here to help!
 
The postman just delivered my kit to me. I won't be installing it until Hugo post the installation manual on nsxprime. The nsx window regulator is too fragile and complicated to fool around with wihout proper instructions.
 
Hugo, thanks but I got it all back together lastnight, it works but very slow but its ok till sunday LOL. I can wait. its funny that after I pryed the last wheel up that has the wound up cables and the when they sprung out I actually had to sit there and figure out how they went back on, so I actually learned alot from the experience. and was thinking how we could add 2 more wheels at the top? so there would be a total of 3 wheels instead of just the one at the 180 ya know. I think it could be done. thanks for your help. but again I will wait till you post your instructions,

Hugo whats your e-mail address so I can send you all the photos I took last night maybe you can add them in with your instructions. anyway
have a great day guys. I am still excited to finish this upgrade. LOL
 
+1 on Thread of the year and best first post to boot. Thanks for giving me another DIY project! I just love working on the NSX. Cheers!
 
I found some interesting thread about the greasing of the regulator and window tracks:

http://www.nsxprime.com/forums/showthread.php?t=131840

most of all because of the quantities of solutions that were suggested in that post:
WD-40
graphite powder
Honda's Shin-Etsu
Honda UREA Hi-temp Grease (green)
Dry Silicone Spray
White lithium grease

As there are so many different solutions, some of them must be wrong :biggrin:

So let's look at the S2000 regulator once again, that is always a good start:

s2000grease.jpg


It uses in fact a white grease, but S2000 track is made in steel not aluminium, and guides are made in plastic and not rubber like the ones from our beloved NSX

That gave me the idea to go to a grease specialist shop and he recommended me a white grease with TEFLON in a spray can, compatible with aluminium and rubber:wink:

Here's how it looks like:

greaseh.jpg


The WD-40 seems to me to be the worst solution, has it deteriorates rubber, smells bad, and as it is liquid it won't stay in the tracks/regulator and will end at the doors steps probably

What do you think?

I am not a shareholder of BARDAHL, just found that this brand might be a good solution.:biggrin:
 
Last edited:
most of all because of the quantities of solutions that were suggested in that post:

Nobody was conducting critical analysis and measuring the friction of the component pieces. It took a robot engineer to do just that!

I spent a lot of time trying to duplicate the friction on the window tracks and was unable find appreciable drag.

I concluded that the regulator was the cause of most of the drag, but I was unwilling to start yet another project.* I ended up swapping out parts (motor and guides) from a near new regulator and determined that the motor was a big part of the problem, all else being equal. The result was posted and the information was clobbered.

You caught on to the binding that the cable guides create and how the S2000 engineers solved it. A follow up with the motor disassembly showed wear on the transport drive. Later you created your own kit after many hours of testing, analysis and development. Nice work!!! Cool.

Huga you have a bright future ahead of you :) I support your endeavor and bought three kits.

Time to pass the torch,

Drew

/Ultimately, for most people (especially Americans), on effort toward things that one cannot brag about: It has to be easy or it is not worth doing.

*(I've done a few: electronic parts , floor mat reproduction, CCU metric conversion, Bose DIY, ALB analysis and tried to kick off a tool loan community [see ALB bleeder])

**The ALB bleeder has been a great success, I keep hoping that others will send their tools out on the circuit, but no such luck :( Come on guys, I'm getting old!
 
Thank you Drew for all your compliments, it's nice to see that you also like to invent things :smile:

In my case, the greasing didn't solve the problem, this is what made me search for what else could be wrong, so I guess I was lucky. If the greasing would have solved it, I would never had the idea to open the motor and compare it to the regulator of the S2000.

Perhaps this Teflon White Grease in spray would have "virtually" solved the problem, hopefully I just discovered it now:biggrin:
Even with a pulley or a new regulator, we'll always need a grease and most important is to use a rubber compatible one, so avoid the WD40 or the ordinary brown one.
 
Hugo,
did you get a chance to finish the instructions? I was going to send you all the pics I took to your e-mail address but there are so many I wasnt going to sent 4 at a time, anyway let us know when the Instructions will be available. your the best and I wish your could get an award for best new product of 2010 for NSX PRIME
 
shawn110975: you have PM for temporary unfinished instructions :wink:

Your positive feedbacks are my real award :biggrin:
This post is not finished yet, but thank you for the nomination!
I am preparing some bombastic instructions, that is the only thing I can say for now, and it is worthing the wait I think:rolleyes:

Cheers
 
OK finished the driver door yesterday, the short video on how to compress the springs was easy. took about 30 seconds to complete. and the window works great, it is much faster than before. and if you pull down on the window to try and add more load to the motor it doesnt slow down at all. so my conclussion for this upgrade is complete,

this upgrade is a must for ALL NSX owners it is worth the 1 hour of your time to do. and fun when you see the working product at the end.

the first door you start will take a while as your kinda learning what needs to be done, but the second door you do will take you less than the first. now I did not need to add the axle slip as my axle was perfect. so that may add a few minutes.

anyway Great job and I am happy with the end results.

HUGO is the MAN
 
Back
Top