• ***AVOID MARKETPLACE SCAMS!!***

    Scammers are using compromised Prime member accounts to pose as a trusted seller in the marketplace. Before you enter into a deal with any seller, follow these tips to keep yourself safe. If you encounter one of these scammers, please report them immediately and we will lock their account.

    Caveat Emptor!

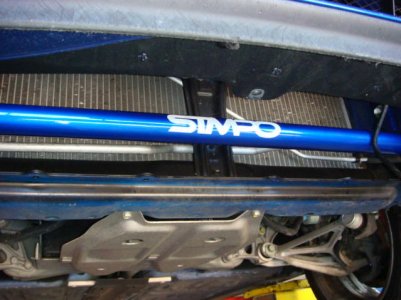
STMPO race products - New product offering - NSX Front Chassis Reinforcement Bar

Status
Not open for further replies.
I had to enlarge the holes in the R bar to get it to fit after installing the STMPO bar.

Do you have a pic? From what I could tell the side brackets were too thick to allow it length wise to fit inside the STMPO bar. Looks like it would fit with thinner brackets.
 
Do you have a pic? From what I could tell the side brackets were too thick to allow it length wise to fit inside the STMPO bar. Looks like it would fit with thinner brackets.

No that wasn't my issue. Mechanic did it... I took a few pics, don't know what it will show. I will try to post. I have to find them.
 
Dave

Looks like the bars are actually adjustable howbeit slightly but may be enough to not require further modification. I'll try tomorrow and post up if it works.
 
Installed ours this afternoon and man what difference. Another awesome product from STMPO. Install was a breeze and the blue looks great to boot! Thanks again Ross for the great service and Perry for helping on the install.

P1070201.jpg
 
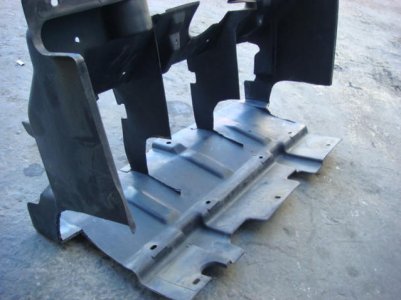
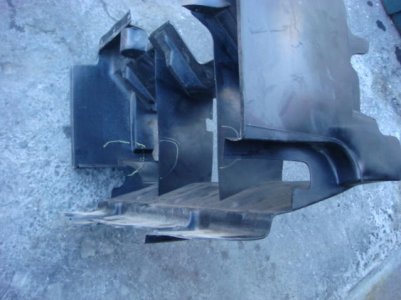
Here are two pics of the plastic shroud trimmed... Thanks Michael...

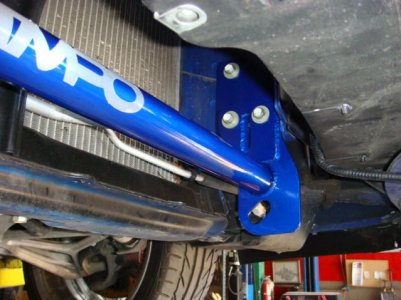
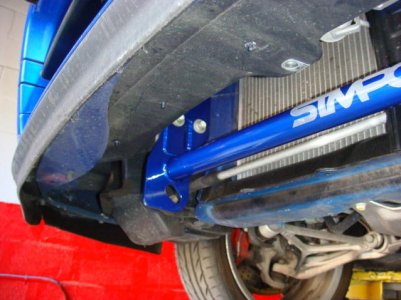
I also included 3 more installed pics....

Regards....
 

Attachments

  • trimmed.jpg
    trimmed.jpg
    39.2 KB · Views: 479
  • untrimed shroud.jpg
    untrimed shroud.jpg
    39.6 KB · Views: 459
  • bar2.jpg
    bar2.jpg
    54.5 KB · Views: 500
  • bar 1.jpg
    bar 1.jpg
    52.7 KB · Views: 477
  • bar 3.jpg
    bar 3.jpg
    49.4 KB · Views: 466
No that wasn't my issue. Mechanic did it... I took a few pics, don't know what it will show. I will try to post. I have to find them.

Dave

Did your mechanic let you look at? As the bar brace can't lay flat against the STMPO due to the weld.
 
All orders were shipped and we have the following in stock...

Silver
Black
White
Red
Imola Orange
Spa Yellow

Regards,
 
We have another one going on our street/track car, full review to come!

Thanks Ross!
 
A very popular X-Mas gift in stock.... all colors below on the shelf....

Silver
Black
White
Red


Regards,
 
For those that have installed the bar without removing the bumper, what is the "secret" to removing the plastic air dam. I removed the 7 clips and bolt from the bottom and the 5 clips at the top. I'm sure there are a few that I can't find. Please help. I only have one set of replacement clips and it took my dealer way too long to get those in. If I have to install the new clips now without the bar, it will just further delay the install.

Thanks,
Kenny
 
Based on my experience and the pictures in this thread, I have to assume there is a wide variation in this piece through the model years. Sounds like your piece is similar to mine and there was no way it was coming out without pulling the bumper or radiator out or something. We ended up cutting off a U shaped part of the air damn where the bar was to go and it worked out quite well (my friend had some choice words about the install process though). Bent the air damn in to get at the bolts one side at a time, slide the bar in, and buttoned everything back up.

As for my review, the biggest difference is going up my driveway. I have to go up one wheel at a time to minimize scraping, and the car flexes a bit when you do that, but it does flex much at all with the chassis bar in place. I took it out on the track and there were a lot of changes (brakes, left the targa on, going the opposite direction on the track) so I can't attribute anything to the bar, but I had more fun than I have before :D. Worth the price just to get up the driveway as smoothly as it does now ;).


Thanks for the honest review... and sorry the plastic shroud thing is a pain... we are almost done with a FCB install video so everyone can see how it needs to be done.


We plan to continue making parts that work... we would like to know if they did either way.

FXMD will be a huge help to all of us on "true track tested" feedback....

Regards
 
Here is a brief summary on how I removed the plastic air dam, with the bumper on. I have an '05, so I'm not sure how this will vary with earlier models, if any. There are 5 clips across the top, 7 clips on the bottom, and 1 bolt on the bottom. There are also 5 clips holding various wires to the air dam itself. I did disconnect the wiring for the O2 sensor, I know the location of the sensor is not the same on all years. That should be everything either attaching the air dam to the car and things attached to the air dam. The key to removing it, is to fold the far outside vertical pieces inward and slowly work it down. Watch out for the O2 sensor as it gets in the way. This may only affect later models. Replacing the air dam is much easier after it has been modified, as there is less plastic to manipulate. Hope this helps.

Kenny
 
Sorry, some of us are no help. I have a custom front end, and it just slid into place.....

By the way.........If I have not already said so.....These STMPO braces are the BOMB..:biggrin::biggrin::biggrin: Seeing as the NSX is a mid engine car, and crumble pretty damn easy, I would..and will not ever own a NSX without all the STMPO braces available. Besides tightening up the cars: ride/feel, they may actually save your life!!! Put a price on that!!!!! :wink: I know alot of you think Ross is a crazy SOB, but you know what? He is!!!:eek: But he knows his shit about our NSX's and is trying daily , to bring us more cool stuff to market. Those of you on the fence about buying his products, need to act before guys like Ross move on to other business opportunities. Ones, that actually make money.....:rolleyes:

P.S. Ross finish up your front strut brace..I will take one in Formula red!!
 
Last edited:
Sorry, some of us are no help. I have a custom front end, and it just slid into place.....

By the way.........I have not already said so.....These STMPO braces are the BOMB..:biggrin::biggrin::biggrin: Seeing as the NSX is a mid engine car, and crumble pretty easy, I would..will not ever own a NSX without all the braces available. Besides tightening up the cars, ride/feel, they may actually save your life!!! Put a price on that!!!!! :wink: I know alot of you think Ross is a crazy SOB, but you know what? He is!!!:eek: But he knows his shit about our NSX's and is trying daily , to bring more cool stuff to market. Those of you on the fence about buying his stuff need to act before guys like Ross move on to other business opportunities. Ones, that actually make money.....:rolleyes:

P.S. Ross finish up your front strut brace..I will take one in Formula red!!

lol... as always... your a huge confidence booster Brent...

The brackets for the windshield wipers are at cnc... when they are back.. the FSTB will be for sale... with one of the first ones going to you my friend.

Regards
 
I just got back from my first drive with the front bar. I took the targa off to see how much it helped the cowl shake. It is noticeably better on a rough road.

I then took my favorite curvy road to test it out. All I can say is WOW. What a difference. The chassis felt alot stiffer in the front. Before with the top off, I could feel the twist in the chassis and the shake in the cowl on a mid corner bump. That is all about gone now.:biggrin::biggrin:

My next piece will be the chassis bar for the engine bay. I can't wait.

Thanks Ross, Keep up the good work.:smile:

I'm a step ahead of you. I first mounted the front bar and was impressed when driving up the driveway how the car never flexes. Then this week, I mounted the rear engine bay bar. BIG DIFFERENCE! It was 42 degrees and I took the top off for a quick spin just to see.... HUGE!

I'm not one of those "butt dyno" guys, and I have been disappointed many, many times chucking out $$$ because of reviews that I have read on Prime where they raved about something or another only to find out the change was minor or psychosomatic. I can say - adding the rear bar made a bigger change that adding the front. Both together is not a minor "I think it improved it a little" change - it's the real deal!
 
Last edited:
Just got my front reinforcement bar from STMPO. First off....first rate quality. Welds, paint......everthing. Nice stuff. The install was easy, it fit like a glove. Didn't need to do anything weird for the install (no spacers or hammer required). This piece fits like it came from the factory and it is stout but light. Can't wait to see the difference it makes.

Once you remove the two plates that the reinforcement bar replaces, the weight of the bar itself is nominal. I didn't weight everything but I would guess there is very little weight increase if any.

Of course my front bumper is currently removed for paint so the install was really easy. But hey, it only took me an hour to remove the whole front bumper so even with that the whole process was only a few hours total. Trimming the air dam was really quick....15 mins tops with my Dremel.

The only issue I had is that EVERY plastic fastener broke removing the air dam. That's what you get when you have a 1991 in the desert.

Bottom line.....get one while they're hot. This is a nice product.

Posted a few pics to help people get the idea.....

First pic - No bar
X3263.JPG

Second Pic - Stock plate that STMPO Bar replaces
X3264.JPG

Third Pic - Other side stock plate
X3265.JPG

Forth Pic - STMPO bar in place
X3266.JPG

Fifth Pic - STMPO Bar upclose.
X3267.JPG

Sixth Pic - STMPO Bar installed
X3268.JPG

Seventh Pic - STMPO Bar and air dam trimmed and installed
X3269.JPG
 
Thanks for the pics. I can't wait to get one of these on my car. :biggrin:
 
Ross how come the main beam is at a spot that is actually BELOW the body? Seems like it should be up a few inches. I installed mine but was wondering why it was that way.
 
Ross how come the main beam is at a spot that is actually BELOW the body? Seems like it should be up a few inches. I installed mine but was wondering why it was that way.

Desiging parts for the application would be the best way to asnswer that Turbo2go.

For the application of selling an inferior part to the crowd of everyone... we placed the front chassis bar in the ideal location for the shroud to remain funtional.

Just small cuts to accept the bar from frame rail to fraim rail is all that is needed.

The reviews of the product speak for themself... dont ya think :wink:

Regards

I knew you were selling me crap... LOL

so you don't think there is more of a chance of "flex" because the plates are being squeezed together where there is no bar? Are the plates that stiff? Could it seriously go up higher if we are willing to make cuts in the shroud?
 
Ross how come the main beam is at a spot that is actually BELOW the body? Seems like it should be up a few inches. I installed mine but was wondering why it was that way.

Shouldn't that read "I had mine installed" since your too much of a fairy/b*tch to install anything yourself:tongue:

Actually Dave it's the same spot where our Type R bars were before so this must be pretty much the optimal spot for the bar.

Also hey Ross how is that other front strut brace coming??
 
Status
Not open for further replies.
Back
Top