The $1.55 Repair

Timely!

I just got home and found that my brake lights were on.

Looked in the footwell and there are the remnants of the part.

Funny, just two weeks ago a similar switch issue on the clutch pedal on my '94 Miata sent me to the Mazda dealer for a $3 cruise control repair.

Thanks to the OP for the fix, and to Nero for resurrecting this thread just recently.

So, tomorrow morning it will be a trip to Acura or Honda.
 
If you all of a sudden discover one day (while out of your car) that your brake lights are illuminated as if the pedal is still being depressed, or your battery is dead, this might be the solution.
<img src="http://www.vf2ss.com/transfer/brake/installed.jpg" border="0"/>

awesome write up! thanks so much!

after my car being garaged since last August, my buddy and I finally just rebuilt my passenger rear axle and now I am finally driving again! After my test drive, I got home and my lights wouldn't shut off. I immediately searched prime and came across this page. I then went back and found 3 pieces of the rubber part broken. I'll also add, trying to finagle my way into my floorboard really proved how out of shape I am! I am going to follow other's recommendations and install a bolt and nut.

thanks again guys!!
 
While your down there, replace the grommet that activates the start switch on the clutch pedal too. Time/heat also detererates this grommet as well. Mine left me in a parking lot.
 
welp, my cruise control clutch grommet broke off, so I replaced that, and the brake one. I can't get my hands up there to replace the top clutch one, though... it seems impossible!
Has anyone removed the clutch pedal to do it? It seems like the only way!
 
Alright... I just replaced all 3 plugs on my car. It was a huge pain in the ass. LEARN FROM THIS:

Bottom 2 (brake and cruise control) are stupid easy. As everyone knows, the upper clutch kill switch is the devil.

So I thought I could take the clutch pedal out. I tried to take the bolt out, but a socket wouldn't fit on the bolt due to a gray metal enclosure above the steering column. A box wrench wouldn't fit on due to a lip on the bracket that holds the bolt! Fuck!
My hands couldn't get anywhere near the grommet, so what I did was...

Take the clutch return spring off.
Then disconnect the clutch master (take the cotter out and the pin) and push it out of the way.
Then I was able to freely push the clutch back and reach a long 8" pick up to the plug to pry the old one out. If you have someone else to push the clutch in for you, you probably don't have to take the spring off/the master.

The new, white plugs, are a little taller than the old plugs, and won't fit past the pedal hinge and up to the hole. So I ground the pointy end of the grommet down a couple mm til it would fit.
I then stuck the plug onto the end of my pick (if you have long tweezers, it would be better. My plug now has a tiny little indent/hole in it)
I reached the plug up with the pick, and put it into the hole. I then reached a long 1/4" socket extension up and rested it against the plug, pivoting the clutch pedal to push the plug all the way in against the extension.

Then just re-attach the clutch master/pin/cotter.

The clutch return spring was the hardest part about this. Getting that thing back on was a PAIN IN THE ASS. But If I had to do it again, I could in ~5 mins.

What you do is, back the bottom cruise control switch out all the way, so the pedal can move all the way back.
Get some GOOD ZIP TIES THAT WONT BREAK and step on the spring so it compresses. Zip tie that motherfucker, 1 zip tie on each side, so it stays compressed.
Actually, I put 2 zip ties on each side so they wouldn't snap off and pinch my fingers.

Then just put the top 2 prongs back into the top holes, while pulling the pedal back, and put the other end in the pedal grommet. Cut the zip ties and you're done!
 
Last edited:
Nice work and nice description of the process. Glad you got it done and sorry I couldn't have made it easier. I suppress any memories I may have had because it was kind of awful.
 
And, some years later.... From my fB thread in NSX Prime...

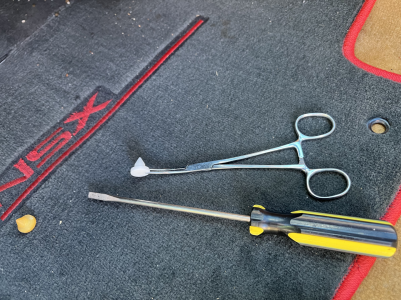
Update Oct. 6, 2022: Got the third one (upper clutch/starter safety switch) proactively today… Removed seat, added some floor padding, laid back, turned on some soft music, got my mood lighting right(magnetic flex light mounted to brake pedal) and tools(long narrow screwdriver, curved forceps) handy, got comfy…. 😜

Ha! Was not fun, might even use the word “dreadful” at the risk of being too dramatic 😜

Used a shortened broom handle to hold the pedal down a bit, just enough to see & pop the old one out with the screwdriver, then used curved forceps and the long screwdriver method to get the new one in. Using right hand only up behind the dash. Had to get the stopper with the forceps attached, to stay there, slightly lodged in the hole while I quickly reached for the screwdriver to push/leverage it in. Couldn't just do it with the forceps at that angle and how the forceps were holding the stopper.

For some this may seem easy, for me it was something I'd rather not have to do ever again.

Thanks for all the advice and support NSX family!!! You are the best!!

Update: Nov. 1, 2022

Parts used in my fix...

This post was after I had already replaced the two "easier" ones on the lower parts of the brake & clutch, right after I had the "brake light always on" issue due to the brake plug fail...

Just had an idea that might help others, that I might try if I ever have to do this again...
- maybe stick a length-trimmed sewing pin (small wire) into the center of the stopper (silicone-based ones, plastic would require drilling), then one could use forceps(because they lock closed) (or long needle-nose pliers) to grab the stopper in a way that one could also use the forceps to push the part into the hole. ( The way I did it, I held the part in the forceps as shown in the pic, just to get it where I needed it, then used a long screwdriver to leverage it so that it popped/latched in. ) Then try to pull the pin out without pulling the stopper out as well, so that the metal of the pin doesn't wear on the switch pin.

- I've also heard of others running a wire through the center of the part and threading the wire through the hole and pulling it into place that way, then pushing it completely in with a long screwdriver.

For those that seem to believe that this upper clutch stopper removal/install replacement is easy, please feel free to educate the rest of us that have done this and really hope to never have to do this again :)
 

Attachments

  • NSX_ClutchStop.png
    NSX_ClutchStop.png
    2.4 MB · Views: 14
Last edited:
My clutch pedal plastic piece degraded about a month ago and I got two replacement pieces. They are made of a ptfe-like material and are a bit harder and seem like they will last longer than the original pieces. Since my old one just fell out, it was pretty easy to go inverted under the dash and push the new piece in.

About 2 weeks later my brake piece fell apart too, if you get one, make sure you get two. :)

Was that the lower clutch switch stopper? I have never seen the adverb easy used in the same sentence or paragraph when describing replacement of the upper clutch stopper. Other adverbs and adjectives usually apply to the upper clutch stopper.
 
First was clutch, second was brakes. Both just popped in. Maybe I'm missing something. :LOL:

I did spin upside down and wedge under the dash with my feet up on the seat. Maybe the trick is full commitment!
 
Was that the lower clutch switch stopper? I have never seen the adverb easy used in the same sentence or paragraph when describing replacement of the upper clutch stopper. Other adverbs and adjectives usually apply to the upper clutch stopper.
Yup.. No kidding... I'm a big guy, none of the three were fun, but that upper clutch (starter switch) was NOT fun in any way shape or form...
 
Every single Honda. The side of the road fix we used to do was duct taping two pennies together. The bolt and a chunk of rubber (to hold the bolt in place as a 'locknut') also works equally well.
First was clutch, second was brakes. Both just popped in. Maybe I'm missing something. :LOL:

I did spin upside down and wedge under the dash with my feet up on the seat. Maybe the trick is full commitment!
Lol! I wish I had taken pics of my experiences with this!! The way I did the lower ones (clutch & brake), I had my wife sit in the drivers seat and slightly press the pedals away from the switch while I was on my butt on the garage floor, back to the car, right arm to the limit up under the dash trying to find the holes to push the stopper in. Yes, the lower ones were easier to do than the upper, but for me, neither area was fun. Reminded me of my diary-farming days while trying to help cows have their twisted-up calves, with one arm buried all the way into a cow, having to do everything by feel ... Working on the car did smell better and was less messy though :)
 
I drilled a very small hole in the center of the grommet and ran a fine wire/fishing line through it and through the upper clutch pedal hole (rear to front). I vasoline'd the grommet and pulled on the wire and the grommet centered itself and popped right in. Then I cut the wire...done!
 
If you all of a sudden discover one day (while out of your car) that your brake lights are illuminated as if the pedal is still being depressed, or your battery is dead, this might be the solution.

If you haven't read this yet, in an effort to get your brake lights off, you've probably:

• flipped the parking lights on and off several times hoping it would fix itself
• grabbed the keys and took'er out for a spin (why not:biggrin:) to see if it magically resets itself
• considered or already pulled a fuse to turn'em off so you don't drain your battery
• disconnected the battery
• ...or it's too late

Regardless, you realize that you're gonna have to get down in the footwell and figure out what's wrong.

The problem is a completely disintegrated rubber stopper (15+ years old) that has fallen into pieces somewhere in your footwell. It fell out of a hole of a metal frame that is part of your brake pedal assembly (part 032).

gone.jpg


The brake switch has a spring loaded pin that gets depressed (= brake lights off) when the pedal is in resting position. If the stopper is missing (note: your brake switch is most likely just fine and not needing to be replaced) the pin will never get depressed thus remaining open and your brake lights as a result will NEVER turn off...even if the key is out. And if you parked your car in the garage and wasn't planning on visiting it again for a week or so, your battery is gone.

These threads 1, 2, & 3 had the same issue but since none of them mentioned the part number or included pics, I put this together and the part # is 46505-SA5-000 which can be purchased for $1.55:eek:. Also, Honda's new stopper is made out of molded plastic instead of rubber.😄

newstopper.jpg


Fortunately for me, awhile back I had a similar issue with the clutch
pedal snagging on something and the solution to repair it was very simple and is exactly the same solution to repair this, so I pretty much knew what was wrong and fixed this in less than five minutes since I already had the part.

So check if you have the rubber or the newer plastic stopper. If it's rubber, check if they are brittle or just save yourself the headache of experiencing any of this by ordering 2 at the same time for a whopping $3.10 and swap out the clutch and brake stoppers.

installed.jpg
THANK YOU!!!
 
Back
Top