T-Belt R&R

Which thread are you refering to? Does the -305 come with the new cover? 19200-PR7-305 SET, WATER PUMP ASSY. is about $205, right?
This thread has discussion on kit http://www.nsxprime.com/forums/showthread.php?t=97332
New cover does come in kit, as well as WP and grommet...those three things. I paid $199 from Tim, but price has probably gone up by now, so $205 sounds right.

Bill
 
I convinced Dali to pick up a few -305's, so he has them in stock now.

Apparently -305 is not a standard part number and has to be overridden in the North American systems.

Drew
 
Ok, my new crank pulley arrived yesterday and I was looking at the manual for installing the bolt. :smile: My manual (and the on-line manual) have a typo and at the bottom of the bolt installation instructions on 6-21 it says "Apply to the bolt threads but not the surface that contacts the washer." Back on 6-3 it says "Apply OIL to the bolt threads but not the surface that contacts the washer." Oil? No way- that would really overtighten the bolt, no? :confused: No wonder that thing was so hard to get off! I would think the threads should be cleaned and left dry and the surface that contacts the washer should be lubricated. But this is the opposite of what it appears to say.

OK, but this is why I am really confused: This info follows the last half of the instructions, which are for installing a NEW crankshaft. So this begs the question to me- Is this oiling-the-bolt stuff part of the procedure for a new crankshaft only and I should simply torque the bolt (on my used crank) without oiling? :confused: Please verify. Is there a new procedure in a Service Bulletin or something?

Thanks, Bill
 
Last edited:
I am getting ready to do this job on my newly acquired 98 with 47,000 miles. A local member is graciously loaning me the tools.

Elite: Could you elaborate why you drop the engine, when the consensus seems to be that it’s a shorter job when you don’t (assuming of course you are not changing the clutch). I do have a lift, so have considered dropping the engine.

Thanks,
John

Sorry, I missed this. I replied to your PM just now. If anyone else wants this info, maybe I'll clean up what I wrote a bit and add it to this thread for reference.
 
The TB job is very reasonable if you dont drop the engine.

Personally i have done many and its really quick with some creative engine shifting.

I think the only reason you should drop the engine is if you want to replace ALL the seals, change out the clutch at the same time. for the clutch its only 1 passenger engine mount away from pulling the engine.

If your just going to do the TB. leave the engine in. The front and rear engine mounts are tricky to get off and line backup.

happy motoring

Rob:smile:
 
WOOOOOOOWHOOOOOOOOOOO!!!!!!!!!!!!!!!!!!!!!!!!!!!!!!!!!!!!!!!!!!!!!!!!!!!!

never had a doubt!

talk about pride of ownership, you must be on cloud 9!

once again, congrats Bill!
beer.gif


Happy motoring!
eek4dance.gif


Rob
 
Last edited:
Questions/comments from a guy in the middle of the TB replacement job.

1) I find that 3/16 and 13/64" drill bits fit perfectly in to hold the cams in position. They slide through the cam retainer whole easily, then bottom out in the holes in the cam after about 1/8". So far so good.

2) There is a lot of stuff to take off. For instance, almost every wire harness bracket bolt on the passenger side has been removed to make this easier. It will be interesting to see if I notice all of them needing to be replaced.

3) My crank bolt was as stuck as I assumed it was. My cheap impact gun did nothing. But, a standard 15" breaker bar, 1/2" drive, with a small cheater bar (a jack handle) did it. At first try, my breaker bar started bending. So I then added the cheater bar and put a floor mat over it in case it snapped. I heard the loud "crack", then inspected stuff to see what broke. It was just the bolt coming out. I'd say I was about 20" away so total torque was less than 330 foot lbs.

Questions...

1) I had a heck of a time getting the covers off. I had the jack lifting the engine from the front more than from the side. The jack was reaching in from under the door instead of being under the rotor. I could only get the engine to tilt so far before the oil cooler got wedged under there (I presume between engine and suspension). There is pretty much no way that I'm going to be able to get the covers back on and bolts in with this limited access. If I jack from the side, coming from under rotor instead of under door - is that the ticket? Or, should I remove the oil cooler and pedestal? Or both?

Also, I removed the tranny bolt completely. The engine is still held by the front and rear brackets. Would it help to put the tranny bolt back in?

2) I am not sure I know which pulley is the crank pulley - the one that fails. I have the A/C and alternator (double) pulley off. Is that the one that fails? Or, is it the one that actually turns the timing belt? And, if it is the little one that turns the timing belt, why does it cost over $200? And, is there any special procedure for getting it off?

Next up:
o mark, then remove timing belt (looks perfect btw)
o replace water pump
o replace crank pulley (once I buy one)
o swap leaking cam seals (if I can find the leaks)
o re-install is reverse of disassembly :)

So far so good, but I'm nervous about getting these timing covers back on.

Thanks for any advice.
 
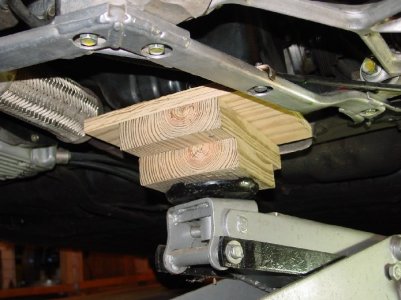
I jacked from under the pass door with jack pad on wood cradle under the oil pan. Jack should go straight up, so shouldn't matter where the jack actually is as long as you are jacking from under the oil pan. Yes the top trans mount bolt has to be out when jacking as well as the pass side top engine mount. I took the oil pedistal completely off, so don't know how to to it otherwise. It was not hard to get the covers off, in fact, I got the front one off, before I jacked the engine at all.

The crank pulley that has both the interfaces for a/c and alternator is the bad actor, not the actual toothed, small, TB gear.

HTH,

Bill
 

Attachments

  • Jack sm.JPG
    Jack sm.JPG
    97.5 KB · Views: 98
I jacked from under the pass door with jack pad on wood cradle under the oil pan. Jack should go straight up, so shouldn't matter where the jack actually is as long as you are jacking from under the oil pan. Yes the top trans mount bolt has to be out when jacking as well as the pass side top engine mount. I took the oil pedistal completely off, so don't know how to to it otherwise. It was not hard to get the covers off, in fact, I got the front one off, before I jacked the engine at all.

The crank pulley that has both the interfaces for a/c and alternator is the bad actor, not the actual toothed, small, TB gear.

HTH,

Bill

On my car, with the engine in the normal spot, it is too close to the body interior to get the panels off. The width of the gap is less than the depth of the side edge of the panels.

I guess I'll need to take the hoses off so I can remove the oil cooler. I JUST did that job last spring! How much, if any, additional coolant will I lose? I only drained from the rear coolant drain plug so far.
 
I could only get the engine to tilt so far before the oil cooler got wedged under there (I presume between engine and suspension). There is pretty much no way that I'm going to be able to get the covers back on and bolts in with this limited access. If I jack from the side, coming from under rotor instead of under door - is that the ticket? Or, should I remove the oil cooler and pedestal? Or both?Thanks for any advice.

Yes, it is one unit, remove the three screws and remove it, as noted in the service manual:). This will give you a few more inches to raise the engine. MAKE SURE you use a block of wood the size of the pan to raise the engine. DO NOT use the jack pad alone or you will dent the pan, which would be very bad.

BTW, no need to remove the hoses on the oil cooler, just let it hang down. It will make a slight mess since oil will drip(no big deal). Also get a new "8" gasket for the oil cooler to engine block, and you will not need to replace the top two bolts as speced in the manual, just clean them up and use some Hondabond on their threads.

HTH,
LarryB
 
Thanks Larry.

I have already removed the oil pedestal. Its just hanging there from the two coolant hoses and the oil pressure sensor wire.

When I jack up the engine, I do have an mdf block of wood between the jack and the oil pan. Its slightly larger than the oil pan bottom.

I judge how far I have raised the engine by looking at the right enine mount bracket (arm). At rest, it is slightly below the hole where the engine mount goes. I took the chassis side of this mount all the way out. When I raise the engine, I can the engine side bracket up about 2" or so from the rest location or maybe 1.5" above where it is when normally installed. This does not seem to be near enough to get the plastic covers back in.

Let me ask this from another perspective. When I let the engine all the way down or when it is at the height it would be with the right and tranny (left) engine mounts in, it seems there is about 1" of space (maybe less) between the rear timing belt cover and the chassis. Unfortunately, the timing belt cover's side edge is more than 1" wide so it doesn't fit by. In one write up, someone said they got their right and left (front and rear) covers off without tilting the engine. I am not sure that is possible on my car. It took significant wiggling, pulling and forcing to get them out.

On the other hand, I did get my cover bolts out (on the front side for sure) without tilting the engine.

I am just hoping I'm misisng something in the raising/tilting of the engine so I can get more room for the re-assembly.
 
OK, I'm not Larry, but...:smile:

I got all the bolts out and wiggled the front cover out without tilting. I just did that because I could. Not saying you need to do it this way.

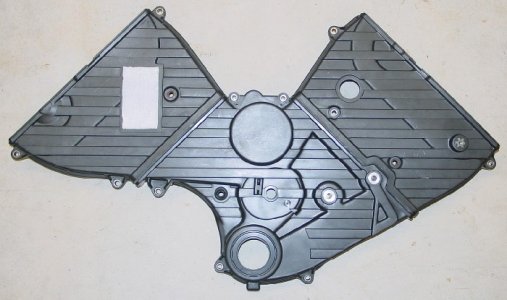
Now, here's the trick: The rear cover could not be removed until tilting the engine. Here's what I did after tilting (remember, the front cover was gone by now, but if not I would remove it first): Pull the rear cover loose, and rotate it to the back of the engine, out of the way, above the header. It is too hard to get it out until the lower cover is removed...the big wire bundle is in the way, and (as you know) there is very little room there. Then remove the lower cover...you have to remove it from above, of course. Then rotate the rear cover back where it was and to the center of the engine and out the top also. Reinstall is reverse...put the rear cover in first and rotate it to a holding position above the rear header. Then put the lower cover in...then the front and then rotate the rear one back into place. Keep track of your seals...one or two may fall out while working the covers out.

I completely removed the upper, pass side engine mount instead of simply rotating it into the body, but did not remove the other part (engine/alternator mount) that was bolted to the engine.

I measure the jacking height the way you describe at this mount, and it was a good two inches up. Keep wriggling. Don't force it.
 
I took a picture of the covers when I replaced my timing belt last year. It was great for knowing exactly where all the bolts go when replacing the covers, and might also help during removal.

(I'm a bit web impaired in that I haven't figured out how to include a picture in a response. I'm used to Outlook, where I can paste in anything directly. PM me and I'll find a way to send you the photo.)

Frank
''96 NSX-T, red/tan
 
Question about the grommet around the TB tensioner bolt...

Is this a simple, flat, right like grommet? Do you install it in the lower cover before installing the cover or after the cover is in?

Q2: I have a rubber grommet like thing that has a nipple on one side. It came with my new lower timing belt cover, which came with my new water pump? Where does this odd shaped grommet go?

I hope this question makes sense to someone.

Flat grommet goes on the tensioner bolt after everything is installed and bolt is tightened...between bolt flange and cover.

Nipple grommet goes into the cover before installing it over the waterpump weep tube. Put in from inside of cover with grommet protruding outside the cover. Push the lower cover on, pushing the grommet over the weep tube.

CRAP! I just got all that crap assembled last night... but without the grommet for the weep tube. Couldn't find reference to it in the manual.

I'll probably need to order a grommet for the idler pulley bolt. Didn't come with one of those.

Is it worth it for me to take all the covers off just to get the grommet on the weep tube??? Please say no. :)
 
Please say no. :)

OK, I will say no:). What you can do is push the grommet over the tube, and using a flat blade screwdriver you can carefully push the grommet in. It probably will take a while, and be careful not to puncture the grommet.

This is probably best done with both the motor mount and the trans mount not bolted in, and you can tilt the engine all the way down on the engine side to get better access to the grommet hole.

Good Luck.

Regards,
LarryB
 
CRAP! I just got all that crap assembled last night... but without the grommet for the weep tube. Couldn't find reference to it in the manual.

I'll probably need to order a grommet for the idler pulley bolt. Didn't come with one of those.

Is it worth it for me to take all the covers off just to get the grommet on the weep tube??? Please say no. :)

I agree with Larry. I bet I could get it installed after the fact if I worked hard enough at it. Personally, I would never disassemble the whole thing for the weep tube grommet.
 
Ah well, what's two more hours of work for a weep tube grommet? :)

I have so much practice now at taking the covers on/off that I can do it pretty quickly. The one big sticking point for me is the middle bolt in the rear TB cover. It takes a lot of tries to get the bolt started. Otherwise, I've messed up all the other steps enough times that I can now do it pretty quickly.

In fact, that's my moral of the story so far. I've done each step (beyond taking the valve covers off) at least twice, so now I'm getting good at it. Of course, I won't need to do this job again for another 100k miles and maybe 10 years, so this extra practice likely won't help.
 
I think I'll be replacing the timing belt and water pump this spring, if it ever warms up here. I have read through the 25 page DIY, and have replaced about a half dozen Honda timing belts over the years, one of which was a 2.7L Legend V-6, the others were 4 Cyl.

I have 2 questions.

a) Per the DIY, it says to never rotate the crank anti clockwise? Is this absolute Gospel (not even a little bit when centering on TDC)? From other belt changes, the method to tension the new belt was to hand crank the engine anti clockwise to take up all the slack on the on the side of the belt opposite the tensioner.

b) For a DIY, what is the avg labor hours. My skill level is somewhere between a journeyman and a master mechanic, with average to better than average set of tools. I believe the book time is around 8 hours, but am curious what some of the other folks replacing the belt and pump took to do it? Speed is not a concern, neither is money. I'd rather spend my time making sure it is done right, unless someone has first hand experience with the Seattle area dealers who aren't going to skimp.

Miner
 
I did my TB belt last year and then helped someone else with theirs. Excellent results in both cases. The only intimidating part was breaking loose the crankshaft pulley bolt. Other than that it was removing what seemed like a million cover bolts in impossible to reach locations. Omnce the covers, etc were off, changing the belt itself was actually simple.

I'm really anal in that I cleaned every part I took off, put lubricant on the threads of every bolt before putting it back in, every bolt went in with a torque wrench (except 2 not reachable with a torque wrench & I settled for a "comparative feel"), silicone grease on all the cam cover seals, double checked the timing marks on the cams at least 4 times, all wiring back in its orignal routing & hold-down clips, & etc, etc., was in no rush, and took my time. Total time was about 20 hours. So, with your experience your should be able to cut off a lot of that.

I've read many horror stories about having the belt jump a tooth from anti-clockwise rotation. However, I did move it backwards maybe 1/4 tooth to get an exact line-up at the crank pulley. But I wouldn't go beyond that. Instead, just crank everything around another 2 turns of the crank.

Frank
'96 NSX-T, red/tan
 
Frank,

Thanks for the info. I'm just as anal and will be in no hurry. When I did my Legend's about 7 years ago, I seem to remember it taking about 3 or 4 days (4 or 5 hours) over the course of a couple of weekends, so around 15-20 hours.

Getting the crank pully bolt loose always triggers the "pucker factor" for me. I am amazed at how reasonable and available the crank pulley tool is. When I changed my first belt, I don't think one could get a tool from anyone other than Honda or Snap-on and they cost several hundred dollars. Of course, I was a pool high school student and if I could have afforded the tool, I would have paid someone to replace the belt. Now the tool is $25 at Autozone. I have a really nice hydraulic floor jack handle that is about 4 feet long and it slips over a breaker bar nicely. 200 ft lbs of torque is easy with a 4' lever. Of course getting the rear brake drum nut off an old VW Beetle was hard even with a 6' breaker bar!

Mark
 
Back
Top