Honcho's Long Road to Imola Type-S Zero

I wasn't thinking about damage to the rubber components. I was thinking about galvanic corrosion; but, if its only overnight the risk is probably small. Getting the tank dry after you drain the ethanol out may be interesting because ethanol is hygroscopic and will suck the moisture out of air risking a residual film of water and ethanol inside the tank. You may need to consider some forced drying.

Will ethanol dissolve the residue from gasoline? Gasoline's components are all non polar molecules and I sort of assumed that the residues would also be non polar making ethanol a poor solvent.

Hmmm, I wonder if just draining as much alcohol as I can and then sealing it up is a better plan?
 
Engine Refresh 1

With 317 waiting patiently for her replacement door, I decided to turn to the engine. It will be getting a full refresh will all new parts, timing belt, water pump and seals. The heads are getting Comptech cams and all new valvetrain from Science of Speed, along with a 3-angle valve job and general cleanup.

To start, we used the hoist to remove the engine and transmission from the rear subframe. You can see that is was easier to work with the front beam completely removed. Also, because of the size of the auto transmission, we had to remove the left side beam assembly to hoist it out.

20191221_120420.jpg

Powertrain removed.

20191221_120526.jpg
20191221_120500.jpg
Next was to remove the auto transmission. This....took some effort. That thing looks small, but it has to weigh at least 100 pounds! It is a BEAST and I recommend just using a hoist to move it around. Spencer and I are pretty strong guys, and we struggled.

20191221_140531.jpg
20191221_140609.jpg20191221_140621.jpg
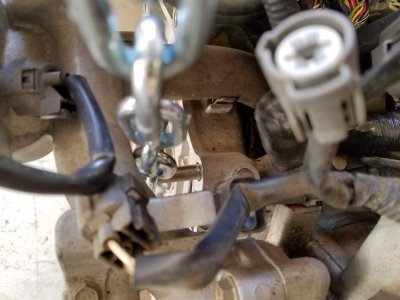
Hoisting the engine was the next step to get it ready to go on the engine stand for disassembly. The engine only has one hoist point, so we put one of the transmission bolts in the block to give it a second lift point. We ended up using a shorter bolt then the one pictured here in order to get the lift point closer to the block.

20191221_140542.jpg

Since it was so easily accessible, I blasted the crank pulley bolt off with the Big Beast. One squeeze of the trigger and it was gone. After watching so many Prime members struggle with 6ft cheater bars and such over the years, it was a welcome relief.

20191221_140558.jpg

What was NOT a relief was the engine stand. Being a good attorney, I came prepared. Weeks ago, I went to ACE Hardware and grabbed four 70mm M12 bolts with a 1.25 "JIS" thread pitch. Once we got the engine lined up with the stand, I started the bolts and they stopped dead after about 2 turns. Steel vs. aluminum so I backed them out gently and tried a different bolt- maybe the threads on the first one were damaged? Nope, same thing- two turns and then STOP. I grabbed one of the Honda trans bolts and tried it- threaded in like butter. With the engine dangling in the air 2 feet off the ground- we had no choice- my C30A is being held onto the engine stand with 3 OEM bolts (one sleeved through the lower right hole on the block) and one mount arm flopping loose. I'd really like to rectify this sooner vs. later. Can anyone who has mounted the C30A to an engine stand help? What bolts should i use??? :confused::confused:
 

Attachments

  • 20191221_140542.jpg
    20191221_140542.jpg
    184.2 KB · Views: 1
Last edited:
That's very weird, I just used some M12x1.25 bolts I had laying around from when I had a B20Z bolted up to the stand a few years ago and they threaded right in, I think I got them at Lowes so nothing special. Stopping after 2 turns almost sounds like the thread pitch is off somehow, if you lay the new bolts down on top of the OEM bolts do the the threads line up perfectly? Also if you have an M12x1.25 die you can run it down the bolts to get rid of any potential imperfections in the threads.
 
Last edited:
Compare your different M12's by holding the threads directly against each other (head to tail, vs tail to head). The threads should "mesh" with each other, if they don't...you know where you problem lies.

I'll bet you have a different thread pitch when compared to your known good bolt.
 
Compare your different M12's by holding the threads directly against each other (head to tail, vs tail to head). The threads should "mesh" with each other, if they don't...you know where you problem lies.

I'll bet you have a different thread pitch when compared to your known good bolt.

Ditto on this. M12 bolts are available in 1.75, 1.5 and 1.25 (JIS) pitch. I think M10 and M12 are the only bolts with 3 pitch options. JIS is super fine which would strike me as odd for an engine mount.
 
Last edited:
Engine Refresh 2

I was fortunate to have a week in the garage with my master (aka my father), but sub-zero temps limited the work we could do. First, we confirmed that 12 mm x 1.25 is the correct thread pitch for the engine block transmission bolts. It turns out the aftermarket bolts are cast and have rough casting defects in the threads. After running them through a 12 x 1.25 die, they threaded into the block like butter!

After carefully replacing the bolts one by one, the engine is now secure on the stand.
20191226_211345.jpg
Here we are beginning to prep the engine for power washing (still waiting for some warm temps). Wrap all exposed harness plugs, block spark plug holes, etc. Yes, my dad is wearing a Dodge jacket.

20191226_132655.jpg

Managed to extract the magnificent Comptech cams from [MENTION=4282]docjohn[/MENTION]'s old heads. There is some light varnishing and I will thoroughly clean them with a shop rag and gasoline until perfect.

20191226_145249.jpg

Once I get a break in the weather, I will apply the initial pressure wash and degrease phase to the engine. Then, remove the electrical harness and begin disassembly and removal of the heads. I'm working up a huge parts order- I hope everything is in stock at Honda...
 
Transmission Refresh 1

As an interim step to the 6-speed, I acquired this 79k mile 5-speed from another fine Prime member. I am going to rebuild it with the JDM gear stack and NSX-R LSD springs- just like my last NSX. I can drive this for a long time, if necessary, since 1-2-3 are virtually identical to the 6-speed. Also will replace bearings and seals and inspect synchros, though at 79k I doubt they are in bad shape. It's freezing (8 degrees F outside) so only managed to get it up on the bench.

20191226_211322.jpg
This is a snap ring transmission with its original case, so first step is to inspect the snap ring. It's still there and in one piece. Maybe I got lucky with this one...

20191229_153802.jpg

Spreading the snap ring resulted in a click, but I did not see the countershaft drop down at all. How wide do you have to spread it to get it to release the countershaft? It's too cold so I will try again tonight.
 
General

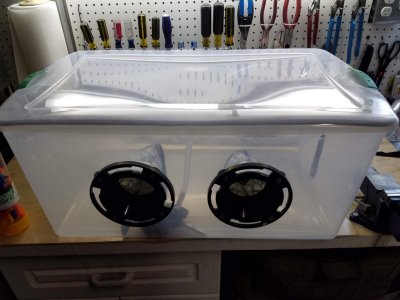
With the sub-zero temperatures, I decided to do an indoor project. I built a DIY blasting cabinet out of a walmart plastic tub. I have many parts of the car that are grimy. This will help greatly in cleaning them.

Grandpa and grandson assembling (we used a car air filter for pressure equalization)

20191228_141304.jpg

Final product. In retrospect, I would put the arms farther apart and higher up. Still, it works well.

20191229_161042.jpg

Test run on my junkyard manual transmission brace. This thing was caked in black grime and grease. This is after about 30 seconds using baking soda.
20191229_161033.jpg
 

Attachments

  • 20191229_161042.jpg
    20191229_161042.jpg
    180.6 KB · Views: 1
General

Still too cold to do much work, and Mrs. Honcho wanted new light fixtures installed in the kitchen and dining room, so not much NSX work this weekend. Also, I'm still waiting on my replacement door from SOS. However, I was able to play with my blast cabinet a bit.

First up is my ABS bracket. Caked in grease and grime.

20200105_160426.jpg

Into the tub it goes.

20200105_160456.jpg

Cleaned to this level after about 2 minutes in the blaster, using baking soda. I rinsed off with warm water and lightly scrubbed with some dish soap to remove any baking soda residue. It is now ready for the ABS upgrade. Just need to build the harness lol.

20200105_164510.jpg

Next is my front engine mount. It looked about the same as the ABS bracket. I will extract the cracked rubber bushing and re-cast a new one in 70A shore hardness urethane. The blaster was able to clean out all of the "screen webbing" on the casting- amazing. This would have taken ages with a wire brush.

20200105_170639.jpg

Even did the bolts too!

20200105_170644.jpg
 
Slick cabinet. You say 'Baking Soda'; but are you using sodium bicarbonate blasting media or actual baking soda you scored from your kitchen cupboards? I am thinking that actual Baking Soda would be fine enough that the box would fill up with a dust cloud instantly; but, I have never used NaHCO3 as a blast media so have no experience.
 
Slick cabinet. You say 'Baking Soda'; but are you using sodium bicarbonate blasting media or actual baking soda you scored from your kitchen cupboards? I am thinking that actual Baking Soda would be fine enough that the box would fill up with a dust cloud instantly; but, I have never used NaHCO3 as a blast media so have no experience.

See post #103 for more details on soda blasting.
 
Is there an advantage to pressure washing with the harness on? I’d be scared of damaging it but I’ve never used a pressure washer for engine cleaning.

Also are you planning on keeping or deleting EGR? It's easy to code out in the ECU and easy and cheap to block off (have the guy repairing the heads tap and plug the hole in the front head) and there's a BMW block off plate that's $13 and fits over the hole in the intake manifold perfectly.

The soda blasting seems to be working out great, I need to swing by HF and pick up a box of that media for things where glass beads are too much.
 
Last edited:
Slick cabinet. You say 'Baking Soda'; but are you using sodium bicarbonate blasting media or actual baking soda you scored from your kitchen cupboards? I am thinking that actual Baking Soda would be fine enough that the box would fill up with a dust cloud instantly; but, I have never used NaHCO3 as a blast media so have no experience.

Should have been more specific. :) Armex sodium bicarbonate blasting media. Available here.

Is there an advantage to pressure washing with the harness on? I’d be scared of damaging it but I’ve never used a pressure washer for engine cleaning.

Also are you planning on keeping or deleting EGR? It's easy to code out in the ECU and easy and cheap to block off (have the guy repairing the heads tap and plug the hole in the front head) and there's a BMW block off plate that's $13 and fits over the hole in the intake manifold perfectly.

The soda blasting seems to be working out great, I need to swing by HF and pick up a box of that media for things where glass beads are too much.

My initial thought on pressure washing was that the harness plugs on the engine are weather-resistant and it therefore might be smarter to leave them plugged in to keep the water out while washing. Now that I see how many plugs are unplugged already, it doesn't make sense to do it this way. So, I'm going to remove the wire harness and then wrap the exposed plugs (spool valves, etc.) in plastic wrap with rubber bands. I'm also going to remove the exhaust manifolds and stuff the ports with rolled bubble wrap. Still trying to get my plan of action right on this. The idea right now is to "scrape" as much of the gunk and grease off by hand with shop towels, then hit it with the degreaser, let it soak, agitate with a bristle brush, and then pressure wash it off. I also have to vacuum all of the dead leaves that have accumulated under the water passage pipe in the V-tunnel. I was going to replace the knock sensors (since a good signal will be critical for our timing tuning), but interestingly, [MENTION=25737]Kaz-kzukNA1[/MENTION] has mentioned several times that these sensors and the harness should not be touched. Have to research more on that.

I'm torn on EGR. Yes, we could just code it out and block the ports. It would make tuning easier because then we don't have to tune the EGR fuel map. However, the more I read, the more I want to keep it. Apparently, by keeping chamber temps more stable, EGR helps keep your engine internals cleaner, improves atomization and throttle response, and is good for your cats. It's only really activated during steady state, part throttle cruising, so it doesn't get in the way at the circuit or driving hard on the touge. Thus, I kinda want to keep it.

I like the soda because it does not disturb the surface of the aluminum. When I was stripping the subframe parts last year, I noticed that crushed glass did abrade the aluminum slightly. Next, I'm going to try aluminum oxide on the rear brake calipers.
 
Last edited:
Engine Refresh 3

Another intake manifold on my bench.


20200109_204624.jpg


This intake has done 137,000 miles over 28 years. The level of contamination is therefore not surprising. Lots of greasy black soot in the intake snout and at the intake ports. This is from a combination of PCV blowby and using oiled air filters like K&N in the past. For this reason, I strongly recommend using only the factory (or equivalent aftermarket) paper air elements in your NSX. This will take ages to clean- I may just send it out with the cylinder heads to be cleaned in the hot tank instead rather than spending hours scrubbing with the solvent.

20200109_204610.jpg

As expected, the magnesium base was full of ancient, smelly motor oil. This was deposited in the manifold over 29 years of operation by the PCV system, which sucks oil vapors out of the heads and returns them to be burned in the combustion chamber. The same is sitting in your NSX right now. While it doesn't really affect operation of the engine (though it probably slightly reduces chamber volume for the VVIS system), I will be adding a oil/air separator to the PCV line to keep this out of the manifold in the future. It smelled horrible.

20200109_205934.jpg

I forgot to unfasten the bolts while keeping the manifold upright (I remembered the first time back in 2012), so I turned it upside down to take it apart. This was the result. Now more cleaning...

20200109_205939.jpg

Lots of small pieces in the oil. These are flakes from the gray coating applied to the VVIS butterflies. I may take a brass wire brush and gently brush the plates to get any more loosened coating off. Don't want this getting sucked into the engine.

20200109_211035.jpg
 
Engine Refresh 4

EGR plate removed. Lots of bad exhaust contamination. The small ~5mm EGR ports inside the runners are almost 100% clogged. I doubt this NSX was getting much if any recirculated exhaust gas for the last few years. I have no idea how to clean this and I wonder if even the hot tank will be able to remove it fully. The best I can think of is to use long pipe cleaners that I have for my AR-15 gas ports, soak them in solvent, and then attempt to push them through each of the 6 EGR ports. Honestly, this has me re-thinking using EGR on this car.

20200109_212232.jpg
20200109_212239.jpg
VVIS check. Even after 137,000 miles and 29 years, all are still secure. I guess I am lucky... I was originally going to loosen them and add red loctite, but I may just leave them alone.

20200109_211051.jpg20200109_211058.jpg20200109_211113.jpg20200109_211117.jpg
 
Engine Refresh 5

FITV is out. Not bad contamination, but I will replace it rather than clean. There is a thermowax pellet that sits in the bottom of the valve and is bathed in coolant. There is no way to inspect the pellet and/or remove any scale or contamination from the coolant passage, so best to start with a fresh one. As for this one, thank you for your 28 years of service.
20200109_204926.jpg
20200109_204936.jpg


EACV is out. This is the electronic plunger valve that the ECU controls to maintain a stable idle. The screen port was about 75% clogged. I will replace it with a new screen and clean the rest of the valve body.

20200109_205235.jpg

Time to inspect the thermostat. Even in hot 85F summer weather, this NSX took a long time to warm up. No signs of damage or failure. Usually, you see mushrooming/damage of the center rubber, which allows some coolant to circulate through the radiator even when cold. No such damage here. It remains a mystery... Still, I will replace it with an all-metal version made by Stant (no center rubber piece to fail). It's one of the few parts on the NSX where I prefer aftermarket over OEM.

20200109_213852.jpg

Fairly clean water passage. No scaling or corrosion.

20200109_213925.jpg
 
Body and Paint Work 27

Removed the driver side mirror from the door. Got it disassembled but unfortunately broke the small tab on the wire plug for the mirror motor. Should not affect operation at all, but still frustrating- it snapped as soon as I pressed down. Old, brittle plastic... Now have to mask it for paint.

20200109_221033.jpg20200109_221039.jpg
 
That's about how my intake manifold looked the first time I took it apart at 105k miles. What I ended up doing was degreasing the VVIS plates then applying a drop or two of penetrating thread locker on the ends of the screws, I'm not sure if it's actually helping anything (besides my emotional state) but I figure it can't hurt and it doesn't require backing out the screws and disturbing the stake. Over the past week or so I've been looking into plumbing an aftermarket air/oil separator into the PCV/CCV system to try to keep the intake manifold cleaner.

Matt had a post a few years back talking about how the EGR pathways on the Legend C-series intake manifolds are prone to clogging and restricting flow. (but also mentioned the NSX design is less prone to clogging) The EGR system on these cars is a product of the 80s and is archaic at best, it only monitors EGR valve lift and not gas flow, so if the ports start to clog you get less inert gasses than the ECU expects and more oxygen so the mixture starts to lean out, which leads to pinging. This is my main reason for removing it on my car, along with just trying to simplify things, and plenty of other cars get along just fine without any sort of EGR.

IIRC Kaz' reasoning on the knock sensors was that the heat of being in the valley of the engine causes the plastic bits of the knock sensors and harness to become brittle and break when removed. I had to remove mine to have the block machined but I probably would have left them alone otherwise, but I didn't have any issues with brittle plastic. You can get new sensors for about $120 each from Amayama (nearly $200 in the US) and a new knock sensor sub-harness for $50 if yours breaks, should you choose to remove them.
 
Last edited:
Weight Reduction - S Zero Conversion 31

Ski season has started in full swing, so not much time for NSX work on the weekends. I need to master my evenings better so I can spend an hour each night getting some work done! Still, time to catch up on the blog. There is a lot in motion. About $4,000 in OEM Honda parts is held up in Japan due to a few backordered pieces. I hope to receive them in a few weeks. About another $3,000 in used and new parts are on their way from Austria, thanks to ATR-Parts. More boxes keep arriving and I'm running out of room in the garage- I need to get this car to paint asap, but still need to release all of the wire harnesses and tape/mask the various lines that are staying on the chassis. Does anyone know where to find those orange zip ties that clip into the body? They shatter every time I try to pop them out, so I will need about 20.

Got the HVAC removed from the interior. It's on its way to Joe G. in Florida for a complete refurbish, including new evaporator.

20200112_123607.jpg

20200112_123642.jpg

20200112_123753.jpg

Have to clean this residual, ancient foam.

20200112_123745.jpg

Very empty interior. One last look at the AT brake pedal.

20200112_123632.jpg

Blower motor removed. Time for a complete strip, deep clean and fresh rubber. I will use an improvised air filter device to help prevent this in the future.

20200112_123808.jpg

20200112_123813.jpg

More engine prep for the cleaning stage. Have to get it as clean as possible before removing the heads.

20200112_165515.jpg

Old boat anchor manifolds off. I only spun out one stud from the head.

20200112_165540.jpg

Engine wire harness off. I need to find replacement blue zip tie clips- they all shattered when I tried to squeeze them.

20200112_165523.jpg

Brake booster out. Need to clean this old corrosion up and shoot with some black rustoleum.

20200112_165459.jpg

Type-S Seat project underway!

20200112_165344 (1).jpg

Also, I was sent the wrong A/C compressor and the supplier is MIA.
 
Last edited:
Small update for the blog. Still waiting on the body shop. I'm starting to feel like this will be the most time- consuming part of the project, so I'm trying not to stress too much about the delay. They are basically handling this as a side project, so the owner has to approve it. Still, I'd really like to get the chassis out of the garage so I can start on the engine refresh...

It's been too cold to work in the garage the last few weeks, and I'm just getting over a bout with the flu, but things are still in motion. First, this happened:

partsjapanff.jpg

Overnight parts from Japan! :D And Austria! Basically every remaining part necessary to complete the project has arrived. Hundreds and hundreds of parts. Only major outstanding items are headers (on backorder) and all rubber seals.

Lots of side projects to complete: brake refinish, casting new engine mounts, remove heads and send out to machine shop, clean and rebuild intake manifold, rebuild transmission, rebuild CV joints, remove and install non-compliance bushings...

I need to get this chassis to paint to make room in the garage.... First, I need to sleep more to kill off this flu!
 
Weight Reduction - S Zero Conversion 32

Another big snow storm, so I found a nice inside project to work on. A genuine Type-S Zero gauge cluster.

Time to wash up the gauge cluster pieces. Lots of dust and debris gets into all the small spaces- a little dish soap and warm water is the best way to get it all out.

20200223_132643.jpg

Taking up some drying rack space with the dishes. After 20 minutes, I used a hair dryer to evaporate off any additional moisture (especially inside the light recesses).

20200223_132648.jpg
 
Weight Reduction - S Zero Conversion 33

The pieces we will need for the conversion. The tach is from a 1997 NSX.

20200223_143750(0).jpg

First, remove the AT shift lever indicator lights. I almost left the top two in for a NSX-R style shift light, but decided against it, as the though of drilling holes in my tach made me nauseous.

20200223_140135.jpg

Cleaned up the trip meter and odometer with a damp microfiber towel and reinstalled, using the steel-colored screws.

20200223_145956.jpg

Install the repaired circuit boards, courtesy of BrianK. All new caps and a few repaired traces. You can see the thin green wire at the bottom of the tach board.

20200223_150902.jpg

Using the 10 brass screws, mount the rear plastic to the front gauge housing. This "sandwiches" the circuit boards. There are also plastic clips all around the housing- take care.

20200223_152034.jpg

Next, install the brake/door safety indicator using the two small brass screws. I really hope my "BRAKE" light issue has been resolved!

20200223_150323.jpg
20200223_150341.jpg20200223_152021.jpg
 
Last edited:
Weight Reduction - S Zero Conversion 34

Fuel/Volt and Temp/Oil gauges installed, using the brass machine screw/washer combos. Very critical here to not overtighten. I used my fingertips on the screwdriver, turned until the screw stopped and then turned about 1 mm more using just fingertip pressure to engage the lock washers. I hope I did not go too tight.

20200223_152733 (1).jpg

Taking even more care for the speedometer and tachometer. Very expensive parts. Fingertip pressure only.

20200223_154543.jpg

This car is now a MT. :)

20200223_154623.jpg

Now, let's make it a S-Zero. The genuine faceplate.

20200223_135424.jpg

The replacement felt washer for the trip meter button. This part goes between the faceplate and the gauge.

20200223_161029.jpg

S-Zero faceplate fitted.

20200223_163609.jpg

Spent ages (30 minutes +) with a damp microfiber towel and my breath removing every single little speck of dust from the gauge faces. They are extremely delicate and the surface is a very thin black paint. You must use dry nitrile gloves and nothing other than water to touch it. It is very easy to mar, and even finger oil will make a mark. Dampen your towel- do not put water directly on the gauge face. You should perform this step right before installing the glass in order to minimize any further dust contamination. Finally, once I was happy with the result, I installed the new cover glass, using the black trim screws.

New glass on bottom, old on top.

20200223_164039.jpg

Now the car is a Type-S Zero.

20200223_165553 (1).jpg

Now for the rubber and felt. Top two tabs are rubber. Bottom three are felt. My NSX was missing all three felt pieces.

20200223_170357.jpg

Reinstalled the top light fixture, replaced all light bulbs with new ones, and added the rubber and felt. I'm extremely pleased with the result. It looks like a brand new car.

20200223_170820.jpg
 
General

Interesting to compare the US-Spec AT NSX early model to the Japan-Spec later S-Zero.

Here is the US-Spec center light area. It includes EPS, SRS and TCS, which were all part of the standard 92 AT setup. It also says "Anti-Lock" and "BRAKE"

20200223_135502.jpg

On the S-Zero, it's different. Obviously no TCS, SRS or EPS offered on that model, so the lights have been blacked out. Also, "Anti-Lock" becomes "ABS" and "BRAKE" becomes a symbol, perhaps the Japan-market universal symbol for the E-Brake?

20200223_135438.jpg

Also interesting to examine the right side light cluster. Here on the US model, we have a seatbelt warning light and the "TCS OFF" light. Fascinating how many indicator/warning lights there are for TCS on the NSX. Was Honda concerned that owners could accidentally run with TCS off?

20200223_135508.jpg

On the S-Zero, it's different. TCS is blacked out, since that model was for running on the circuit and did not include TCS. Also, the seatbelt light changes to what looks like a defroster indicator? Or a coolant temp warning light? Blown fuse indicator? Now, every time my NSX reminds me to put on my seatbelt, I get to see this interesting little light.

20200223_135443.jpg
 
Back
Top