Honcho's Long Road to Imola Type-S Zero

Do the NSX-R brake dust shields have a different part number? I thought they were all the same for NA2 on the front and rear are the same across all years.

I'm pretty sure it's a year thing and not an engine designation thing. IIRC, 91-94 shared the same P/N front shields except for the NA1 NSX-R. From '95-'05 I believe the front shields are all the same and match the P/N from the NA1 NSX-R.

'91-'94 Front Shields - 45255-SL0-010 (Right) / 45256-SL0-010 (Left)
NA1 NSX-R/'95-'05 - 45255-SL0-N00 (Right) / 45256-SL0-N00 (Left)
 
Last edited:
Do the NSX-R brake dust shields have a different part number? I thought they were all the same for NA2 on the front and rear are the same across all years.

I'm pretty sure it's a year thing and not an engine designation thing. IIRC, 91-94 shared the same P/N front shields except for the NA1 NSX-R. From '95-'05 I believe the front shields are all the same and match the P/N from the NA1 NSX-R.

'91-'94 Front Shields - 45255-SL0-010 (Right) / 45256-SL0-010 (Left)
NA1 NSX-R/'95-'05 - 45255-SL0-N00 (Right) / 45256-SL0-N00 (Left)

Yep, the revised, ventilated brake shields were originally designed for the NA1 NSX-R. Honda decided to include them on all 95 and up NSXs after that.
 
Weight Reduction - S Zero Conversion 28

YR-514P

Big news on the project- instead of completing "Stage 0" where I would drive the car as is for a while, Mrs. Honcho has given approval to move directly to Stage 1! That means it is time to start stripping the car down to the frame for its Imola Orange paint job! :D Lots of work to do now...

The hunt for a paint shop and a dual car discount begins... [emoji16]


Sent from my iPhone using Tapatalk
 
Health Check 09

Now that we are moving directly to paint, I had to do some final mechanical checks before removing the engine and rear subframe. As part of the Stage 1 compromise with Mrs. Honcho, I agreed to run the engine as is and not perform the engine refresh at this time. However, before I do that, I want to make sure I understand the condition of the engine and whether it can make it 2 or 3 years before the engine refresh service. It was time to carry out the compression test.

First step is to remove the coil covers. The front bank cover gasket was pinched and not seated correctly. It was like this while mounted.

20190615_171240.jpg

The rear bank cover gasket was seated properly.

20190615_171224.jpg

Small crack at the mounting hole on the front cover. Fairly common issue due to over-tightening the nut. I will fill the crack with permatex gasket maker just to keep the moisture out. Otherwise, the covers are in good condition.

20190615_171247 (1).jpg

Rear strut bar removed. I have the NSX-R strut bar to replace it.

20190615_171207.jpg

I was pleased to see the exterior condition of the coils. Very clean and still shiny mounting bolts.

20190615_171152.jpg
 
Health Check 10

Coils removed. Number 1 on the bottom right and they are arranged as they sit in the engine. Note the corrosion on the rear bank coils compared to the front bank. Even with correct fitment of the cover gasket, moisture still attacks the metal. Because of this, I will purchase either the RF Yamamoto or Davis Design coil gutter to steer water away from the rear bank.

20190616_153440 (1).jpg

Number 4 coil. Almost new looking.

20190616_153513.jpg

Number 1 coil. Fairly bad corrosion, but firing ok.

20190616_153457.jpg

The worst one was Number 3. Metal sightly lifting away from the plastic housing. Seems to be firing ok, but depending on price, I may try to find the 6-coil kit Honda used to sell for something like $150. I heard it was discontinued, but will look.

20190616_153502.jpg

Spark plugs were all uniform in wear and condition except for number 3, shown here. Some light carbon and rust at the bottom of the threads near the electrode. But, very pleased with the overall health/story of the plugs. They will be replaced with new plugs upon reassembly.

20190616_121314.jpg
 
Health Check 11

Compression Test 06/16/2019


Warmed up the car until the radiator fan activated and then carried out the compression test procedure. Removed fuel injector resistor to cut fuel and cranked the engine while applying WOT.

20190616_120257.jpg

#3 My Daughter pressed the release button for a slight moment, but the reading before she did that was 190 psi. :D

20190616_121119.jpg

Since this is my engine, no problem publishing the compression data here:

#1 --> 191 psi
#2 --> 191 psi
#3 --> 190 psi
#4 --> 192 psi
#5 --> 190 psi
#6 --> 192 psi

Applying the 0.8 correction factor for my altitude (6,000 ft), we get a sea level compression result of:

#1 --> 229 psi
#2 --> 229 psi
#3 --> 228 psi
#4 --> 230 psi
#5 --> 228 psi
#6 --> 230 psi

I'm extremely pleased and relieved. This is near brand-new spec for a C30A and, at 137,000 miles, even better than my last NSX was at ~90,000 miles. While the final values are good to know and indicative of the overall health and wear level of the engine, the variance between cylinders is more important. The "OK" standard for Honda is 28 psi or less. The variance in this C30A is 2 psi or less. Excellent.

I have to say, while the previous owner let the cosmetic condition of the car slip, he took very good care of the engine. My suspicion last year that the engine would test out well has been confirmed. I had originally planned to do the valve adjustment service while the engine was out of the car, but with these results, I'm not sure i could improve it at all. I may just clean up the engine, address any seeping oil leaks and run it as is until it is time for the 6-speed and Comptech cams. This NSX has a strong heart! Interesting that today was the last time I will run the engine. The next time it runs, the car will be orange. :D
 
Once again, thanks for documenting all your procedures. I am facing a lot of the issues you are, but I am in no way shape or form as fastidious as you. But my starting point is not as good as yours. Mine suffered rear end damage and as a result I'm not quite so likely to go for the sort of restoration you are embarking on. My goal is to get mine into "driver" condition. Or maybe "driver+". That has already been a financial strain. I am really looking forward to the whole engine drop, as I will be facing that one day soon. So, please don't omit any details. Your attention to detail is an inspiration to those of us who are mere mortals. Best of luck as you continue on your project. I plan to follow closely.
 
Body and Paint Work 22

Back from France and with the basement nearly complete, it is time to keep moving on the tear down. Today, @HamburgerBill was in town for some 9mm range therapy and volunteered to lend a hand. We removed the tail lights, trunk interior and engine cover.

20190727_173945.jpg

20190727_173952.jpg


20190727_160639.jpg
20190727_174112.jpg


20190727_174154.jpg

We discovered more self-tap screw holes in the trunk. I think these were used to mount the aftermarket amp. Very frustrating.

20190727_174027.jpg

20190727_174009.jpg
 
Last edited:
Weight Reduction - S Zero Conversion 28

Minor update. Courtesy of the Bumblebee, the project received a special treat. Comptech IEM heads! With cams! The catch is that way back when, in the mists of time, the Bee was tearing down the back straight at the Glen...when a valve spring in cylinder Number 5 broke :eek:. It was a sad day for docjohn, made even worse on the drive back to Pennsylvania as he got to listen to all those metal bits bouncing around in the engine for a couple hours! But, now, the Comptech engine will rise like a phoenix to once again terrorize the streets of America (and maybe Europe!).

I have already contacted three separate cylinder head shops and they all advised that the damage is easily repairable. In fact, they were surprised at how little damage it was for the type of failure. Basically, they tig weld aluminum to the damaged area and then CNC machine it back to spec. 20 years ago, this would have been a major repair. But with today's CNC equipment, it's only a couple hundred bucks! I was going to sell these heads, as I really just wanted the cams, but given the low cost of repair (it is guaranteed to be as strong or stronger than the original casting), I'm putting them on 317! They are fully ported and polished, and are already cut for the 36 mm intake valves. I'd be crazy not to. Pics of the damage to #5 are below. This is what happens when a valve spring breaks at high rpm.
20190804_202013.jpg20190804_202023.jpg

Here's an example of how the repair is done (action starts at 6:00):


Very special thanks to Prime's own [MENTION=4282]docjohn[/MENTION], who made this possible. Honcho and the Bee go way back. Here we are 10 years ago at NSX Stock, when NSX owners all got along and there was no FB group. We actually got together for realz:

spH3-CJkGXmzudgvMjcHOjPJ72AlFmqAfIOFndk6Rbr5MGzxPu9q_-mFmR22y41QNplpzNezBS7zA8gLc51D4VQSqXVlX-ovI2cFII9kD_k9utrplWj9LsOc5zCbDFCQsKOD9mhY_qPZ9h6T5puTsw0_shM6j6dvaxN7cARrxR15Tkmq4tq2TjbQqaYSjVl1W-sSCTbjWTnz_1a15Hp9rmSQSQwJp8JU2zGPX57QM9nESGYpBH0pbj_Mof2rKqQrCI8d5lz6bPQ8WlPxMC76vf9tj2tD4PFDRbMB2i8rK8b-EEmyp2mpvxDMqzJbGVQUrM4T0VbYCFztkPsgME32XQpvgGRTRz7xHp7Ms0AHq_eys1t8xdCoBSLkgj48Rm6F9KXAZRrxpr69LkZoJ8anEFueyJmbL6d6Bp28IhTIqh11wUKrtmOu81qak6QbrhTJOeQ-cRMclRHtYNeZpaOEzsQytbkOBZzVoUy4p9xS6ZRIcZ6YnLOr5x_kbGpBU1_P2Zr4WG3mIYmntIgQGBZytVnM_7FqwRAoH_bEUKF-8DwgQJUnDGQIEBAMEwLGjsZEnvazg414YLatyItNsapDRt47Dfn23fZoLYTseCrfmC4VLWtex9MEj6qUbZnJgOLgIozqj5PijPqCMgAlsC9Nj5wXknik1OzWYneRH8iP0G8vzORaaKWTE54rAJiX4s-lSvFTUDmUlEaDI1cFLUgZYAum=w720-h540-no
 
Last edited:
Very special thanks to Prime's own [MENTION=4282]docjohn[/MENTION], who made this possible. Honcho and the Bee go way back. Here we are 10 years ago at NSX Stock, when NSX owners all got along and there was no FB group. We actually got together for realz:

Small world, I was there that day too!
 
Awesome! Glad to see the parts go to a very deserving enthusiast. I was hoping to see the parts chronicled here. I feel like a part of my history will help Honcho create his own. I had flaked out on a few folks in the past because I had a feeling that there was still another right place for these to end up....and my gut was correct!....Back when I asked CT to rework the heads the price was 1200$..... Now when Honcho raises his mighty hand the cams (both banks btw) fly at immense speed from wherever they may be to his worthy palm....
 
Last edited:
Body and Paint Work 23

Progress continues on the tear down. I am continuing to target December for paint.

The doors are now completely gutted and nearly ready for paint. Even though they appear to have been upgraded in the past to the newer design with the revised cable stay block, I'm going to send the window regulators out to be rebuilt.

20190825_125100.jpg
Crushed, ancient door seals. All the rubber seals on the car will be replaced.
20190825_140533.jpg

Window glass removed. I have to take these to a window tint place to get the tint removed.

20190825_171221.jpg
All the window bits. The idiots who painted the car also got red on the upper door trim seals, so I now have to remove it using some goof off, a q-tip and a lot of patience! I'm going to have these re-painted Berlina Black, along with all of the other black trim pieces.
20190825_171229.jpg

Old ABS system is out. I'm upgrading to an AP1 system using a custom "Honcho Harness" :) I'm going to set it up to be relatively easy to change over to an OEM NSX modulator in the future.
20190825_200619.jpg
 
Last edited:
Body and Paint Work 24

@NSX_n00b lent a hand and we made huge progress on the car. I'm quite close to pulling the rear subframe. After that, it's off to the paint shop!

First, a big scare. The original plan for the day was to complete the gutting of the front bay. After quickly removing the A/C condensers (they will be replaced), we turned to the blower unit. All was going smoothly until I got under the front of the car to get the lower 2 blower bolts. They spun off easily, but the blower was predictably stuck to the body after years of time. I grabbed the blower to break it free from the body and...the entire front of the car tilted up!!!! I let go and the front end gently settled back down onto the front jack stands, like a seesaw. "The front end just lifted," I said. "No, it was just the blower moving away from you," Spencer replied. "Watch this," I said and gently pushed up on the front end. The front end easily lifted up about 6 inches and I settled it back down on the jack stands. "Woah." So yeah, our big plan for the day was not going to work. We had removed so much weight from the front end that the car was maybe 50 pounds away from tipping backward. This was bad- I had been planning this for weeks and now we couldn't do any of it. What to do? "I guess we have to take heavy stuff off of the rear," I said with a shrug. Here was our temporary solution until we could get some weight out of the rear. Note- when stripping a NSX to the chassis, remove the rear subframe FIRST. :D
20191006_165837.jpg

So, the rest of the day became a game of "so, what's heavy that we can take off?" Our first answer was "the exhaust!" Problem- this is an OEM muffler and cats that have never been off the car in 26 years. I went through this misery when changing to the Fujitsubo Super Ti on my last NSX. My solution there was to soak the rusted nuts in PB Blaster overnight and then hit them with my impact gun. Even then, it took forever because you can't get a straight shot onto any of the bolts with the gun because the exhaust pipe pushes the gun down. So you have to come at them from an angle and pray that you don't strip the nuts. But, here I had not soaked the bolts overnight...because I wasn't planning on removing the exhaust :mad:. The impact gun didn't budge them. It was defeating. What else is heavy? "I don't know, the intake manifold?"


Protected intake ports. Now I can vacuum those leaves.
20191006_165957.jpg

What else is heavy? "The alternator?"
20191006_123818.jpg

What else is heavy? "The rear hatch- that's gotta weigh a ton!" (it did)

20191006_165734.jpg

What else is heavy? "The rear spoiler."

20191006_165741.jpg

There were some more things. The partial result of our efforts:
20191006_165711.jpg

After that, the front end did not lift off of the jack stands anymore. So, the big scare was a blessing in disguise. With all that effort, I'm just about ready to take out the rear subframe!
 

Attachments

  • 20191006_165650.jpg
    20191006_165650.jpg
    286.3 KB · Views: 2
Last edited:
Body and Paint Work 25

We thought that draining the coolant from the engine block would reduce weight, but the drain plugs are blocked by the front exhaust manifold, which would not come off. Still, we drained the coolant from the center tunnel, which got rid of most of the engine area coolant. We also drained the radiator, now feeling better about the weight balance. One thing we knew would help was something that needed to be done anyway: the really old gas in the tank:
20191006_180631.jpg

My lawnmower and snowblower will be set (with some stabil lol)!

Now, I really have to figure out how to attack those exhaust bolts- it's holding everything up.
 
Last edited:
Glad to see more progress. Looks like great opportunity to contribute to the other thread on prime with all the weigh/part :)

*** First post today doesn't show pictures.
 
For your information, there is a Type S Zero for sale in Japan at the moment - downside is that there are only a few photos

The car hasn't made it to the vendors website yet

Amazing, a real one! One of only 36 ever made...and a 2000 too! Bummer about the lack of photos, but I noticed three new things already: (1) the rear strut brace uses the "old" silver bolts from the early coupes and not the "new" black flanged bolts from the NA2 NSX-R; (2) the radio delete plate appears to be a gloss coat black of some sort (maybe single weave carbon?) instead of the matte gunmetal from the 1997 S Zeros. I wonder if this was an option?; and (3) even the lightweight S Zero still used a spare tire! I would have thought Honda would include the fix-a-flat can like they did on the NSX-R for this track car version. Thanks Nick!
 
Engine and Subframe Removal 1

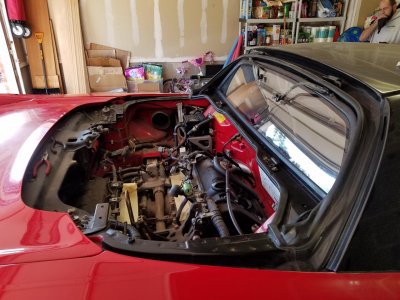
Lots more progress this weekend. Aside from a few remaining small issues, we will be removing the complete rear subframe next Sunday. After that, the car will off to the paint booth.

We accomplished much:

20191103_160747.jpg

Exhaust is out!

20191103_160807.jpg

We left the rear cat on, as the top flange bolt was inaccessible with the impact gun. I will zip tie it to the subframe for lowering and then remove when I have full access to the flange bolts.

20191103_161024.jpg

Lower U-Bar. Going to get a full scrub. Also makes a great template for the subframe dolly.

20191103_160830.jpg

Rear shocks are finally out. Note the red overspray from the crappy paint job. Even though we dropped the lower arms and toe links for the purpose of removing the axles, we found that this made pulling the rear shocks MUCH easier!

20191103_160820.jpg
20191103_160920.jpg
 
Engine and Subframe Removal 2

The AT shift cable presented more of a challenge. In order to remove the clevis pin from the selector lever on the transmission (it's all under the shift cable cover), it looks like the trans needs to be in neutral. My transmission was in park. Try as we might, we could not get the gear selector to move inside the cabin, which makes sense as the AT computer probably locks the selector unless the car is running. Thankfully, Honda engineers threw us a bone. It turns out the AT shift cable uses a turnbuckle type connector to mate the cable end to a threaded rod, which connects to the clevis pin. I was able to unthread the connector and the cable dropped free. But, fo those of you with AT cars who need to drop the engine/trans, MAKE SURE your car is in neutral before dissassembling it! :)

AT cable showing threaded end.

20191103_161009.jpg

Shift cable cover lightly back in place with 2 bolts.

20191103_161014.jpg

A CRITICAL and potentially project-devastating step for the AT is the removal of the flywheel torque plate bolts. These are the bolts that connect the engine side plate on the flywheel to the torque converter on the transmission. There are 8 of them. You cannot separate the transmission from the engine without removing these 8 bolts. They are soft metal and easily rounded. A good 6-point socket is a MUST here. Another trick is to use a good electric impact driver. The sharp impact helps break the bolt loose without bending or twisting it and potentially snapping off the heads. The trick is that the bolts are only accessible with the gun at the left-most exposed area of the plate. I found that, using a box wrench on one of the bolts, I could rotate the engine to expose one bolt at a time. It probably would have been easier with someone rotating the engine via the crank pulley, but my method worked. Because of the orientation of the bolts, however, I had to rotate the engine in the wrong direction! Thus, if you use my method, you MUST MUST MUST check the cam alignment before starting the engine! Rotating the engine the wrong way can cause the timing belt to lose tension and skip a tooth. Here is the plate and working area. This was the scariest part of the day.

20191103_161002.jpg
 
Engine and Subframe Removal 3

After reading many threads over the years about how awful removing the 36mm axle nuts, which are torqued to 250 ft/lbs, can be (6 ft cheater bars, broken breaker bars, etc.), I went out and got this. My kids call it the "big beast".

20191103_160726.jpg

It's 3/4" drive and weighs about 10 pounds lol. Even "starved" for air with a 1/4" quick connect (it really needs a 3/8" for full effect), using a 3/4" drive socket, it LAUGHED at the axle nuts. One squeeze and they were off! We were stunned. Hopefully the crankshaft bolt will be the same. It zipped off the rusted exhaust bolts like they weren't even torqued btw. This thing is a beast!

However, we then got stuck. The LH axle did NOT want to pop out of the trans, even with [MENTION=34522]NSX_n00b[/MENTION] pulling the hub out and up. And, the axles were both welded into the hub splines with rust. A 1lb hammer and wood block did nothing. I posted about it on another thread.

20191103_161044.jpg

20191103_160908.jpg

We gave up on the axles for a moment and turned to the radiator, feeling confident that we had removed enough weight from the rear end of the car to be safe. It takes longer, but my razor blade method makes removing the old, crusted hoses so much easier. You just need to take care not to score the mating surface. I use a pick to stretch the rubber away from the nipple so that I can cut it with the razor. It works very well. I also got to use my hose clamp pliers for the first time- they are nice once you figure out how to fit them.

20191103_161345.jpg

27 years of bugs, rocks and crud. And red overspray. Isn't it cool how you can see the outline of the radiator stay?

20191103_173237.jpg

Into the bin it goes. Will be replaced with Koyorad.

ECU harness pushed through the firewall. ECU will be out for modifications to accept the Moates Demon 2 for datalogging and ECU tuning.

20191103_161205.jpg


We decided to get greedy and attempt the gas tank. The fuel pump harness came out of the cabin easily enough, but we got stuck on the "remove the hoses" part of the process. How, exactly, are you supposed to remove "the hoses" with the engine in the car? The fill tube connection is buried behind the firewall. We decided to wait until the engine was out when access was better.

20191103_161253.jpg

20191103_161308.jpg
 
Engine and Subframe Removal 4

Preparing the floor for the big day. Lots and lots of NSX parts laying around. ATR Parts, NSX Shop, etc. A Prospeed DSE-001 exhaust is wrapped up, as are the orange Alcantara door panels. And, in the big box, a 70k mile 5-speed transmission. :D While the 6-speed is simply out of reach right now financially, a used 5-speed is well within budget. I will clean, disassemble, inspect and rebuild with JDM short gears and the NSX-R differential load spring, along with new seals and anything else that is worn out. I can drive on this transmission for a long time, certainly long enough to save up the cash for a new NSX-R spec 6-speed (~$12k). :D

Still have to fab the dolly and lifting plates. Also need to tidy the workbench to make room for R&R work on the trans and disassembly of the Comptech heads so they can be shipped out for repair.

20191103_201445.jpg
 
Last edited:
Back
Top