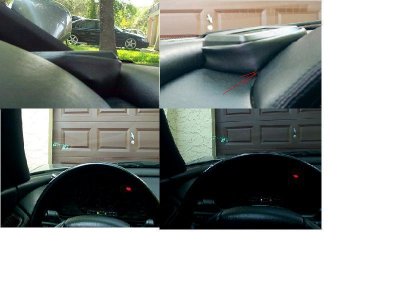
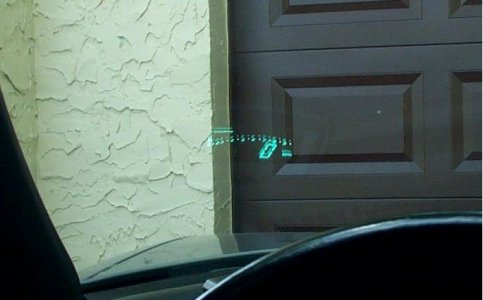
I finished my install today. I really wanted to take some digital pics of the opened up guage area, but I left my digital camera at the office. Here are some key things that I did as part of the install.....
First I found a fuse linked w/ ignition on power only and I wired both power wires to it. (The unit memorizes the hard settings so there is no need to keep all time power going to it)
In the OBDII cars, the wiring is a little different than the 91 shop manual. If you remove the two large plugs that go into the bottom of the guage cluster, you find the tach and speed wires. The tach wire is on the left side plug (closest to the dash light dimmer switch) It is green. Splice into that wire. The plug closet to the ignition key has the speed sensor wire. It is solid ORANGE (whatta pain to find this out. Much thanks to user dnicholson and his newer model shop manual pdf's )

After much debate I mounted mine in the same area/angle as donwon's. It ultimately looked the brightest there.
I tested it out and decided to not use the auto dimmer. I manually set it on the brightest setting.
I DID NOT use the tinted reflection rectangle and I could see it fine (no noticable doubling.) After fiddling with it I found 2 things that helped eliminate the doubling. 1) Put it on the brightest setting and 2) aim the unit at the window not at its brightest angle. The doubling is probably still there, but just not real visible. During Maximum sunlight, it is not as bright on the window as you see in the pictures with the tinted rectangle, however I have no problems seeing it. (the tinted rectangle isnt any big deal but it would bother me.)
Donwon confirmed that the pulse setting is 4. After I had the right speed sensor wire, it was easy to figure that one out. On the wrong settings, the speed still reads in mph but is off by like 10 to 30 mph.
As far as passing the wires through the dash, I decided to go through the area between the dash and the top part of the guage cluster (steering wheel hump.) I could not find any factory opening to push the wires through. If you look from the inside of the guage cluster area, you can see the leather pulled around tightly and stapled on the underside of this area. I knew that If I went straight down into that seam that I would not separate the leather. I took a SUPER SHARP pointed cutlery knife and pushed it down into the area where the dash and steering wheel hump leather meet. I pushed down into it along that joint making a slit 1 to 1.25 inches long. I then took a clean screw driver and opened up the slit area. It was still very tight. It was tough to push that plug through. be carefuly not to damage the plug.
Ultimately, the unit could be removed and you would never realize the dash was separated in that area.
I made a small holder out of packing foam (it was flexible) I went to the local fabric shop and purchased black vinyl (approx $4 for 1/2 yard) I have tons left. I wrapped a thin piece around the outer parts of the holder and sowed it on the bottom and around the inside edges. Came out nice. Looks similar to an extension of the dash. I could probably make it even better, but the wife's blood pressure was almost boiling at this point.....I adhered it to the dash and the inside of my custom holder with the supplied mounting tape.
Pictures are worth all these words and more. I will post some pictures tomorrow night.....


