Bilstein Stock install

Joined
11 August 2006
Messages
218
Location
Columbus, OH
Hello all. I have been searching for a DIY with pics, but I am striking out. The DIY on PRIME sounds like the install is a PITA, but others have said it's not too bad. I have airtools and such so I am confident I can do the install. Can anyone direct me to a more detailed DIY for a shock install? Pics would help too.

Thanks
Ray
 
It's not that difficult IMO. You need a spring-compressor for the front OEM, a second guy to get out the OEM-shocks and a translation book from english to whatever language you like to get known to the most common curses if you try it alone. :D
 
It's not very difficult compared to the header installation I finally completed. :wink:

The job is pretty intuitive. The hardest part for me was getting the OEM rear shocks out. It's very helpful to have someone push down on the brake rotor while you try to get the shock out. Spring compressors definitely help.
 
Make sure you find the heaviest guy on your block to help you. Having someone lighter than 150 lbs won't help much when it comes to putting weight on the rotors to get the OEM's out.

Put masking tape or blue painters tape along the wheel fenders to protect it. A very good precaution. I came very close to scratching the paint serveral times.
 
I don’t have real pics to share (I’ve had my shocks out multiple times, but forgot to take pics), but I’ll try and give a few pointers.

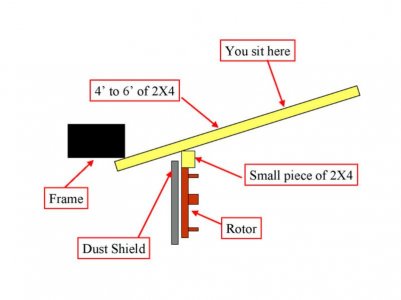
Instead of trying to track down the fattest guy on the block what you do is use leverage to your advantage. What you need is a 4’ to 6’ piece of 2X4. There happens to be a spot on the frame, both front and rear, that makes a perfect place to pry from. Stick the 2X4 under this spot and on top of the brake rotor. The dust shields are larger than the rotors and you don’t want to pry on them, so you will need a small piece of wood (maybe 4” to 8” of 2X4) to place on top of the rotor (see the sketch). Now all you have to do is sit on the 2X4 and pry. This allows you to pry (using your butt) and still work with your hands to get the shock out. It turns a supposed 2 man job into a 1 man job and it works perfectly.

Another trick is to not completely remove the 3 upper nuts that hold the shock to the frame until after you have done the prying (obviously at this point the bottom shock bolt has been removed). Only completely remove 2 of the nuts and leave the last nut hanging on by only a couple of threads. If all 3 nuts are removed, and you begin prying, the shock will follow the A-arm. The shock fits in the A-arm very tightly and it is a pain to get it out of the A-arm if the shock is no longer connected to the frame. The prying action will remove the shock from the A-arm automatically and then you can remove the last nut.

With this method I have had all 4 shocks out of the car in less than 45 minutes which included jacking the car up and removing the wheels.

Hope this helps.
attachment.php
 

Attachments

  • shock install.jpg
    shock install.jpg
    28.3 KB · Views: 4,289
I just had Bilsteins installed by my trusted mechanic. I took my wife to lunch, took a nap & watched a movie. I then picked up my NSX with new shocks.

Suggest this. :smile: :smile:
 
So far so good. Took me a while to get the first one out, but after I figured out the best place for the spring compressor, the 2nd front shock came out in 28 minutes. On to the rears.
 
Well, I finished up just a few hours ago. I will do a better detailed DIY later, but here are the main points. Big thanks to the guys in this thread and Larry who was very helpful.

1. Got left front off in about 1 1/2 hours by myself. A little trial and error but I finally got it. Once I knew the trick, the right side front was out in 28 minutes. Used a spring compressor on the fronts and used a rubber hammer to pop the bottom out of the knuckle. Would have been easier with 2 people.

2. The rear were more of a challenge. We did not have to loosen the A arm. We loosened the top 3 bolts on the OEM shock, unbolted the brake line applied the spring compressor and used the 2x4 and they popped right out.

We did remove both sway bars because I added the Type -R and Zanardi, but I suggest unbolting them anyhow to get them out of the way. Only slip up was when I grabbed a rear shock for the front and confused myself for about an hour.:biggrin:

I used the lower perch and stock springs. Car is dropped nicely and feels great. I have not pushed it very hard but I will once alligned.
 
1. Got left front off in about 1 1/2 hours by myself. A little trial and error but I finally got it. Once I knew the trick, the right side front was out in 28 minutes. Used a spring compressor on the fronts and used a rubber hammer to pop the bottom out of the knuckle. Would have been easier with 2 people.

2. The rear were more of a challenge. We did not have to loosen the A arm. We loosened the top 3 bolts on the OEM shock, unbolted the brake line applied the spring compressor and used the 2x4 and they popped right out.

I was just curious as to why you needed to use a spring compressor. At one point I tried to get a compressor on one of the springs while it was in the car just to see if I could get it to fit, but it was impossible. The compressor I had was quite large (it was the set you can borrow from Autozone). I just used the 2X4 to pry and had to finagle the shocks a bit and they came right out. Anyway, just curious.
 
I sued the compressor from Autozone. It was the external one, it comes with 2 compressors, 1 for each side. I only used one compressor on the fronts. Just enough to get the shock out of the knuckle. Used both on the back.


I was just curious as to why you needed to use a spring compressor. At one point I tried to get a compressor on one of the springs while it was in the car just to see if I could get it to fit, but it was impossible. The compressor I had was quite large (it was the set you can borrow from Autozone). I just used the 2X4 to pry and had to finagle the shocks a bit and they came right out. Anyway, just curious.
 
After 4 NSXs, and a dozen other cars, I've never used the spring compressor to get the assembly in or out. Disconnect the sway bar end link and find a fat man to stand on the rotor.

We now have a running gag, referring to a fat man as 'special tool #4'
 
I did not have tool # 4 so I had to use what I had. I agree with you, if I wouold have had a 2nd person to stand on the rotor I would have probably not needed the compressor. Now, the rears, I had 1 fat guy and a short jewish guy and we still could not get it out without the compressors.:biggrin:

After 4 NSXs, and a dozen other cars, I've never used the spring compressor to get the assembly in or out. Disconnect the sway bar end link and find a fat man to stand on the rotor.

We now have a running gag, referring to a fat man as 'special tool #4'
 
My local acura dealer quoted me $832 just for labor to change all 4. So i guess this will be on my DIY list.
 
I pulled out all 4 dampers/springs last night. Piece of cake. Unbolted all the nuts on the top EXCEPT one for each shock. Unbolted the bottom of the shock. Then I took the jack and put on the rotor and jacked it up and then released it and the a-arm came back down. Used the 2x4 method and sat on it and the shocks came out easily. I have read what a PITA it was, but really I didn't have any problems at all using the above method.
 
I installed Bilsteins about two months ago following the guidance given previously in this thread. The only real problem I encountered was that the original lower shock mounts fit so tightly in the lower suspension arms that pressing down on a suspension arm just elongates the shock rather than releasing it from the suspension arm. Find a way to keep the shock from "stretching" and removal of the old shocks and installation of the Bilsteins is a pretty simple DIY job if you have the necessary tools, IMO.
 
Last edited:
Now, the rears, I had 1 fat guy and a short jewish guy and we still could not get it out without the compressors.:biggrin:

LOL:smile:
 
Back
Top