ABS conversion

The only differance so far is shorter reaction time. The unit pumps much faster allowing u to stop faster without skidding or having the wheels lockup.

So, what you are saying is that with the new ABS-unit your braking distance IS shorter than before. AND it also performs better on uneven road surfaces :smile:
 
Last edited:
So, what you are saying is that with the new ABS-unit your braking system IS shorter than before. AND it also performs better on uneven road surfaces :smile:

Yes
 
Thats great news, cause, really, the original unit for me is a POS.
I will one day have to do this update.
Trev
We need someone to do a group buy with a complete kit, Done!
 
How long did you wait till all the parts arrived at your door? Which took longest?
 
You didn't ask me, but I got all but one of the parts in about 4 weeks. The one I'm still waiting on is the long line (they call pipe) the goes over to the passenger wheel. I'm fabricating a new bracket now that will save another two pounds and took back three of the brackets. When they converted, instead of making one new bracket, they used the large Nissin alum casting from the early model (it's acually minutely different) and made two new STEEL brackets to hold the module and the proportioning valve. Kind of tachy, I'll bet their budget on the late car changes was real tight or something. I've been waiting on the SOS harness for some time that was supposed to be in stock. Chris??? I'll post about the bracket when I get it done, but unless you do your own fabrication and welding, the bracket would cost probably $500 or so. I think the weight savings might be a little higher than we were anticipating even with old mount. The cost effective way would be to buy all the new parts, and then skeletonize them if you have the skills.
 
I tought on the NSX you can turn off ABS? Im not much of an ABS fan anyways. My 92 honda civic hatch VX with no ABS is much more of a fun drive then my 92 honda accord with ABS.
 
Re: ABS conversion wiring & more

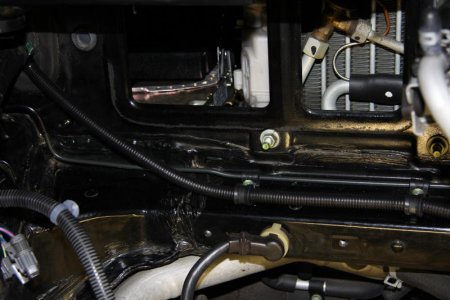
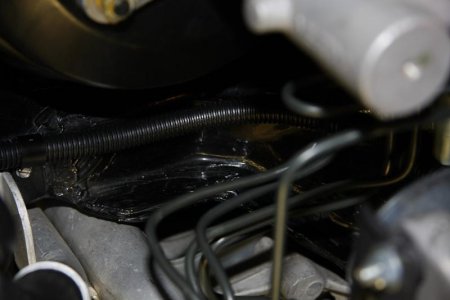
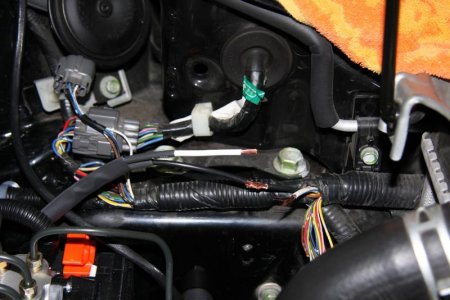
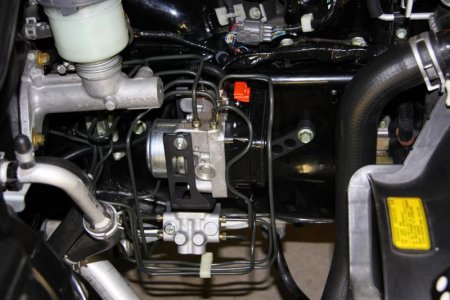
Did the ABS conversion recently. Assuming 20% off, It's going to cost around $1600, you will drop just under 15# total. It will give you considerably faster "cycle" times, meaning it reacts to the road surface quicker and resets quicker. Since I also put on new tires at the same time, I'm not willing to fully test this setup just yet, but I did give it a couple of 40 mph grass runs. It was involving more of the wheels instead of having on or two wheels seeming to go out much sooner that others. This should result in less yawing action. I like that a lot. And I LOVE the simplicity of the new unit, it works in the active braking system and does not have it's own separate hydraulics, so less maintenance. That alone is worth half the cost IMO. If you already have decided to do this, the following may be of interest in addition to the SOS installation instructions that comes with their harness: Pull the heater assembly for better access. It's gasket may cause it to stick to the bulkhead, so be careful when you break it loose. Once it's loose you pull it to the passenger side to get it free. The worst part of the install is replacing both front brake lines to the calipers. You will have to unbend the sharp hook bend at the caliper end of each of these lines, and you will have to bend the passenger line in the middle quite a bit to get it behind the AC lines. I tested one of the old lines and these lines do not work harden quickly so you can bend and rebend as needed. I have attached a couple of pictures of the wire harness route and how I fastened the harness with hardware store cable clamps. I did wire the harness considerably simpler than SOS instructions show. I removed all the orange connectors and their bracket in front of where the old unit was (ahh-glorious weight reduction). I just cut the whole bunch of wires to the connectors about 6 inches from the main harness. I then found the only two large wires, one white and one black. These are the pump power wires that are needed to be reconnected to the new harness. You can see in the picture that I have one connected and getting ready to solder the other. Make sure you use shrink wrap around the connections. You can then just cut all the other old wires back to the main harness and tape up. Very clean and looks factory. I'm very happy with the conversion. You may notice the funny module bracket I fabricated to save a couple more pounds (see prior post if interested), but frankly it is probably way too much work for most, so you will need to use the large lower bracket from your old unit, so don't sell it! I could probably do this job a second time in a very long day, but I would allow several days for this job. It is a bit confusing the first time. Frankly I don't think I'd trust a dealership to do this. PM me for any more details. Vendors feel free to furnish this is desired.
 

Attachments

  • IMG_0175.jpg
    IMG_0175.jpg
    59.2 KB · Views: 160
  • IMG_0177.jpg
    IMG_0177.jpg
    34.8 KB · Views: 142
  • IMG_0179.jpg
    IMG_0179.jpg
    62 KB · Views: 155
  • IMG_0180.jpg
    IMG_0180.jpg
    62.9 KB · Views: 172
Larry,
Glad to see your project done. Just in time for the snow to melt and get the old girl on the road. Sure looks nice and clean. Great JOB!!!
Brad
 
Thanks for the write-up.

How does the ABS light behave in the dash-board? Does it light up while starting the engine and then lights off?
 
I have a complete 2000 nsx abs unit w/all hardware and connector from a wreck vehicle. My vehicle is a 1991. Can the new abs connector be splice into the old module connector? If so any help, would be appreciated.

Danny
 
I have a complete 2000 nsx abs unit w/all hardware and connector from a wreck vehicle. My vehicle is a 1991. Can the new abs connector be splice into the old module connector? If so any help, would be appreciated.

Danny
Ya know I really didn't get into the wiring diagrams at all because I didn't have to. There are a lot of wires in this new harness from the unit to it's ECU (the damn thing weighs 3/4#), I would be scared of burning up some wiring in a main harness. Having said that if we didn't have the harness available, I'd do it myself :eek: Since we do, I'd just pay the money and be VERY happy that a Honda person designed this for us.
 
Re: ABS conversion wiring & more

If you already have decided to do this, the following may be of interest in addition to the SOS installation instructions that comes with their harness: Pull the heater assembly for better access.
Tks Tanto .. great advice .. I just did this conversion in the last week and your advice made it much easier access to work with the firewall grommet
The worst part of the install is replacing both front brake lines to the calipers.
Actually, I'm not convinced it was the worst part but it's right up there. In fact, after doing the front left line, I had a long hard look at whether I couldn't just re-bend the right line to reach .. and it wasn't that hard to do. But in retrospect I don't think I could have re-bent the left one. My other candidate for "worst part" would be the removal of the cradle that holds the old ABS computer .. way too many other electrical plugs to disconnect in a space half the size it needs to be.
I did wire the harness considerably simpler than SOS instructions show.
I just used those crushable (STAKON?) connectors that already have an insulated coating on them and then used electrical tape to finish up. But on the topic of the harness, the SOS instructions say to install the harness first and one of the first steps is to locate the pump power connector. It must have taken me a least a half an hour to find it because the picture they supply is of all the other connectors. I decided to do the harness after swapping the ABS hardware and then all the connectors were much more obvious and easy to deal with.
I could probably do this job a second time in a very long day, but I would allow several days for this job. It is a bit confusing the first time.
You've got to be kidding! I'm no mechanic but I'm pretty handy and have a reasonable selection of tools but it took me 3 elapsed days although I wasn't working on it full time. I think it took me about 12 hours just to disassembly the glove box and remove the old abs computer; run the wiring harness (including removing and replacing the blower); replace the abs bracket and make the connections; re-assemble the glove box; bleed the brakes; and fix a leak in one of the ABS hard lines (I hadn't tightened it enough). When I first read the SOS instructions that say something to the effect of "remove the cradle that holds the old ABS computer and other electronic assemblies", it sounded like much more of a cake-walk than it turned out to be. To their credit, they supply everything (parts) in the kit that you'll need; everything fit first time; and they do have pictures with the instructions that did help.

This actually brings up a strong recommendation I have .. when buying the flare nut wrench for the brake line connections (10 mm BTW), try to get one that has a joint at one end. Once you start getting the lines installed, there is virtually no room to work on some of them (because of the brake cylinder and all the bends) and I'm not sure I could have done it without a flexible flare nut wrench.

A couple of times when I started to get frustrated with things, I thought "this definitely isn't for the average 'do-it-yourselfer' but looking back, I think that with some revisions to the SOS instructions .. and advice from yourself and others .. plus a shop manual is an advantage as well .. I think it probably could qualify as a DIY project as long as this isn't your first trip under the hood and you are methodical and don't frustrate easily. And if I'm any example, you're going to wind up with lots of brake fluid on your garage floor so try to take precautions.
 
Back
Top