99 MCB "Reimagined"

2023 ended not so well for me. Got sick and had to go to the ER. Spent all of December recovering so didn't have time to work on the car. Now that I've recovered a bit, of course the first thing I did was unbox my wheels and put them on for a test fit.

My first impressions... it looks just like the Type S cars I use to watch on Best Motoring, love the look. It does need to be lowered a bit to reduce the huge gap from the fender.

The wheels came with Good Year RevSpec RS-02 tires, I think they are Japan specific summer tires, decent reviews so I'll run with these for now. Tread wear is 200, so when they are exhausted I'll get a set of Potenzas.

Order new black OEM lug nuts to go with the wheels. Also looking into getting OEM "H" center caps to match.

Wheel well was really dirty but I had to hold back on cleaning it because it was getting late. I'll do a deep clean when I have more time to get it spotless.

Next things on the list to install:

NSXR Chassis Braces upper and lower
NSXR 02 front sway bar
NSXR 02 shift knob and shift boot
Zanardi short shifter

The hard decision now is which suspension set up to go with??? OEM 02 NSXR or aftermarket KW/Ohlins/Endless???

1704507738587.png1704507770765.png1704507787466.png
1704507800783.png1704507814629.png
 
You'll need the LHD NSX-R shift lever from Mita to use the R knob. The R knob has male threads sticking out, unlike every other Honda knob including the Zanardi/Type S which have female threads.
I got the 02R knob which works with LHD shift levers, just screws down. Just need the Zanardi lever to thread it down lower. 91R shift lever won’t work on LHD, like you said. It uses a male thread into the lever.
 
2023 ended not so well for me. Got sick and had to go to the ER. Spent all of December recovering so didn't have time to work on the car. Now that I've recovered a bit, of course the first thing I did was unbox my wheels and put them on for a test fit.

My first impressions... it looks just like the Type S cars I use to watch on Best Motoring, love the look. It does need to be lowered a bit to reduce the huge gap from the fender.

The wheels came with Good Year RevSpec RS-02 tires, I think they are Japan specific summer tires, decent reviews so I'll run with these for now. Tread wear is 200, so when they are exhausted I'll get a set of Potenzas.

Order new black OEM lug nuts to go with the wheels. Also looking into getting OEM "H" center caps to match.

Wheel well was really dirty but I had to hold back on cleaning it because it was getting late. I'll do a deep clean when I have more time to get it spotless.

Next things on the list to install:

NSXR Chassis Braces upper and lower
NSXR 02 front sway bar
NSXR 02 shift knob and shift boot
Zanardi short shifter

The hard decision now is which suspension set up to go with??? OEM 02 NSXR or aftermarket KW/Ohlins/Endless???

View attachment 187032View attachment 187033View attachment 187034
View attachment 187035View attachment 187036
Ahhh, you are so fortunate to be able to find those BBS wheels - I wish I had your connections in Japan!

Good luck with your project, will be following this thread!
 
Seriously good looking build right here. Always hated the fact the Zanardi was only available in red.
 
I had a free day on Friday to work on my car, it ending up turning into a full weekend project. You can say one thing lead to another on this one.

My original plan was to install my NSXR upper and lower chassis braces and call it a day but then my NSXR sway bar arrived from ICP Motorsports so I figure I'd put that on as well.
1705554517815.png
1705554565566.png
1705554597035.png

After removing the front bumper, I saw that the car was really dirty from all the years of build up. I spend a lot of time just clean and wiping things down, prob more time on this than actually installing the chassis bars. The undercarriage is in similar condition, so dry ice blasting is definitely on my wish list.

1705554773193.png

After my initial wipe down and cleaning. Almost every 8mm clip was broken when remove, they were all dried up and frail.
Thank goodness for Prime, order some on Amazon and they were pretty good quality.

1705554856091.png

Upper bar was pretty easy to install once I had everything off the car.

1705555032360.png

Lower bar was just as easy to install, two bolts and I was done. The front sway bar however, was a bit of a challenge getting the bar out. I had to really lower the batter support tray using a jack as a support to get the bar out.

1705555580019.png1705555603589.png 1705555617449.png

Before I put everything back, I cleaned the bumper support and drained all the old water from the wiper reservoir tank. Found the area where the bumper was repaired, the previous owner said that he was in a minor parking lot accident where someone backed into the car. No frame damage and the bumper wasn't replaced - I may replace it myself just because I hate damaged parts - call it OCD. But at least I confirmed that it wasn't anything serious.

You can't tell from the exterior.

1705555846805.png1705555856260.png1705555871244.png
 
Well my one day project turned into an all weekend project.

Picked up a set of used Tein RA coilovers from Shad, he said they only had a few hundred miles on it and the owner swapped them for CT coilovers because it was too firm for his liking.

1705556079650.png1705556091067.png

I've removed my suspension off my previous NSXs before but never had this much trouble. I ended up picking up a set of smaller spring claps from AutoZone to help me get them out. They were really dirty but seemed to work fine still. The Tein RA will hold me over until I decide on suspension set up. I set the fronts to be 25 1/4 inch from ground to fender, and the rears to be 26 1/4.

I know this may not be the right way to measure the proper ride height, but I've been doing this for years and it works for me.

1705556349608.png1705556368991.png


I had some time today to take it out for a proper test drive. My roads here are smooth so they performed great, a lot more responsive in the front end, corners flatter, and feels lighter in the steering - maybe it was going from 17 inch rims to 16 inch rims??? Unsprung suspension weight? I know the Tein RA are a lot lighter due to the aluminum construction - forgot to weight them but I read it's over 26lbs lighter than the OEM suspension so I'll just go with that. The ride height looks pretty dead on, maybe a tad bit lower.

Still need to get this aligned
1705556381685.png

Weight reduction tally:
Tein RA -26lbs
NSXR chassis braces +4lbs
NSXR front swaybar +2lbs
BBS Wheels ??? will update once I know
 
Just want to say I really love this build and your philosophy. You are doing it the right way and have a heck of a NSX there.
 
I got the 02R knob which works with LHD shift levers, just screws down. Just need the Zanardi lever to thread it down lower. 91R shift lever won’t work on LHD, like you said. It uses a male thread into the lever.
Until we made our shift lever. Now it can be used on LHD.
 
I had some time today to take it out for a proper test drive. My roads here are smooth so they performed great, a lot more responsive in the front end, corners flatter, and feels lighter in the steering - maybe it was going from 17 inch rims to 16 inch rims??? Unsprung suspension weight? I know the Tein RA are a lot lighter due to the aluminum construction - forgot to weight them but I read it's over 26lbs lighter than the OEM suspension so I'll just go with that. The ride height looks pretty dead on, maybe a tad bit lower.

Nicely done and looks great! What you're feeling in corners is definitely a combo of everything - coilovers, R front sway, R chassis bars, reduced unsprung weight from the S wheels and possibly even the tire compound. For me, doing these things in sequence all resulted in incremental positive changes each time, so I imagine loading them all on the car at once is a dramatic difference. I'd go a little lower personally, but that's the SoCal NSX owner in me talking :D
 
Quick installation done on the Zanardi shifter with 02R shift know and shift boot.

Everything was pretty easy to install, got myself some Honda Urea grease from my local dealer.
Total install took about and hour and half, took my time cleaning each part before reassembling them, I did miss the little ball bearing that goes in the small black plastic clip, so I'll have to order it and reassemble once I get it.

Shifter does feel smoother and the shift knob does sit lower, as far as short throw - I don't notice it as much as the original one had a short throw already. Overall happy with the mod.


1706402381597.jpeg
1706402414863.jpeg1706402423986.jpeg1706402430347.jpeg1706402435960.jpeg

I went a bit ape crazy this week and ordered a ton of parts from Japan.
Here's the list below:

02R rotors front and rear
02R steering wheel
02R glove box cover
NSXR gauges
NSXR radio delete plate - matte black
Full red interior carpet kit
JDM darker tail light set with 92R center lens
JDM darker spoiler lens
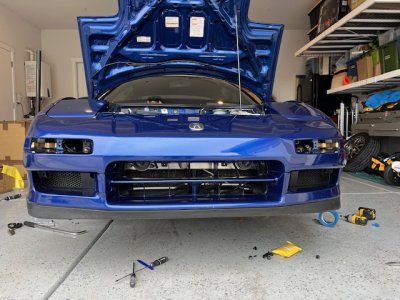
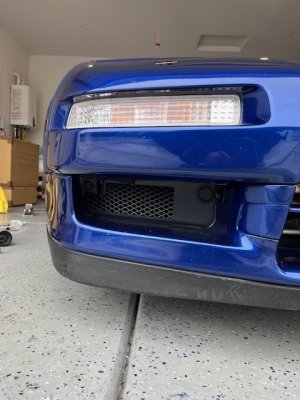
R front bumper grill and side vent grill
NSXR maintenance lid
KSP NSXR Black Carbon Kevlar seats
Rear hatch molding set


Weight reduction tally:

Spare Tire/bracket -32
Engine Cover -25?
Radio -5
Speakers/sub -10
CD Changer -5
Wipers -3
Tein RA -26lbs
NSXR chassis braces +4lbs
NSXR front sway bar +2lbs
BBS Wheels -8lbs
Comptech exhaust -20lbs
Comptech headers ???

Total -128lbs total
 
Lookin’ good - can’t tell from your pictures, but as you have deleted the front fog lights, have you ordered the stone shields that fill the two holes in the lower bumper in front of the aircon radiators? I thought I had the part number to hand, but can’t find it right now.
 
Lookin’ good - can’t tell from your pictures, but as you have deleted the front fog lights, have you ordered the stone shields that fill the two holes in the lower bumper in front of the aircon radiators? I thought I had the part number to hand, but can’t find it right now.

Yes, I have that on order along with the mesh for the side intake.
 
Some notes of your recent purchase

Glove box cover will not fit LHD.
KSP seats, you'll be quite disappointed in them if you don't fix it up.

How about you let ship my seats to you and be your first customer to mod the KSP seats? I can be your demo car for the US.

I was probably one of the first guys to order parts with Marc before MITA was established, so have always supported you guys.
 
The NSXR grills where a straight forward install. I removed the bumper to access the back of the bumper to insert the grill into the slots in the bumper.
IMG_3146.jpg

I had to remove these clips so that the grill would fit into the slots
IMG_3151.jpg

There are two screw in the front the bumper that secure the grill
IMG_3148.jpg

Completed the install wasn't that hard. OEM quality never fails, grills are made well and the mesh looks like it was welded on.

IMG_3155.jpg

Didn't have time to install the rear hatch trim and side grills, that's for another weekend.

also got these in...

Complete New JDM tail light kit - with spoiler LED, gaskets, trims, screws, bulbs, nuts

1708489064615.png

Someone took this shot and sent to it to me on IG...
CCA112CE-06CB-48D2-B6A3-4776339A5057.JPG
1708489161830.png1708489183881.png
 

Attachments

  • IMG_3150.jpg
    IMG_3150.jpg
    218.3 KB · Views: 19
  • IMG_3154.jpg
    IMG_3154.jpg
    64.7 KB · Views: 16
I want those NSXR front bumper mesh grills, just don't feel like taking off the bumper to install them.

Car is looking unreal! OEM Plus FTW
 
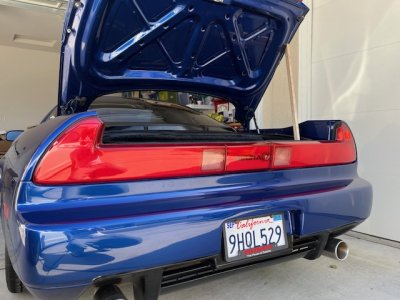
Quick update. Had a chance to get the JDM tail lights installed and course I had to clean all the dirt and dust off as well. This was fairly straight forward, you do have to finesse the top rubber gasket in so it won't separate from the lights, I used some soapy solution to make it easy to push in.

I also slowly compressed the gaskets and didn't tighten them all the way per some advice from other Prime members, went back a day or so later to tighten them all up. All new OEM bulbs replaced.

Also went back and forth between the NA1R black "H" and the Type S silver "H" - decided on the R piece.
IMG_3257.jpgIMG_3258.jpgIMG_3259.jpgIMG_3260.jpgIMG_3261.jpgIMG_3262.jpgIMG_3263.jpgIMG_3264.jpgIMG_3265.jpg

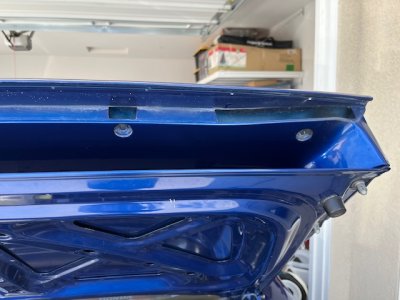
Rear JDM spoiler light installed as well
IMG_3266.jpgIMG_3267.jpgIMG_3269.jpgIMG_3284.jpg31A66094-41CD-44CB-B8A8-4B47D80AAD94.JPG

One step closer to looking like a true JDM NSX.

Got word from KSP that my seats are complete, shipping out next week. Super excited to see them, probably gonna redo the cushions.
 

Attachments

  • IMG_3268.jpg
    IMG_3268.jpg
    103.4 KB · Views: 8
  • IMG_3256.jpg
    IMG_3256.jpg
    184.2 KB · Views: 8
Last edited:
Back
Top