Your screen-name - is that "Smile" Doc i.e. Dentist?
Or am I way off? Maybe you're a Psychiatrist!
Thanks for the comps & flattered to have you seek suggestions for your application.
Actually much easier install there from physical perspective, at least re cable runs; my concern is typically one of theft invitation, but that's not necessarily a major concern depending on personal circumstances ( and still
reasonably unobtrusive behind the seat.)
You can hook up the power by the same method, but instead of going "South" through the
rear engine firewall to trunk, you'll find another feed-through grommet (major harness!) coming through the front engine firewall into the driver's side bulkhead. You still need to remove the air-box to gain access to this feedthrough. One "complication" to get to that, is to remove the panels on the left (right as you look towards the rear) i.e. driver's side.
You need to remove the gas release lever & the rear hatch lever handles to enable the removal of the left-rear trim panel. The prior handle is easy, just lift & pry it forward - interference fit on the lever shaft.
The hatch lever handle is not so straight-forward if you haven't done it before (much easier in retrospect after achieving first time!) You need to pry the lever away from the panel with a flat screw-driver or similar, then use some needle-nose pliers to pull off a small retaining clip behind the lever. There's not much space to access the clip so you need to create the space with the leverage action between panel & lever.
Refer to this diagram (clickable link)

To feed through the power cable, it's easier to first "fish" through a smaller gauge solid copper wire (or coat-hanger) from the engine side, then attach the power cable & pull it through. It's a little more congested in that area & you are working a little "blind" on the interior side, but the "fish" will help immensely.
You should be able to find on that rear bulk-head a number of existing ground points (without any drilling required) to which to connect your power-ground wire.
For the RCA & speaker wires of course, you have much shorter run & no need to mess with pulling through the engine compartment! (or removing the right side panels at all). I would probably use a shorter RCA cable - the one supplied is awfully long for your requirement. 2m (~ 6.5') I would think adequate.
Now - that just leaves mounting the amp.
If you refer to
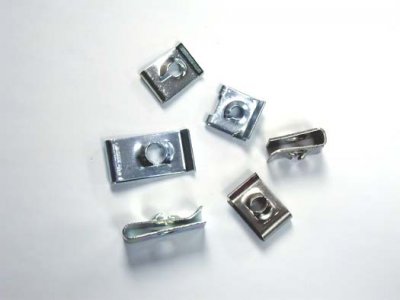
Random Harmony's new tunes thread, you can see that I mounted his directly on the trim panel - this is just screwed straight through the panel with some speed clips - U nuts- on the rear-side to hold the screws secure. The panel then just snapped on as regular with the OE clips. One concern with this might be is if it was broken into, it would not take any effort to steal this. My general opinion on this is moot, as if it is more securely fastened, it just creates more damage in the process of ripping it out anyway! (If they want it they'll take it regardless)
The other
perhaps more valid concern with the larger (heavier) Diamond amps is whether the weight can be supported by the plastic clips if the amp were only fastened to the panel? It
might be adequate, just not sure how secure it would be - the plastic clips certainly snap pretty tight - I would be loath to out & out recommend without being able to test it out personally . But in RH's case it was really quite secure physically - I think it may still work quite adequately even with heavier Diamond amp.
One problem in that area is there's not much to screw into there.
As alternative thought, I might suggest making a dummy panel of 1/4" or 3/8"" MDF or plywood covered with vinyl (to use instead of the OEM trim panel - even 1/4" is going to be substantially more robust than the OEM hard-board piece); put some speed clip U-nuts over the original holes tat the plastic clips would engage & screw directly into those through (marginally) clearance holes through the MDF which mimic the locations of the original corresponding clip holes.
Then mount the amp by screwing directly through the vinyl into the wood with a wood screw.
Ideally you could access the screws securing the panel to the clips - to remove as one complete assembly (amp/panel) ideally if required - but it all depends on how these holes compare to the mounting holes of the amp as to whether directly accessible.
Hope this is somewhat helpful.

p.s.Here's pic of "U-nut"s - I know what they are when I look for them in the hardware store, but the nomenclature is not something readily obvious!
They work by slipping over an existing panel and tightening against it. They can also be used simply & practically on the back-side of the OEM trim panel without actually being held captive, as they would in "normal" application - like across the captive hole for the OEM clips on the bulkhead as described above, or in my trunk amp-mount application, across a bracket.
.


