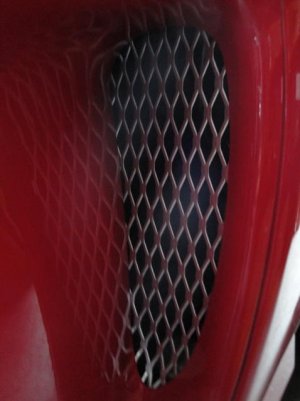
I think I remember someone installing homemade mesh screens (Zanardi?) on the side vents. Anybody remeber who? I was going to try and duplicate the type R hood mesh for the side vents, thought if someone had already done it I wouldn't have to reinvent the "wheel" Gracias!
Side vent mesh vs. OEM slats
- Thread starter Bodhi
- Start date
From the FAQ: Mesh "Zanardi NSX Style" Side Air Intakes
Durr! I guess I missed that, thanks! :redface:
The mesh looks way cool. I think the slats look pretty dated and a little cheap, personally.
- Joined
- 22 May 2007
- Messages
- 115
WIKI needs to be updated with the wrench size. A 22mm is the best fit. Go to the local hardware store before you begin and purchase a $5 wrench and cut in half or to about 3 inches. I promise this will save you time and your sanity.
Damn, I gotta find me a pair of the oem mesh sides. I wonder who carries them?
Damn, I gotta find me a pair of the oem mesh sides. I wonder who carries them?
I thought all of the 02+ cars came with the mesh sides?
I have been looking for the right light gauge diamond expanded metal mesh and can't find anything close to the OEM mesh. Ideally it would be stainless, not aluminum.
Does anyone know of a source for the mesh? Perhaps we could do a "group buy" since each car would require such a small quantity. I'd also like to add it to my front (radiator) area.
Does anyone know of a source for the mesh? Perhaps we could do a "group buy" since each car would require such a small quantity. I'd also like to add it to my front (radiator) area.
I thought all of the 02+ cars came with the mesh sides?
DOH!! You're right. For some reason, I thought I had a different type of mesh. I just looked and it's the same one.:biggrin:
I have been looking for the right light gauge diamond expanded metal mesh and can't find anything close to the OEM mesh. Ideally it would be stainless, not aluminum.
Does anyone know of a source for the mesh? Perhaps we could do a "group buy" since each car would require such a small quantity. I'd also like to add it to my front (radiator) area.
Steven,
Try here www.mcmaster.com . They have the mesh in stainless as well as aluminum.
Osiris_x11
Gold Member, Moderator: Marketplace
go w/ plastic/urethane...
If you plan to paint/refinish the galvanized-steel hex-style mesh to a matte-black color, a better/easier alternative would be...
MESH GUTTER GUARD (Harbor Freight)
~$3.99 for 6.5" x 20' roll, black urethane hex-style mesh
* much easier to cut/handle (no sharp edges)
* won't chip, corrode, or need painting/repainting ever
* use the extra for the front-bumper valance openings (protect A/C condensors & radiator)
Re: go w/ plastic/urethane...
This looks like a great option. The polyethylene/polypropylene compound is consistent with the OEM 02+ front bumper mesh and won't chip. It's going to be more flexible than any metal/aluminum option as well and as Osiris pointed out safer to work with as well.
Also, the minumum required for a color change is going to be a powder-coat. I've seen people paint this stuff with 10 layers of paint and 5 layers of protectant on top of that and they still chip. I've also seen powder-coated versions chip after time. This black polyethylene/polypropylene is just what the doctor ordered.
If you plan to paint/refinish the galvanized-steel hex-style mesh to a matte-black color, a better/easier alternative would be...
MESH GUTTER GUARD (Harbor Freight)
~$3.99 for 6.5" x 20' roll, black urethane hex-style mesh
* much easier to cut/handle (no sharp edges)
* won't chip, corrode, or need painting/repainting ever
* use the extra for the front-bumper valance openings (protect A/C condensors & radiator)
This looks like a great option. The polyethylene/polypropylene compound is consistent with the OEM 02+ front bumper mesh and won't chip. It's going to be more flexible than any metal/aluminum option as well and as Osiris pointed out safer to work with as well.
Also, the minumum required for a color change is going to be a powder-coat. I've seen people paint this stuff with 10 layers of paint and 5 layers of protectant on top of that and they still chip. I've also seen powder-coated versions chip after time. This black polyethylene/polypropylene is just what the doctor ordered.
Re: go w/ plastic/urethane...
I believe the 02+ OEM front bumper mesh is aluminum. It dents when impacted by rocks which you can push back out. Also it does chip, looking like bare aluminum.
This looks like a great option. The polyethylene/polypropylene compound is consistent with the OEM 02+ front bumper mesh and won't chip. It's going to be more flexible than any metal/aluminum option as well and as Osiris pointed out safer to work with as well.
I believe the 02+ OEM front bumper mesh is aluminum. It dents when impacted by rocks which you can push back out. Also it does chip, looking like bare aluminum.
Re: go w/ plastic/urethane...
It appears you are correct. This is a very poor design. Not sure why Honda would put an aluminum mesh so easily dented/chipped under the bumper. The plastic is a much better option.
I believe the 02+ OEM front bumper mesh is aluminum. It dents when impacted by rocks which you can push back out. Also it does chip, looking like bare aluminum.
It appears you are correct. This is a very poor design. Not sure why Honda would put an aluminum mesh so easily dented/chipped under the bumper.
Re: go w/ plastic/urethane...
Those guys are a lot smarter than me but here's my guess :smile:.
Any impact hard enough to dent the aluminum could conceivably tear through the plastic and damage the radiator. You would also have to remove the front bumper to repair the mesh.
The OEM mesh is bent in a Z pattern. It is mounted only at the tip of each horizontal portion of the Z. The vertical part (that you see) is basically "floating" since there are no mounting points. Using plastic in the same design would require vertical support to keep it from being flimsy or warping out of shape.
Maybe they needed another .0001% of aluminum on the car to call it "All Aluminum" :biggrin: .
It appears you are correct. This is a very poor design. Not sure why Honda would put an aluminum mesh so easily dented/chipped under the bumper.The plastic is a much better option.
Those guys are a lot smarter than me but here's my guess :smile:.
Any impact hard enough to dent the aluminum could conceivably tear through the plastic and damage the radiator. You would also have to remove the front bumper to repair the mesh.
The OEM mesh is bent in a Z pattern. It is mounted only at the tip of each horizontal portion of the Z. The vertical part (that you see) is basically "floating" since there are no mounting points. Using plastic in the same design would require vertical support to keep it from being flimsy or warping out of shape.
Maybe they needed another .0001% of aluminum on the car to call it "All Aluminum" :biggrin: .
Last night I removed the left side air scoop vent to install the mesh. I don't know if this works for everyone, but try this before attempting the wrench.
With the right hand on the bottom nut, with the left hand I pushed on the outside where the stud bolt was to relieve pressure on the nut, it easily turned and came off. I maneuvered to the top nut, applied pressure from the outside and it also came off.
When I reinstalled the nut, I found that you could tighten only to a certain point, and again pushing from the outside (and the fit wasn't flush yet) pushed on the outside and continued to tighten the nut. For me at least this was the easiest method to removing the nut.
I'm not an engineer. Knowing this was a tight fit and getting a wrench into that area would be difficult and based on the shape of the nut, this may be the intended removal method.
If you are using a metal mesh, ensure the edges are ground down and/or bent down the best you can. As the vent is reinstalled, if there are sharp edges and you have your arm back in there, you don't want any exposed edges cutting your skin as you put the nuts back on.
shawn110975
Suspended
Yea when i took mine off i couldnt get anything in there to turn it,, I got mad!! and pressed hard enough on one side of the nut and it came free!! then the other one you gotta wiggle your hand up in there,, yikes what a Pain!
I thought all of the 02+ cars came with the mesh sides?
No only the Zanardi, 2003 to 2005 has mesh side vents.
Last edited:
I haven't got around to replacing the side vents yet.
Budget-Gutter mesh painted Black

Stimulus-Zanardi,04-05.

I decided to buy the OEM part, looks alot better.
Part numbers
74472-SL0-J00
74482-SL0-J00
Budget-Gutter mesh painted Black
Stimulus-Zanardi,04-05.
I decided to buy the OEM part, looks alot better.
Part numbers
74472-SL0-J00
74482-SL0-J00
Follow up to yesterday's post.
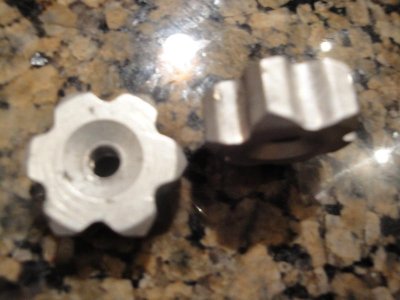
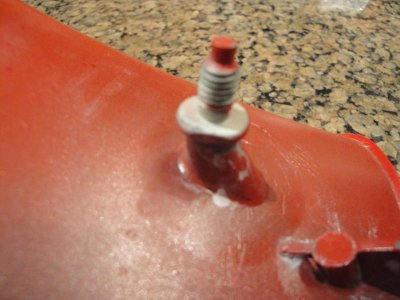
One photo shows the two nuts that need removing. It doesn't look like these nuts were made to fit a wrench, but were made large for the hand tool. Another photo shows the stud the nuts attach to.
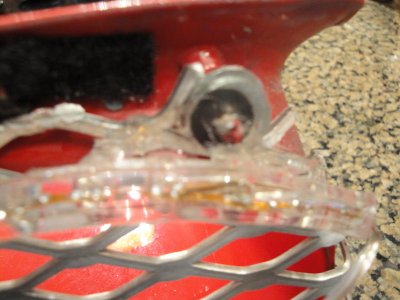
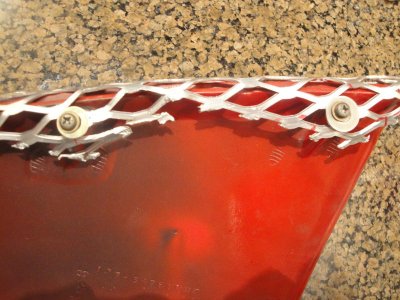
There are 4 screws attaching the inserted slat piece to the scoop plate. I complely removed the slats and formed the mesh over the openings. I then used a slighter larger washer and used the four available screws to attach the mesh to the scoop plate. As some one posted earlier, this increases the opening volume for more air flow.
I didn't take a finished photo yet but will add it later.
Attachments
I did this mod a few years back as it blends in very nicely with the mesh that is in the scoop on the WW side skirts.
Why not just cut a paper pattern of the vent, precut a piece of whatever material you're using and slip it over the slats from the outside. You could then fasten it to the slats with a small ziptie or wire. If the edges bothered you, you could surround it with slit small black rubber tubing. 
I prefer the honeycomb vents better like the Gallardo.
I bought mine from a metal supply store called Industrial Metal Supply (IMS).
I bought mine from a metal supply store called Industrial Metal Supply (IMS).
I prefer the honeycomb vents better like the Gallardo.
I bought mine from a metal supply store called Industrial Metal Supply (IMS).
U know, stock Pontiac GTO's for example, have honeycomb grills.
I wonder what they would look like inverted on the NSX side.

Similar threads
- Replies
- 3
- Views
- 256
- Replies
- 18
- Views
- 3K
- Replies
- 25
- Views
- 717
- Replies
- 1
- Views
- 146


