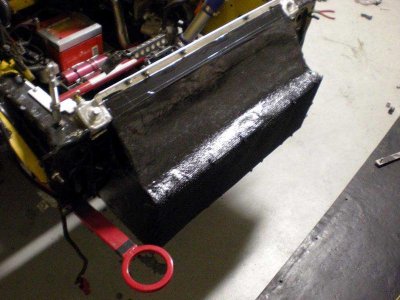
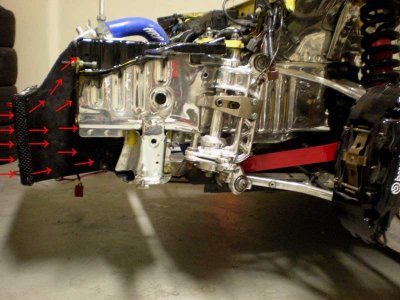
I thought I would share some pictures of the new radiator box I made this week. I realize a lot of you have aftermarket front bumpers in hotter climates than mine (often with no box or even the stock plastic shroud) and no off the shelf boxes are available. It's a pretty easy shape, and a great aero item for DIY.
A quick primer on boxes.
Unless your new aftermarket front bumper looks like a Mac Truck, chances are good that the cooling inlet on your front bumper is far smaller than the surface area of your radiator. Their is a great reason for this. The more exposed duct area, the more overall drag and higher aerodynamic penalty. On many types of race cars it becomes a balance between aerodynamic drag, cooling efficiency, and even frontal downforce.
Enter the radiator box...
The primary objectives of a radiator box in a nutshell is to 1) force all the incoming air stream through the radiator 2) ensure that air is equally distributed across the surface area of the radiator and 3) straighten or direct the air before it enters the radiator for maximum cooling efficiency.
The better your box does these three things, in general the better it is.
JMS Racing RadBox V1.0
As you can see below- my version 1.0 from last year (just a nothing-special basic box) satisfied the first requirement well- it at least channeled all the air into the radiator.
Lightweight at a couple of pounds, yet sufficiently rigid for the chore it did the job. It took me less than an hour or two to slap together out of fiberglass, aluminum, and blind rivets.. cheap prototype fashioned from cardboard templates. I made a couple of them that varied slightly in design and used this one for a few track days:

Shown Above: My old radiator box design from 2006. Note the sharp angle of the top edge and the fact that the core sits behind the frame rail caps.
Advanced Primer: On the road to a better rad box design
Setting a higher bar in a club sports performance context, let's satisfy the last 2 criteria far better than the first one did [without pulling out the computational fluid dynamics plug-in for CATIA].
Here is all you need to know.
Air is like water, in that it "attaches" to surfaces. As you can see in the picture above... my last one had a steep angle sloping from the top of the inlet up toward the top of the radiator. I did some research, and the problem with this design decision is actually pretty significant in principle.
It results in the air instantly detaching at the sharp edge; thus only using a small portion of the total available surface area of the radiator is utilized. In layman's terms- the air just keeps on going in a straight line and into the lower half of the radiator.
Further, what little makes it up to the top creates turbulent circular flow patterns as the air is at the wrong angle to penetrate the top rows of fins and thus tends to stall and stagnate. Not as visible, the floor of the box directed air toward the lower core support bar which tends to get in the way.
As it turns out, a bad design like this with too many compromises will penalize drag, cooling efficiency, and frontal downforce (bad all around). At worst, take that nice investment in a pretty $800 multi-pass radiator and hand you a cooling regression versus the stock single pass and ABS plastic shroud. The reason? The thicker core demands the more effective airbox design all things being equal. You need the proper flow and pressures to help scavenge.
The solution? Look inward. The curves have it. Compare these two very common rad box designs- which looks better to you?

(Photo Courtesy Circle Track Mag)
The Implementation- Rad Box V+1
My new prototype (pictured below) in turn does away with sharp angles in exchange for compound curves as suggested by the above diagram. The contour of the roof now maintains a longer path but the shallowest possible arc- which allows the air stream to remain attached to the top of the box as it flows along the interior and into the core. This uses the upper half of the radiator far more efficiently in principle, helping to distribute the air more evenly along the core. A small detail that most anyone could miss, turns out to be make or break.
The last requirement is satisfied two fold. One, because the angle returns to 90 degrees and level/even with the top of the radiator (such that the air is now oriented properly before entering the top most rows) is equally important. I also angled the bottom panel to precisely align with the bottom row of fins so the core support doesn't get in the way. Secondarily, the design has one vertical fin which splits and help straighten the incoming air with minimal added drag.
Some pictures:

Above: Front bumper removed to reveal the front of the new radiator box design. Note the contour of the roof, and what just ten extra degrees of tilt on the core did to minimize the angle.

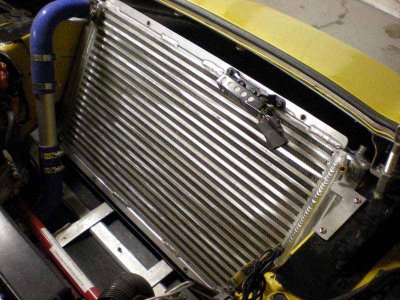
Above: The back of the radiator exposed (rear shroud off to reveal the CR aluminum triple pass).

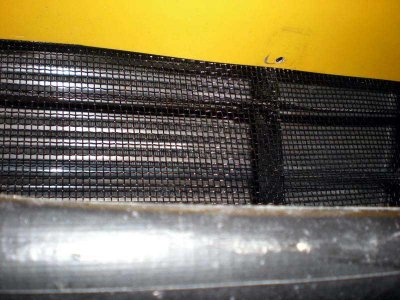
Above: While not everything that looks better always is... if I was an air molecule my best guess is this is worth a few cool degrees. Note the single fin to help direct air to attach to the roof of the box
Some other noteworthy items:
- Materials of choice are aluminum or fiberglass/carbon. Aluminum L brackets and rivets work well for quick assembly. Quarter turn fasteners are ideal for quick removal so you can change them out and experiment as needed. Some boxes may be better for some courses than others. If you have a higher speed course or super speedway... obviously give the nod to aero efficiency in the design of your box and try and keep that grill opening wide, low, and small as possible.
- Do use a screen. While less is more for the pros... take the pain. A grill is a great idea for your box. Steel preferably. Medium mesh, the grill is sized for decent flow while keeping out track debris (you don't want a bolt or debris from the car in front of you to get kicked up at 100mph and take out your new ubber expensive radiator). The aluminum doesn't hold up for a full year. I've found all sorts of interesting thinks stuck on my grill. It also affords a way to "adjust" the cooling system by taping over it. You can put racers tape over the grill to optimize for cooling vs. aerodynamic efficiency (lower frontal cd). An old trick, you can add more late in the day as ambient temps begin to cool off.
- Shape/design counts. Keep the interior of the box very smooth, to help keep the boundary layer as close as possible to the surface and avoid laminar flow separation. Avoid edges or sharp angles in the design. The first 85% is easy. The last 15% of design optimization is the hard part.
- Angle the core. If your rules allow it, do use a more aggressive angle on the radiator. I would suggest 30-45 degrees minimum. By sharply angling the radiator forward, you can maintain more ideal entry and evac angles with your shroud by using shallower angles. You can see just how a few extra degrees can make a huge difference in your design. You can also use a taller core, and it lowers the center of gravity of the object in the chassis which is significant when you factor in core, fluids, and the fact that it is at the far polar end of the chassis. It also is easier to solve for the bottom contour than the top on the front shroud. Another plus is it further gives you more room behind the radiator for the rear shroud.
- Delete what you can. For track guys, do delete your A/C, locking mechanism and support. Both for weight savings, as well as for better cooling and aerodynamic efficiency.
- A trick, you can re-orient your NSX Type-R front support bar horizontally instead of vertically by trimming the mount down and using just the two bottom bolt holes. This minimizes the disruption the front bar has on the air stream in the event you wish to retain it.
- Keep a log book. If you haven't already, put a sender where it counts and invest in a reliable cooling gauge. Celsius is ideal. You can then see if your changes work.
Conclusions:
More often than not it takes the same amount of time to do something right as it takes to do something wrong. Any monkey can fabricate. Having the knowledge of proper design, which comes from real world motor-sports experience and testing- makes the ultimate difference. If in doubt, consult a trusted pro racer.
References:
http://www.stockcarracing.com/techarticles/general/scrp_0509_efficient_cooling_radiator/index.html
http://www.circletrack.com/techarticles/ctrp_0707_stock_car_aero_downforce/rear_spoiler_angle.html
A quick primer on boxes.
Unless your new aftermarket front bumper looks like a Mac Truck, chances are good that the cooling inlet on your front bumper is far smaller than the surface area of your radiator. Their is a great reason for this. The more exposed duct area, the more overall drag and higher aerodynamic penalty. On many types of race cars it becomes a balance between aerodynamic drag, cooling efficiency, and even frontal downforce.
Enter the radiator box...
The primary objectives of a radiator box in a nutshell is to 1) force all the incoming air stream through the radiator 2) ensure that air is equally distributed across the surface area of the radiator and 3) straighten or direct the air before it enters the radiator for maximum cooling efficiency.
The better your box does these three things, in general the better it is.
JMS Racing RadBox V1.0
As you can see below- my version 1.0 from last year (just a nothing-special basic box) satisfied the first requirement well- it at least channeled all the air into the radiator.
Lightweight at a couple of pounds, yet sufficiently rigid for the chore it did the job. It took me less than an hour or two to slap together out of fiberglass, aluminum, and blind rivets.. cheap prototype fashioned from cardboard templates. I made a couple of them that varied slightly in design and used this one for a few track days:
Shown Above: My old radiator box design from 2006. Note the sharp angle of the top edge and the fact that the core sits behind the frame rail caps.
Advanced Primer: On the road to a better rad box design
Setting a higher bar in a club sports performance context, let's satisfy the last 2 criteria far better than the first one did [without pulling out the computational fluid dynamics plug-in for CATIA].
Here is all you need to know.
Air is like water, in that it "attaches" to surfaces. As you can see in the picture above... my last one had a steep angle sloping from the top of the inlet up toward the top of the radiator. I did some research, and the problem with this design decision is actually pretty significant in principle.
It results in the air instantly detaching at the sharp edge; thus only using a small portion of the total available surface area of the radiator is utilized. In layman's terms- the air just keeps on going in a straight line and into the lower half of the radiator.
Further, what little makes it up to the top creates turbulent circular flow patterns as the air is at the wrong angle to penetrate the top rows of fins and thus tends to stall and stagnate. Not as visible, the floor of the box directed air toward the lower core support bar which tends to get in the way.
As it turns out, a bad design like this with too many compromises will penalize drag, cooling efficiency, and frontal downforce (bad all around). At worst, take that nice investment in a pretty $800 multi-pass radiator and hand you a cooling regression versus the stock single pass and ABS plastic shroud. The reason? The thicker core demands the more effective airbox design all things being equal. You need the proper flow and pressures to help scavenge.
The solution? Look inward. The curves have it. Compare these two very common rad box designs- which looks better to you?

(Photo Courtesy Circle Track Mag)
The Implementation- Rad Box V+1
My new prototype (pictured below) in turn does away with sharp angles in exchange for compound curves as suggested by the above diagram. The contour of the roof now maintains a longer path but the shallowest possible arc- which allows the air stream to remain attached to the top of the box as it flows along the interior and into the core. This uses the upper half of the radiator far more efficiently in principle, helping to distribute the air more evenly along the core. A small detail that most anyone could miss, turns out to be make or break.
The last requirement is satisfied two fold. One, because the angle returns to 90 degrees and level/even with the top of the radiator (such that the air is now oriented properly before entering the top most rows) is equally important. I also angled the bottom panel to precisely align with the bottom row of fins so the core support doesn't get in the way. Secondarily, the design has one vertical fin which splits and help straighten the incoming air with minimal added drag.
Some pictures:
Above: Front bumper removed to reveal the front of the new radiator box design. Note the contour of the roof, and what just ten extra degrees of tilt on the core did to minimize the angle.
Above: The back of the radiator exposed (rear shroud off to reveal the CR aluminum triple pass).
Above: While not everything that looks better always is... if I was an air molecule my best guess is this is worth a few cool degrees. Note the single fin to help direct air to attach to the roof of the box
Some other noteworthy items:
- Materials of choice are aluminum or fiberglass/carbon. Aluminum L brackets and rivets work well for quick assembly. Quarter turn fasteners are ideal for quick removal so you can change them out and experiment as needed. Some boxes may be better for some courses than others. If you have a higher speed course or super speedway... obviously give the nod to aero efficiency in the design of your box and try and keep that grill opening wide, low, and small as possible.
- Do use a screen. While less is more for the pros... take the pain. A grill is a great idea for your box. Steel preferably. Medium mesh, the grill is sized for decent flow while keeping out track debris (you don't want a bolt or debris from the car in front of you to get kicked up at 100mph and take out your new ubber expensive radiator). The aluminum doesn't hold up for a full year. I've found all sorts of interesting thinks stuck on my grill. It also affords a way to "adjust" the cooling system by taping over it. You can put racers tape over the grill to optimize for cooling vs. aerodynamic efficiency (lower frontal cd). An old trick, you can add more late in the day as ambient temps begin to cool off.
- Shape/design counts. Keep the interior of the box very smooth, to help keep the boundary layer as close as possible to the surface and avoid laminar flow separation. Avoid edges or sharp angles in the design. The first 85% is easy. The last 15% of design optimization is the hard part.
- Angle the core. If your rules allow it, do use a more aggressive angle on the radiator. I would suggest 30-45 degrees minimum. By sharply angling the radiator forward, you can maintain more ideal entry and evac angles with your shroud by using shallower angles. You can see just how a few extra degrees can make a huge difference in your design. You can also use a taller core, and it lowers the center of gravity of the object in the chassis which is significant when you factor in core, fluids, and the fact that it is at the far polar end of the chassis. It also is easier to solve for the bottom contour than the top on the front shroud. Another plus is it further gives you more room behind the radiator for the rear shroud.
- Delete what you can. For track guys, do delete your A/C, locking mechanism and support. Both for weight savings, as well as for better cooling and aerodynamic efficiency.
- A trick, you can re-orient your NSX Type-R front support bar horizontally instead of vertically by trimming the mount down and using just the two bottom bolt holes. This minimizes the disruption the front bar has on the air stream in the event you wish to retain it.
- Keep a log book. If you haven't already, put a sender where it counts and invest in a reliable cooling gauge. Celsius is ideal. You can then see if your changes work.
Conclusions:
More often than not it takes the same amount of time to do something right as it takes to do something wrong. Any monkey can fabricate. Having the knowledge of proper design, which comes from real world motor-sports experience and testing- makes the ultimate difference. If in doubt, consult a trusted pro racer.
References:
http://www.stockcarracing.com/techarticles/general/scrp_0509_efficient_cooling_radiator/index.html
http://www.circletrack.com/techarticles/ctrp_0707_stock_car_aero_downforce/rear_spoiler_angle.html
Attachments
Last edited:


