Like many of you, the absence of a filter between the cabin and the Great Dirty Beyond has caused me considerable consternation. And, like many of you, I’ve been interested in a simple, OEM-maintaining (or at least, a non-OEM-destroying) solution. Keep in mind that this is for a 1991 NSX, I don’t know if it applies to later years. Here’s what you’ll need:
FRAM CA 9115 air filter
Tape measure
Heavy shears (I used trauma shears, a wire cutter would work too)
A knife (take your wife's best kitchen knife, she'll give you a great big hug)
An Ethicon medium titanium clip-applier (or I guess, if you had to, tape would work too)
The CA9115 air filter fits perfectly width-wise into the intake duct, but it’s exactly 3 inches too long. To keep it’s nice oval shape, I elected to remove 3 inches from the middle and pull the sides together. Downside is that the filter would be interrupted (i.e. gaposis), upside is that it would fit flush.

First, I removed the black rubber gasket which comes with the filter. Next, after measuring carefully, I used the shears to cut through the thick plastic ring at opposite sides of the filter. The knife was used to cut the filter element itself. I chose apposing apices of the folds of the filter element; this would allow simple re-approximation later. If you hold the filter so that you’re looking at the underside (the side with the longer filter-folds), you can count 18 folds. The simplest thing to do, is to remove 6 of those. I chose the 6 immediately around midline, but I guess it doesn’t matter. Last, I trimmed the gasket and did this in an off-set fashion to preserve as much function as possible. The pictures will explain better.
Here’s the removed pieces. Note that there are 6 complete folds on the table-side (that’s the filter’s long side...bad picture) while there are only 5 complete filter-folds and 2 half-folds on the up-side (shorter part) of the filter.

Putting it back together was pretty straightforward. Heck, with the gasket in place, the thing almost holds itself together. Here it is from the underside:

I didn’t even bother gluing the gasket to the filter, there was no need. To deal with the gaposis on the filter element itself, I chose the handyman’s secret weapon: an Ethicon Medium Titanium Clip-applier. I’m sure you all have one sitting around the garage....

A strip of masking tape would suffice. Here’s the result (sunnyside-up):

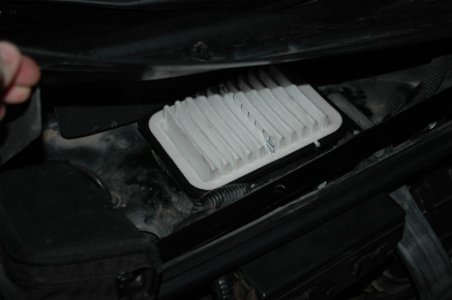
It drops in (without any chance of falling in). It fits snug. It’s reproducible. It’s easy to make. It cost $14.00 at Checker. It gives you something to do between beers on a Friday night. I’d say it’s a pretty fair solution to a problem I didn’t even know I had.
Just for completeness-sake, I made sure that my fan blew as usual, and it does. That’s key, of course, in this God-Forsaken desert in which I currently live.
I’m happy to help if anyone cares to give this a go.
Best of luck,
Uecker
FRAM CA 9115 air filter
Tape measure
Heavy shears (I used trauma shears, a wire cutter would work too)
A knife (take your wife's best kitchen knife, she'll give you a great big hug)
An Ethicon medium titanium clip-applier (or I guess, if you had to, tape would work too)
The CA9115 air filter fits perfectly width-wise into the intake duct, but it’s exactly 3 inches too long. To keep it’s nice oval shape, I elected to remove 3 inches from the middle and pull the sides together. Downside is that the filter would be interrupted (i.e. gaposis), upside is that it would fit flush.
First, I removed the black rubber gasket which comes with the filter. Next, after measuring carefully, I used the shears to cut through the thick plastic ring at opposite sides of the filter. The knife was used to cut the filter element itself. I chose apposing apices of the folds of the filter element; this would allow simple re-approximation later. If you hold the filter so that you’re looking at the underside (the side with the longer filter-folds), you can count 18 folds. The simplest thing to do, is to remove 6 of those. I chose the 6 immediately around midline, but I guess it doesn’t matter. Last, I trimmed the gasket and did this in an off-set fashion to preserve as much function as possible. The pictures will explain better.
Here’s the removed pieces. Note that there are 6 complete folds on the table-side (that’s the filter’s long side...bad picture) while there are only 5 complete filter-folds and 2 half-folds on the up-side (shorter part) of the filter.
Putting it back together was pretty straightforward. Heck, with the gasket in place, the thing almost holds itself together. Here it is from the underside:
I didn’t even bother gluing the gasket to the filter, there was no need. To deal with the gaposis on the filter element itself, I chose the handyman’s secret weapon: an Ethicon Medium Titanium Clip-applier. I’m sure you all have one sitting around the garage....
A strip of masking tape would suffice. Here’s the result (sunnyside-up):
It drops in (without any chance of falling in). It fits snug. It’s reproducible. It’s easy to make. It cost $14.00 at Checker. It gives you something to do between beers on a Friday night. I’d say it’s a pretty fair solution to a problem I didn’t even know I had.
Just for completeness-sake, I made sure that my fan blew as usual, and it does. That’s key, of course, in this God-Forsaken desert in which I currently live.
I’m happy to help if anyone cares to give this a go.
Best of luck,
Uecker

")


