Homemade complete front undertray for NA1

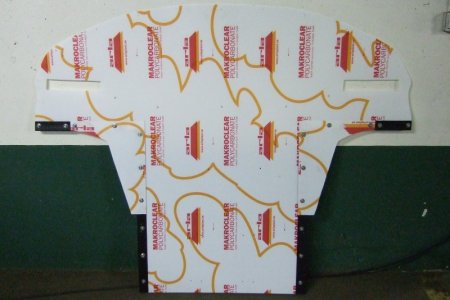
Based on Mac Attack's suggestion, I used my existing undertray as a template for a new undertray made out of a material that cannot shatter - polycarbonate. Polycarbonate is the material unbreakable drinking glasses, Ferrari F430 Challenge windshields, and F22 fighter jet canopies are made of. It's better known under the brand names Lexan, Makrolon, etc. and I bought a 205cm x 125cm x 2mm sheet for EUR 71 from a local store.

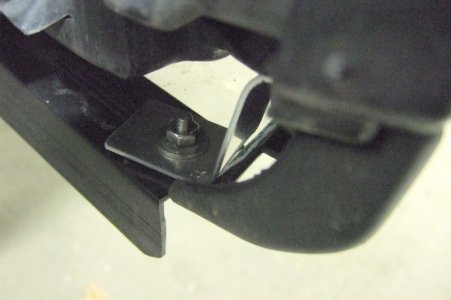
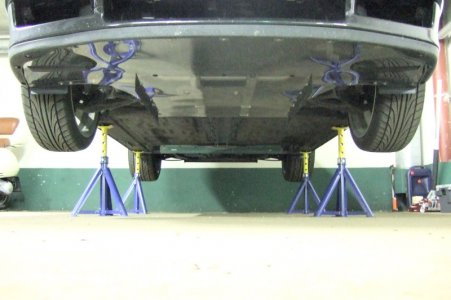
In order to mount it completely flush with the lower edge of the front spoiler, I didn't mount it directly to the front spoiler's mounting bolts directly in front of the wheels. I made little brackets out of aluminum to hold the undertray at those two points and now the undertray is completely flush with the bottom edge of the spoiler all the way around.

In addition, I mounted two little kind of triangle shaped pieces outside the longitudinal fins to make the undertray as wide as is possible without hitting the suspension arms. If the front suspension needs to be adjusted, those two pieces must now be unmounted but that can be done without removing the rest of the undertray.

While cutting and drilling the polycarbonate, it didn't show any tendency to crack. I've had the undertray on for a few weeks now including some high speed driving up to 299 km/h (186 mph) and it doesn't show any sign of fracturing anywhere. Even with the additional sections to make the undertray wider and without a vented hood, the water temperature gauge has still never shown an elevated coolant temperature. I think the front undertray is now about as good as I can make it.
 

Attachments

  • Front undertray unmounted.jpg
    Front undertray unmounted.jpg
    92.7 KB · Views: 697
  • Front Undertray mounting bracket.jpg
    Front Undertray mounting bracket.jpg
    93.2 KB · Views: 627
  • Front undertray mounted.jpg
    Front undertray mounted.jpg
    95.8 KB · Views: 779
I wish you guys lived in the US. I would gladly pay for one of these from you guys. However, at this time I'm missing my front lip, and that's gotta be remedied first.:tongue:
 
Very Nice Work !! :smile:

I still have not come around to getting my own version mounted on the car.

Have one question though. How high does your car sits on those stands that are in the picture? My own stands are not that high and it makes working under the car very tiresome and difficult.
 
A scissor lift would be great and an inground two-post lift would be wonderful. I just have some jack stands that are adjustable from 33.5 to 57.5cm and an aluminum jack that's low enough to fit under my NSX. That gives plenty of room if you're lying on a creeper, but a real lift would be in another league!
 
Heres a couple of pics of my undertray made from ABS plastic.

attachment.php


attachment.php
 
Great mod. I might have to go the lazy route and get the SoS parts. :smile: This should help keep raccoon, lizard and small child carcasses out of the front end of the car.
 
FYI: Audi R8. I like the use of NACA ducts to bring in air for cooling the exhaust area.

112_0701_01z+2008_audi_r8+undercarriage.jpg

I intend to do exactly like this... the most flat, yet acessible in some spots and with a custom difuser integrated in the 02+ valence with a upper bumper cover like the GT-One but even more good looking :wink:
 
R8 is pretty cool and clearly not an "add on". We can still have something similar if we are creative. I just finished my rear diffuser which now completes my total undercover-nose to tail-that includes front undertray, battery undertray with side skirts, gas tank cover, engine undercover, and joining rear undercover and diffuser that overlaps my '94 lower bumper. I made mine all out of aluminum and I think it has to help drag. I have short gears and 4:23 r&p and when I last checked mileage after a period of some rather spirited runs I was afraid that my mileage would now suck. It came in at 28 mpg which was way better than I expected with the gears and r&p change. I drive like an old man unless I'm screwing around but I really think the undertrays help the drag issue. At the risk of sounding stupid (I know the danger of the car feeling better whenever you do something to it, even though it may not be ) I swear the car seems slipperier. I'm sure the gears, etc. help tons, but the rear stays cleaner, the car is quieter on the highway and it sure seems to slice through the air on acceleration in 5th with less effort than ever! Also, I know this has been brouight up, there is NO difference in temps that I can tell at all. I have holes in the engine undertray to allow some air circulation and the rear diffuser/undertray allows for some side flow out behind the rear wheels. Last thing I need to do yet is put the filler pieces that I made for the space inside the rear spats to eliminate the last of the "parachute" that is the rear bumper assy. I'll post some pictures soon as I can get back on a lift, but I really believe this works, so stay with it guys.
 
troca - I can't wait to see your pictures!!! I'm very interested in what attachment points and supports you used, which areas you covered, which you left free, what shapes and angles you decided on, etc. Great work!
 
Any updates on this project. Sounds really interesting and something I definetly want to do as well. Please share some pics if you can also...


R8 is pretty cool and clearly not an "add on". We can still have something similar if we are creative. I just finished my rear diffuser which now completes my total undercover-nose to tail-that includes front undertray, battery undertray with side skirts, gas tank cover, engine undercover, and joining rear undercover and diffuser that overlaps my '94 lower bumper. I made mine all out of aluminum and I think it has to help drag. I have short gears and 4:23 r&p and when I last checked mileage after a period of some rather spirited runs I was afraid that my mileage would now suck. It came in at 28 mpg which was way better than I expected with the gears and r&p change. I drive like an old man unless I'm screwing around but I really think the undertrays help the drag issue. At the risk of sounding stupid (I know the danger of the car feeling better whenever you do something to it, even though it may not be ) I swear the car seems slipperier. I'm sure the gears, etc. help tons, but the rear stays cleaner, the car is quieter on the highway and it sure seems to slice through the air on acceleration in 5th with less effort than ever! Also, I know this has been brouight up, there is NO difference in temps that I can tell at all. I have holes in the engine undertray to allow some air circulation and the rear diffuser/undertray allows for some side flow out behind the rear wheels. Last thing I need to do yet is put the filler pieces that I made for the space inside the rear spats to eliminate the last of the "parachute" that is the rear bumper assy. I'll post some pictures soon as I can get back on a lift, but I really believe this works, so stay with it guys.
 
One thing to keep in mind, if you have not done it, is to have some holes for water drain.

The OEM version has many holes for that purpose, I'm sure there is a reason for that.

Also if you don't have a vented hood, your car may over heat.

Regardless, it look very nice!!!
 
One thing to keep in mind, if you have not done it, is to have some holes for water drain.

The OEM version has many holes for that purpose, I'm sure there is a reason for that.

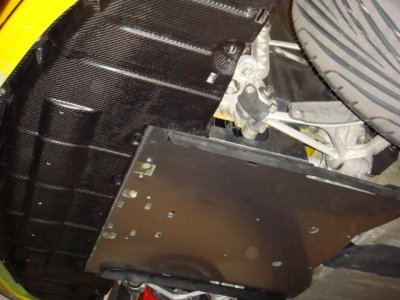
I'm not really sure what the reason for that is. Any water that gets on top of my undertray just runs off into the wheel wells. Since water dainage isn't a problem and holes are aerodynamically "dirty", I didn't drill any additional drainage holes. Maybe drainage holes are necessary if the undertray has vertical sections that extend upwards towards the frame rails that prevent water from running off into the wheel wells - like the OEM NSX-R front undertray does (attached is a picture of Downforce's replica).

Also if you don't have a vented hood, your car may over heat.

I've never heard of anyone that had the stock non-vented hood and who built their own front undertray who experienced overheating issues. My car has never overheated, neither at top speed nor standing in a traffic jam in 97° F sunshine with the air conditioner on full. NSX-SA, who lives where it's even hotter - in Australia - hasn't had any problems with overheating either. He doesn't have a vented hood and his front undertray is even wider than mine between the front wheels.

The vertical sections of the OEM NSX-R front battery tray undercover not only may prevent water drainage, they do block off some of the airflow from the radiator into the front wheel wells. Maybe they block off enough airflow that overheating is a problem if you don't have a vented hood. Without those vertical sections, it doesn't seem to be an issue, though. At least not that I've experienced or ever heard of.

Regardless, it look very nice!!!

Thanks! I'm still happy with it and haven't had any issues.


Below is a picture of the OEM NSX-R front undertray (Downforce replica). The vertical section is the aluminum sheeting in the middle of the picture around the front of the lower suspension arm, which partially seals off the underhood area from the wheel well.
 

Attachments

  • Downforce NSX-R battery undertray replica.jpg
    Downforce NSX-R battery undertray replica.jpg
    57.1 KB · Views: 876
Make sure you have functional vented hood and some Strategically placed holes in the under tray for drains.

If not, your may over heat under long distance or spirited driving.:wink:


Read the OP answer, he never has had any problems with the issues you mentioned. He has had his for quite a while now and so have others. I posted his answer to you below so it won't ignore it Again...:rolleyes:


I'm not really sure what the reason for that is. Any water that gets on top of my undertray just runs off into the wheel wells. Since water dainage isn't a problem and holes are aerodynamically "dirty", I didn't drill any additional drainage holes. Maybe drainage holes are necessary if the undertray has vertical sections that extend upwards towards the frame rails that prevent water from running off into the wheel wells - like the OEM NSX-R front undertray does (attached is a picture of Downforce's replica).


I've never heard of anyone that had the stock non-vented hood and who built their own front undertray who experienced overheating issues. My car has never overheated, neither at top speed nor standing in a traffic jam in 97° F sunshine with the air conditioner on full. NSX-SA, who lives where it's even hotter - in Australia - hasn't had any problems with overheating either. He doesn't have a vented hood and his front undertray is even wider than mine between the front wheels.

The vertical sections of the OEM NSX-R front battery tray undercover not only may prevent water drainage, they do block off some of the airflow from the radiator into the front wheel wells. Maybe they block off enough airflow that overheating is a problem if you don't have a vented hood. Without those vertical sections, it doesn't seem to be an issue, though. At least not that I've experienced or ever heard of.


Thanks! I'm still happy with it and haven't had any issues.


Below is a picture of the OEM NSX-R front undertray (Downforce replica). The vertical section is the aluminum sheeting in the middle of the picture around the front of the lower suspension arm, which partially seals off the underhood area from the wheel well.
 
Excellent work and interesting how we each tackled the problem differently. I used 3/8" Aluminum honeycomb. Front splitter sticks out 6 inches up front and is held by 7 speed nut bolt points and the two front turn-buckles. The rear diffuser is 48 x 54 and is held up by a custom sub-frame made of 60 series U-channel aluminum. Fuel tank is covered with a Downforce FRP piece. Entire bottom is covered for a totally flat bottom and the only hot air egress is out the vented hood up front and out the rear valence and rear wheel wells in the back. Front splitter works real well with the rear diffuser. Lightweight (weighs about the same per square feet as 1/16" Al, but more rigid than 1/4" Al sheeting- used on the Mars Exploration Rover project), extremely rigid (you can rock the car by stepping on the splitter or the diffuser) and fairly easy to cut.
I'll try to find the front splitter pics, but the piece looks almost exactly like NSX-SA's piece, without the slots for the AC condensor/fan vent (I took out the AC long ago) and it sticks forward an extra six inches.

2w2fsqf.jpg


3585tnc.jpg

Middle strakes missing in this pic

2j5j62s.jpg


wkpdau.jpg


Regards,

Danny
 
Last edited:
Lightweight (weighs about the same per square feet as 1/16" Al, but more rigid than 1/4" Al sheeting- used on the Mars Exploration Rover project), extremely rigid (you can rock the car by stepping on the splitter or the diffuser) and fairly easy to cut.

Who sells the sheeting? I want one:cool:
 
Who sells the sheeting? I want one:cool:

Teklam in Riverside CA. You can google"aluminum honeycomb panel" to find a source near you. Can be quite expensive though.

Regards,

Danny
 
sorry to bump a old thread but need some help here. I'm trying to mount my shine type 1 splitter to the alumanite panel but the speednut U shape clip would leave a gap in-between the two piece.
Any other method on how to bolt the shine type 1 lip and the alumanite under tray together? ignore the alignment pic.
83583948_482073592457751_5389255040953221120_n.jpg83000791_2273153559651845_3743484548776722432_n.jpg
 

Attachments

  • 67877070_344603673082747_6153477186318761984_n.jpg
    67877070_344603673082747_6153477186318761984_n.jpg
    94.8 KB · Views: 125
Last edited:
great thread bump hope some of our newer members read through it and appreciate all the awesome DIYers that have and still post.....
 
sorry to bump a old thread but need some help here. I'm trying to mount my shine type 1 splitter to the alumanite panel but the speednut U shape clip would leave a gap in-between the two piece.
Any other method on how to bolt the shine type 1 lip and the alumanite under tray together? ignore the alignment pic.

Looks like you may have to ditch the clip and opt for a mount that will be more stable. Not totally certain that you mean "aluminite" but rather you're referencing the battery tray? I can't tell for sure but if you use longer bolts, spacers, and washers, you may be able to provide a stable platform to hang the front spoiler.
 
83760505_791419801334905_2838139995791818752_n.jpg84481494_188843719178647_3094043299862806528_n.jpg
Looks like you may have to ditch the clip and opt for a mount that will be more stable. Not totally certain that you mean "aluminite" but rather you're referencing the battery tray? I can't tell for sure but if you use longer bolts, spacers, and washers, you may be able to provide a stable platform to hang the front spoiler.

Sorry if I wasn't clear but let me show your what CL65 captain did. I want to know what he used to secure his lip to the under tray his look very flush so minimized the air going inbetween the lip and under tray. I messaged him but he probably retired from Prime lol. For the rear mount I will use the front Tie downs and the holes under the radiator support which I have attached Rivnuts too. if anyone have any ideas for securing the lip to the under tray at in the front I am all hears. thanks
 
Back
Top