header install help

Joined
15 November 2006
Messages
4,164
Location
New Orleans
Well I'm almost done. I have the rear one off, but I can't seem to get at the rear. I'm at the part where people say "drop the shifter cables" and I can't seem to get on the front motor mount. It won't budge at all. I'm trying to just drop the entire thing with the 3 bolts that attach one of the beams to the front mount but I can't get on the drivers side bolt. I'm going to the hardware store right now because my rachet won't fit on it and I'm going to see what else they have. I just don't wanna strip it because it'll be impossible then...

Stephen
 
If I remember, the order is: loosen/remove bolt from front motor mount; loosen shifter cables; drop front beam.

I remember reading how several people had problems getting to the nut for that mount. I think that it was easy for me because of the length of my 1/2" drive extension. With feet under rear bumper and head under front beam looking up, to the right, there is more room between front beam and the car chassis in front of it. There is a wide spot. If I remember, my 6 or 8" extension on the right socket reached to just this location. My ratchet went up through this wide spot to get to the bolt.

If you have the options, try a shallow socket and a deep socket with each extension/ratchet combo you have to see if you can find one that works. Once I found a combo that worked, this proved to be a bit easier than a few other parts. The nut isn't that tight to be a big problem.

The steps that are the hardest to swap headers, to me, included getting the rear beam back on. (See previous thread where I posted questions on the solution) and all the fussing with removing and re-installing the rear header and the shield around the passenger side CV joint. All the effort required to get some of those bolts started and the tool on to tighten was frustrating.

Of course, if you got this far, it is likely that you already removed your cats which means you got those fastners off. That and the O2 sensors are usually the worst part of the project.

The good news, headers are well worth it on NA1 engines.

Thanks for the reply. I ended up stripping the 3rd bolt so I'm going for the main engine mount one instead... I think I can get to it from the bottom or top if I remove the intake.

Anyways, I ended up not removing the o2 sensors because one stripped on me, and the other is still sitting in the front header, also I only removed 1 of the cats, the other one's stripped on me also.

So I only really have one cat off and then the rest of the system is attached besides the headers. I don't really care though because I'm not using cats.

Stephen
 
LOL--are your knuckles bleeding? have you run out of vulgar words to say? If not you are not even close:biggrin:

If you haven't seen it already=>http://www.nsxprime.com/forums/showthread.php?t=74785&highlight=header+diy

Yeah, that's the original diy I found that I was using. I still can't get that engine mount bolt off. I know I can get to it from the top but I forget how and how much stuff I would have to remove up there. It was undone for a timing belt change but I forget since I was just there watching basically.

My knuckles are bleeding and I have a bruise on my face from a rachet falling.

Stephen


Any WD40 in your eyes?

:cool:
 
Yeah, not wd40 though, I was using some other stuff that was spraying all over.

I finally got that bolt out and that beam moved out of the way. I'm debating to remove the ac compresser or not just because I don't want to mess with the belt.

Stephen

fun diy :biggrin: :biggrin: :biggrin:

how many hours are you into it as of now?

drop the A/C. much easier to get to everything. Belt on the A/C is simple and you can get to it from the bottom of the car.

happy wrenching

Rob:smile:
 
fun diy :biggrin: :biggrin: :biggrin:

drop the A/C. much easier to get to everything. Belt on the A/C is simple and you can get to it from the bottom of the car.


Rob:smile:

+1 on drop the A/C. I could hardly get the A/C back on with the headers on and I imagine it would be impossible with the A/C on the whole way.

Note that there are 4 bolts holding the A/C on. I didn't notice originally and spent some time screwing around with where the long ones go vs short ones.

Don't forget to unplug the yellow wire!
 
fun diy :biggrin: :biggrin: :biggrin:

how many hours are you into it as of now?

drop the A/C. much easier to get to everything. Belt on the A/C is simple and you can get to it from the bottom of the car.

happy wrenching

Rob:smile:

Guess I'll go out and drop the ac. I took a break from the nsx for an hour to run a few errands and replace a lightbulb on my vw gti.

So far I have over 12 hours and I'm not even half way done since I still need to put everything back on and stuff. I know it goes faster, but I still need to take off the ac and the front headers...

The belt, you don't touch the tension right? And if I don't have new o2 sensors but I know mine need replacing because the rear got stuck, and the front I haven't tried, but I'm planning on it getting stuck, can I still stick everything back on and plug the sensors in later? I won't be driving the car btw.

Stephen

You should loosen the tension on the A/C belt. The how-to on this forum has that explained. Not too difficult.

I believe you could put the O2s on after install, with some wrangling. I bought mine from SensorsOnLine or whatever, and they will ship overnight for not much $$.

Putting the A/C back on is a task. So is replacing the front beam. So is putting the CV shield and a few other things. Getting the wrench on all the rear nuts is harder than the front, if I remember. You are making big progress at this point though. Most major obstacles have been passed.
 
That is why I paid an NSX tech $300 to install them at his house for me.:wink: It'll be worth your work though. I definately felt the difference.
 
I just done headers on mine and did not know the front motor mount nut is staked. It has to be removed from the the bolt side.


Correct and a little tip Cody from Lovefab tought me was to silicone the nut with the little tab back on the frame by putting the bolt back in after the beam is removed to hold the nut/tab in place with the silicone and be very carefull to rethread it when u need to reinstall the beam not to break the silicone loose after it has dried or it will be very hard to get back on. Also a tip to remove it was with the impact gun, I used an extension and a 1/2" drive and made sure it was on tight with pressing force not to slip off and it came right off the 2 times I had to do this.Was easy access under the rear driverside wheel well.Did not take anything off the top of engine, and also only loosened the aircond compressor did not loosen/adjust the belt, was was extremely hard to get 1 bolt back in if I remember correct but it worked after a beer or 2 :biggrin:
Hope this helps a little, DIY

Maximumyield
 
you need to take the tension off the a/c belt to drop the a/c or putting it on will be uber difficult.

tensioner is very easy to get to from the bottom, you can reach up and hit the lock bolt with a 14 then make adjustments from wiht a 12.

should be quick and easy if you know your way around.

after that, dropping the a/c is quick.

MAKE sure you dont strip ANY of the bolts on the front manifold. if you do.... this 12 hour job can easily become a 36 hour job :biggrin: :biggrin: :biggrin: :biggrin:

well good hands on exp. 12 hours and counting. :wink:

if you need help or tips, give me a ring on the tele.

warmest regards and happy wrenching.

Rob:smile:
 
Don't forget to use anti-sieze on every bolt and nut you touch so the dissimilar metals won't corrode and they won't be nearly as hard to deal with if you have to remove them again.
There is an anti-seize labeled C5-A, (like the airplane) that is for "high temp" applications that has a high copper content, (gold colored) that works the best around the engine. Use it on the nuts and bolts that go to mount the flanges to the cyl. head, the O2 sensors, (don't get any, anywhere else but on the threads) and all the heat shield bolts and nuts. It will make life alot easier down the road.
Remember, when you work on something treat it like your the one that has to work on it next, in our case you probibly will be the one who does.

Cheers
nigel

Thanks Nigel. I've been using some anti seize silver stuff on EVERYTHING so it should be fine. I ran into another problem that I won't be able to fix for awhile though. But I basically cross-threaded the bolt or thread that connects the headers to the bottom of the engine or block or whatever term you call it... I cross-threaded two on the rear header, which are the top left two...

If anyone has had experience with this please let me know. I went to napa and they gave me a suggestion of what to do but I'd like to know if anyone has made the same mistake.

Stephen


if you cross threaded the hole
get a tap that is the same size and same pitch as your bolt.

Then re tap the holes

be really really careful...make sure the tap is square to the hole..
1/2 turn in... 1/4 turn out..until you feel you have matched the existing threads and the tap turns really easy.

if the bolt threads' are cross threaded get a new bolt.
 
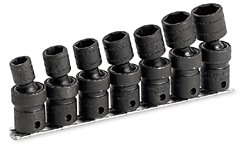
Get these next time everyone, Ed say they are the gas, easy off/easy on!
snap on swivel impact sockets!
Bolts, nutz will come off nicely in tight places.
Trev
 

Attachments

  • 17525.JPG
    17525.JPG
    26.6 KB · Views: 67
Get these next time everyone, Ed say they are the gas, easy off/easy on!
snap on swivel impact sockets!
Bolts, nutz will come off nicely in tight places.
Trev

+1 Can't tell you how many times those sockets saved my arse!!! Highly recommended :smile:
 
Thanks Nigel. I've been using some anti seize silver stuff on EVERYTHING so it should be fine. I ran into another problem that I won't be able to fix for awhile though. But I basically cross-threaded the bolt or thread that connects the headers to the bottom of the engine or block or whatever term you call it... I cross-threaded two on the rear header, which are the top left two...

If anyone has had experience with this please let me know. I went to napa and they gave me a suggestion of what to do but I'd like to know if anyone has made the same mistake.

Stephen

Headers are held on by nuts over studs. The studs can be removed and replaced.

There are a couple of ways to remove the studs. One was is to double nut the stud. Put two nuts on a little, then try to remove the inside one. It may spin out the stud for you.

If you need more grip, there are stud remover tools. I found mine at a specialty tool store. They slip on over the stud, and grab it from the sides - with what looks like many ball bearings. You put a wrench or socket over it and turn them out. Worked great for me when I broke a stud doing this exact project.

Others may have other suggestions. (And, these have been given in a previous header swap thread when I asked the same question.)
 
18APEX32, that's called a sprag clutch and you'd be suprised how many uses they're for them in the mechanical world and you dont realize they're there.
Squirting a little penetrant, (AeroKroil is by far the best i've come across, orange spray can, NOT WD) on the threads and waiting a few minutes will help. A slight bash with a hamer to shock it will help as well.

Cheers
nigel
 
Back
Top