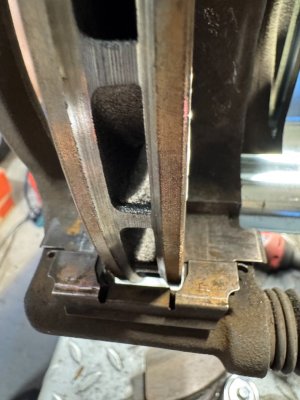
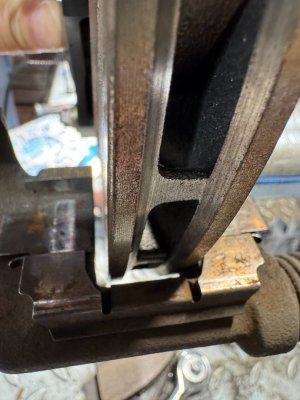
Has anyone here ever installed the Sakebomb Garage competition rear brake kit?

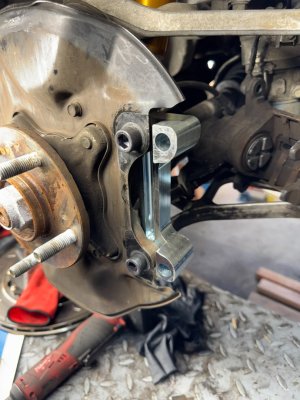
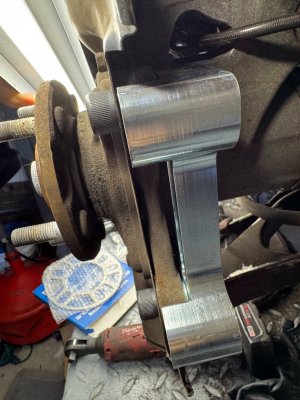
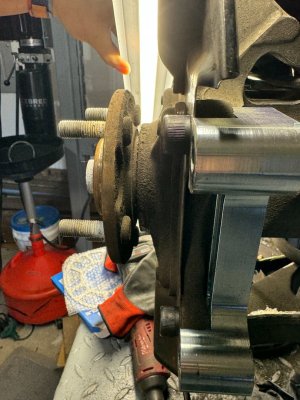
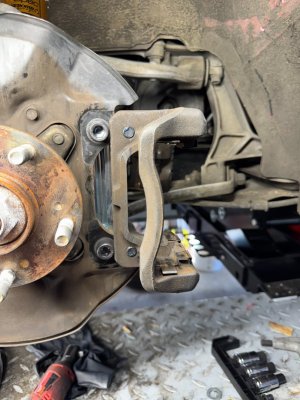
Maybe I’m not fully understanding the fix. Hopefully someone here can help me see the light. The additional spacer/washer definitely helped move the caliper inboard to help eliminate the rubbing of the rotor and caliper bracket. However, it made the interference with the caliper bracket and the bolts that hold the bracket to the the hub worse. Am I missing a step here or is this potentially a new issue?
 
Maybe I’m not fully understanding the fix. Hopefully someone here can help me see the light. The additional spacer/washer definitely helped move the caliper inboard to help eliminate the rubbing of the rotor and caliper bracket. However, it made the interference with the caliper bracket and the bolts that hold the bracket to the the hub worse. Am I missing a step here or is this potentially a new issue?
You maybe got a picture of what you’re talking about here?
 
Quick update. I called Heath and he said the kit is supposed to have hex head bolts with no washers to attach the adapter bracket to the hub assembly. That indeed eliminates the interference with the caliper bracket. My kit didn’t come with those bolts. So he’s going to send them out to me. The only concern is no washer but he said to just loctite them in.

I mocked it up with some bolts I had that were the wrong length and it seems like it will work. The rotor still barely rubs the sheet metal brake pad shim thing but it doesn’t run the bracket itself although it is closer to the inboard side than the outboard side.

I’ll take some pics when I get the new parts.
 
I got the bolts in and here's what I found on my car.

1. The new hex head bolts (no shims) allow the caliper to mount without interference.
54172222872_abb9a6dadc_k.jpg

54173549950_14a92fac87_k.jpg

2. The caliper isn't centered on the rotor. It's very very close to touching on the inboard side. There is a tiny bit of rubbing with the thin brake pad clips. Heath at Sake Bomb said to use a washer to try and center the rotor. However, using a thin washer (~1mm) to space the caliper bracket over a smidge makes the relocation bracket sit "below" the surface of the hub so the caliper bracket can't sit flush with the supplied relocation bracket.
Here you can see that caliper relocation bracket in relation to the hub:
54173410324_5e3035f3b2_k.jpg

Removing the washers, you can see that the bracket is now "proud" of the hub so the caliper bracket can be cleanly mounted to the supplied relocation bracket.
54172222837_72799f9e2e_k.jpg


3. I went ahead and ran it like this. There is a tiny bit of rubbing of the rotor against the sheet metal shim that the pads ride in. Not sure if it's top and bottom or either or. Probably not an issue as the sheet metal will eventually wear away. It's very close to the caliper bracket though. I worried that some heat in the system would make things expand and cause further interference. But I did a pretty robust backroads drive to bed the pads and shake everything down and I didn't notice anything get worse.
Here you can see how much space the rotor has to the bracket on the outboard side:
54173107766_0cdd1aacaa_k.jpg


And here you can see how close it is on the inboard side (touching the shim)
54173380063_fe8928babb_k.jpg


I'll run it like this for a bit and see how it goes. I may trim the shim a little bit if it still rubs after a little while.

Final "finished" photo:
54173410529_f70481a5f7_k.jpg
 

Attachments

  • IMG_4576.jpeg
    IMG_4576.jpeg
    157.6 KB · Views: 2
  • IMG_4577.jpeg
    IMG_4577.jpeg
    188 KB · Views: 0
  • IMG_4578.jpeg
    IMG_4578.jpeg
    184.4 KB · Views: 0
  • IMG_4579.jpeg
    IMG_4579.jpeg
    168 KB · Views: 0
  • IMG_4581.jpeg
    IMG_4581.jpeg
    130.2 KB · Views: 0
  • IMG_4582.jpeg
    IMG_4582.jpeg
    133.9 KB · Views: 1
Back
Top