Door Amplifier-extensive damage after mosfet overheat?

Joined
8 January 2017
Messages
195
Location
South West Florida
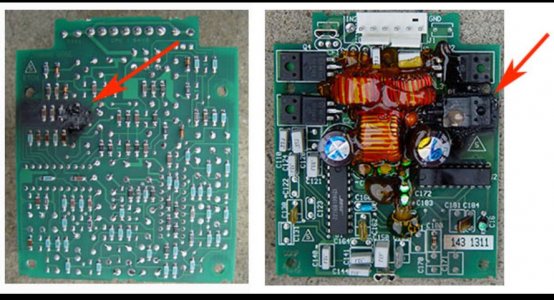
I just replaced all the capacitors in my pioneer (​edit: alpine, my mistake) head unit and began to troubleshoot why no sound is coming from the speaker in my right door. After removing the speaker pod this is what I found inside:

IMG_6222.jpg
IMG_6221.jpg


Not good! That mosfet overheated badly, but why? @Heineken has noted previously that a failing u2 can cause the mosfets to overheat, but it's also possible that I caused the damage during a previous attempted repair at the headunit and installed a cable incorrectly.

So what to do? First step is to remove the obviously damaged parts and take a look at the board. After that I'll probably check continuity of the vias, order 4 of the IRFIZ24N, one of the 33j capacitors and one of the 50v 1u cap and see what happens when I replace everything.

Any/all advice is welcome, this looks like a pretty challenging, or impossible, repair.
 
Last edited:
As long as the U1 and U2 (the BOSE chips) are OK it should be possible to repair it. My suggestion would be to carefully clean the top of the PCB, replace all four MOSFETs, C110, the big cap next to the burned MOSFET and give it a try.

Some further questions to find the potential root cause:

  • Did the amp show signs of capacitor leakage when replacing the caps?
    Asking since larger amounts of acid often hide underneath the old glue and the failure mode looks very similar to acid caused MOSFET failure ..
  • Looking at the back of the PCB, did you use any special flux or non-electronic solder?
    The solder joins look kinda "wet" (could be the picture, though) which is unusual.
 
As long as the U1 and U2 (the BOSE chips) are OK it should be possible to repair it. My suggestion would be to carefully clean the top of the PCB, replace all four MOSFETs, C110, the big cap next to the burned MOSFET and give it a try.

Some further questions to find the potential root cause:

  • Did the amp show signs of capacitor leakage when replacing the caps?
  • Asking since larger amounts of acid often hide underneath the old glue and the failure mode looks very similar to acid caused MOSFET failure ..
  • Looking at the back of the PCB, did you use any special flux or non-electronic solder?
    The solder joins look kinda "wet" (could be the picture, though) which is unusual.
Thanks Heineken! I just read your blog posts on the UK site-very helpful.

Unsure re: capacitor leakage. The caps were replaced by Brian K in 2016, so I'm sure the repair was done correctly at that time. I see what you mean about the "wet" joints, but don't have an explanation. I think it may be a conformal coating applied at the time of repair, but am not sure.


Questions:

-What is the correct replacement for C120? It's markings say .33J on the top and 50-mmk-9045 on the body. The .33J doesn't match any code that I'm familiar with.
-What is the correct replacement for the transistors? the closest I can find at Digikey is IRFIZ24NPBF
-The overheated transistor pulled up the copper pad when it was removed. What is the correct repair? I assume gluing the copper pad back down and applying thermal paste between the pad and the transistor?

Current hypothesis is that the heat melted the hot glue from top of the orange inductors, which is the shiny coating that you see on the top of the board. Unfortunately, between the shiny coating from the previous repairs and the shiny coating from the melted glue, finding evidence of acid is nearly impossible.

IMG_6224.jpg
 
Sorry for having the wrong impression that you replaced the caps, should be all fine what was done at that time :smile:

The transistors are of the correct type and a drop-in replacement.
Re-using the copper pad isn't that important since most of the heat is dissipated via the metal case. Thermal paste and re-gluing is optional, I would say, but can't hurt either.

C120 should be 0.33 uF 50 V MMK type, 5 % tolerance (J)
 
An interesting failure. My first observation is that it is unlikely that you caused the problem with a cable mis connection of some kind - which would be hard to do with the oriented plugs. The Bose amplifier is an H bridge class D amplifier.

H bridge.jpg

When current is flowing through the speaker it follows the path shown in blue or red. For current to flow, two diagonally opposed MOSFETS must be turned on. If the MOSFET damage was caused by something in the signal processing I would expect that the matching MOSFET would be similarly cooked since the current flow through the diagonal pairs is equal. I don't see any sign of cooking on that paired MOSFET.

MOSFETS in a class D amplifier live in the happy land where they are either completely off (no current flow) or hammered all the way on with high current flow but with very little voltage across the device so the power dissipation in the device is very small. That is why class D amps can have very high power outputs in tiny packages with high efficiencies. When turned fully on, a MOSFET does have a small internal resistance (called Rds) which does cause internal heat generation during high current flow. The heat generation is relatively small and it does not take a significant heat sink to manage the problem. Contact between the body of the MOSFET and the metal case on the Bose amp performs that function nicely - the fiberglass board is a thermal insulator and not material to the heat management. If for some reason the contact between the case and the MOSFET was compromised this can lead to a thermal runaway problem. As the body temperature of the MOSFET starts to go up Rds increases which increases the heat generation in the MOSFET which then causes Rds to increase which further increases heat loss and on and on. So, you can have the possibility of thermal runaway on one MOSFET with no damage to other parts except the obvious heat damage.

If you still have the failed MOSFET, check for a drain to source short circuit (the pin designation can be found here - 2nd last page IRFIZ24NPbF.pmd (infineon.com). If the MOSFET failed in short circuit it could have cause collateral damage (the diagonal MOSFET in the pair). If it failed open circuit then there is likely no collateral damage (other than the burnt stuff). If you elect to repair the amplifier, when you reassemble the amp make sure that you have good contact between the MOSFET body and the case. Some thermal paste might be appropriate. It has been long enough since I pulled mine apart to examine them that I can't remember whether there there was thermal grease or not.
 
Last edited:
Very good summary on the H-bridge operation!

Just adding some info there: All the amps I had worked with so far where not assembled with any kind of thermal grease.

The thermal runaway is a possibility but with a correctly working MOSFET there's almost no heat generated - came to that conclusion since the last (working) amplifier I got had non-isolated MOSFETs installed with 1 mm thick rubber pieces glued between the transistor and the metal case .. and did not overheat :tongue:

Another possibility could be the connection from U2 (the MOSFET driver) to the MOSFET gate - one amplifier I repaired had a broken VIA on the path to exactly that MOSFET. If that connection would slowly fail it could potentially cause the MOSFET to partially conduct leading to overheating.

But I could be totally wrong, of course :wink:

An interesting failure. My first observation is that it is unlikely that you caused the problem with a cable mis connection of some kind - which would be hard to do with the oriented plugs. The Bose amplifier is an H bridge class D amplifier.

View attachment 172159

When current is flowing through the speaker it follows the path shown in blue or red. For current to flow, two diagonally opposed MOSFETS must be turned on. If the MOSFET damage was caused by something in the signal processing I would expect that the matching MOSFET would be similarly cooked since the current flow through the diagonal pairs is equal. I don't see any sign of cooking on that paired MOSFET.

MOSFETS in a class D amplifier live in the happy land where they are either completely off (no current flow) or hammered all the way on with high current flow but with very little voltage across the device so the power dissipation in the device is very small. That is why class D amps can have very high power outputs in tiny packages with high efficiencies. When turned fully on, a MOSFET does have a small internal resistance (called Rds) which does cause internal heat generation during high current flow. The heat generation is relatively small and it does not take a significant heat sink to manage the problem. Contact between the body of the MOSFET and the metal case on the Bose amp performs that function nicely - the fiberglass board is a thermal insulator and not material to the heat management. If for some reason the contact between the case and the MOSFET was compromised this can lead to a thermal runaway problem. As the body temperature of the MOSFET starts to go up Rds increases which increases the heat generation in the MOSFET which then causes Rds to increase which further increases heat loss and on and on. So, you can have the possibility of thermal runaway on one MOSFET with no damage to other parts except the obvious heat damage.

If you still have the failed MOSFET, check for a drain to source short circuit (the pin designation can be found here - 2nd last page IRFIZ24NPbF.pmd (infineon.com). If the MOSFET failed in short circuit it could have cause collateral damage (the diagonal MOSFET in the pair). If it failed open circuit then there is likely no collateral damage (other than the burnt stuff). If you elect to repair the amplifier, when you reassemble the amp make sure that you have good contact between the MOSFET body and the case. Some thermal paste might be appropriate. It has been long enough since I pulled mine apart to examine them that I can't remember whether there there was thermal grease or not.
 
Last edited:
The possibility of a problem with the gate signal occurred to me. Something that impaired the gate signal enough such that the MOSFET did not go into full conduction so that there was enough voltage drop across the MOSFET to cause material heating. The problem I see is that the turn on for a MOSFET once you have exceeded the gate threshold voltage is really fast. They really are two state devices. Having a problem that creates a Goldilocks gate voltage that is high enough to initiate conduction; but, low enough to avoid driving the MOSFET into full conduction might be a bit like dancing on the head of a pin.

Its also possible that its not thermal run away or a gate drive problem; but, just a plain component failure without external causes - s**t happens. That said, it seems to be inherent in the EE DNA to speculate about failure mechanisms.
 
The NSX OEM head unit is manufactured by Alpine.
OEM speakers can be driven with any Line-out level signals which some radios provide.
I recall that the Bose amps are 2 ohm speaker outs. I have no idea on the input - thanks for sharing. I had thought the inputs were low level 2.5-5V input signals. Did not know they were regular line level inputs.

Is it possible the output of the Pioneer caused the amps to fail prematurely? Seems like not, but that's where my head was going.
 
All parts are ordered, but I had to change the specs on the square capacitor from .33 uF 50V to .33 uF 63VDC.

What I ordered: https://www.digikey.com/en/products/detail/R82DC3330Z360J/399-11513-ND/4833339

Some rudimentary googling says this is ok, but if I'm mistaken feel free to let me know =)

The cable that I installed incorrectly a couple years back was in the head unit, I believe one of the FFCs that go in-between the boards. I'd love to know the exact cause of this blown transistor, but absent a PCB diagram for that unit I'm not sure we'll ever know. The metal cage was in contact with the amp and no thermal grease present. I'll check for a short when the parts come and I dig back into this.

Thanks everybody! Component-level electrical/electronic repair continues to frustrate and fascinate me.
 
The Bose amplifiers were used in a lot of vehicles. They are all fundamentally the same, differing in details with respect to the feedback signals and the analog signal processing. This link has a nice description of the amplifier used in the early 90's Corvette including a basic schematic.
Bose Amplifier Repair Notes Rev 3/14/02 Gary James (ojas.net)

The schematic is incomplete. Aside from missing the supply voltage path it does not show the inductors (coils of wire); but, they will be present somewhere on the audio out path.

While trolling for stuff, I stumbled across the attached interesting photos. Its a Bose amplifier from a Cadillac and the failure looks remarkably familiar. Initially I thought it was your board time warped back to 2011 - the date of the post on a Cadillac forum. However, the failed FET is in the diagonally opposite signal path. The forum where I found that picture did not have any really useful information and I don't think they attempted to fix the board (although I got tired of reading useless posts so never made it to the end of the thread). Given this similar failure, I think you can be comfortable that you did not precipitate the failure on your board.

The traces for the FET gate signals originate at pins 12, 14, 15 and 17 on U2 which is sort of under C25. I don't know whether those traces are on the top side or bottom side of the board and might have been affected by electrolyte leakage supporting Heineken's suggestion that the failure could have been caused be a faulty gate signal. Given the toasted condition, it may be difficult to determined whether any trace damage occurred pre or post toasting.
 

Attachments

  • Toasted FET.jpg
    Toasted FET.jpg
    133.2 KB · Views: 122
Last edited:
I've seen several of those "single MOSFET cooking" incidents so far. There is a correlation between leakage and MOSFET barbecue, but it might be more complex than initially thought.
There's an interesting twist to it:

  • My amp with the broken via from U2 to the gate of the left bottom MOSFET (same as @SWFL_NSX) made the unconnected MOSFET heat up significantly when I tested it - it seems the H-bridge layout is letting the transistor float somehow - but the PCB did not show any burn marks.
  • Amps with a working U2 to MOSFET connection showed heavy burning on the PCB
My guess is that either acid or a broken PCB trace to the gate of a MOSFET can let it float and overheat.
 
Last edited:
All burned parts replaced, unfortunately still no sound at all from the speaker.

Prior to installation I checked continuity between the middle pin of the burned transistor and u2 (mosfet driver). There was continuity so that via is fine.

Any other troubleshooting I should try before just buying a different amp?
 
The replace versus repair option will depend on how curious you are / how much effort you want to put into it.

This is the approximate schematic from those repair notes I linked in post #13

Bose amp.jpg

On U1, you can see the audio input on pins 1 & 2. The signal pops out of the first op amp in U1 on pin 5 as a single ended signal referenced to LGND (signal ground pin 19). You can trace the audio signal all the way through U1 ( pin 5 - pin 8 - pin 10 - - - - - - pin 15). Since U1 rarely fails, you can fast track by just confirming that you have audio on pin 15 which is the input to pin 6 on U2. If you have audio on pin 6 on U2 with no drive to the speakers then U2 has failed or you still have a problem with the power output stage (Q1 - Q4).

The repair notes provide some good options for tracing the audio signal through the board. Once the audio signal makes it to U2, tracing 'audio' is no longer an option. You can check the operation of U2 by looking at the output(s) on pins 14, 12, 17 and 15 which are the gate signals to Q1 - Q4 . The gate signals will not be a recognizable audio signal. They will be a series of pulses of fixed high frequency but variable width pulses so you really need an oscilloscope to check for the presence of that signal. In the repair notes he provides a link to free oscilloscope software that you can use on your PC. That software may be operating system dated that may not work on Win 7 or 10; but, if you search around you should be able to find updated free software. There are also links to tone generator software for your PC. Both use your sound card so you can't run both at the same time unless you have 2 PCs. The Bose class D amp uses a 25 - 50 kHz carrier frequency (can't remember the exact number). If the carrier is closer to 50 kHz, the free scope software may not work very well / at all because of the limited frequency response in typical sound cards. However, it should be able to show the presence of some activity. If you have a confirmed input to U2 on pin 6; but, no activity on pins 14, 12, 17 and 15 then it is likely that U2 is dead. Since Q3 is the toasted FET it is possible that it shorted the gate signal on pin 17. If pins 14, 12 and 15 show activity; but, pin 17 shows nothing then the internal gate driver on pin 17 may be dead which effectively means that U2 is dead.

The repair guide does not show the connection of the inductors (coils of wire). I expect that those inductors are in the speaker circuit (much as shown in my post #5 ). Since you removed L2 for the repair make sure its connection is OK since it directly affects the speaker output.
 
Last edited:
Thanks Old Guy.

Brian K says he can fix it so I'm sending it off tomorrow. When it gets back I'm going to try to trace the signal and maybe learning something in the process.

I'll update this thread when I get it back and installed.
 
Amp is back from Brian-he made some repairs and bench tested it.

Unfortunately, still no sound from that channel when it's installed in the car.

I'll break out the wiring diagram this weekend, but I suspect the issue is in the headunit. Thanks to all that helped!
 
Ha-I was too! He didn't say, but didn't charge me.

The only components I saw that were replaced were the electrolytic caps (which he already did in 2016) and the ceramic cap that I l replaced with one of a higher voltage. No fly-wire repairs and U1, U2 appear to be the same ones I sent.

I suspect that he just re-capped it, bench tested it, found all was good and then decided to view it as a warranty repair. There is a chance that it would have worked with the repairs I made (I was unable to bench test, and didn't want to open up my other door). I sent him 50$ for his time and generosity.

===========================

Assuming I have an issue with the head unit, any idea on where to look first? My current plan is to verify the wiring harness from Amp to headunit and just start tracing the circuit from there looking for damage. I know there is an op-amp that frequently goes bad, would that lead to a dead channel and an otherwise working unit?
 
I assume that the left channel is working which suggests that the head unit might be OK? If so, you can do a quick check to see if you have an audio in signal from the head unit to the right speaker. If the door is still apart / speaker accessible the easy way is to check for the audio signal at the plug on the speaker unit. Right channel audio is on the white and orange wires at the speaker plug (according to 1991 SM). A simple earphone will do the trick in terms of confirming the presence of the audio signal on those two wires. If audio is present at the speaker plug, then further examination of the speaker amp is required. Check the actual speaker. If the FETs failed shorted they may have applied a high current to the speaker causing speaker coil damage. The first test would be to check the resistance of the speaker coil. If the coil resistance is high, then you may have speaker failure. If the coil resistance looks normal, you could try to confirm that the speaker still works by applying an audio signal to the speaker terminals.

If the audio is absent at the door plug, then the next step would be to access the back of the head unit and back probe the connector on the head unit to see if you have audio out of the head unit. Audio at the back of the head unit; but, no audio at the plug in the door suggests damage to the wiring loom. No audio at the head unit indicates the head unit has to come out for diagnosis.

If your right channel worked before the amplifier toasted its FETs, it is unlikely that the amplifier failure caused a subsequent failure in the head unit. The U1 chip on the amplifier board provides significant path isolation between the high power stuff at the FETs and the audio in signal.
 
Thanks [MENTION=26435]Old Guy[/MENTION]. Finally getting back to this. I do have power and an audio signal to the door (latter verified by headphones with some alligator clips).

Internal wiring in the speaker pod has continuity.

Continuity check at the speaker terminals showed an open short, and when I switch to resistance I see 5.6 M ohms. I'm curious why I'm seeing any resistance if the continuity check shows an open short, but it appears that this speaker is dead. I also briefly connected the speaker to an amplifier I have in my garage, and there was no sound.

I'll order a speaker (probably eBay) later today and report back.
 
Continuity check at the speaker terminals showed an open short, and when I switch to resistance I see 5.6 M ohms. I'm curious why I'm seeing any resistance if the continuity check shows an open short
I'll order a speaker (probably eBay) later today and report back.

An 'open short' is an interesting turn of phrase. The Electrical Engineer in me says that's an Oxymoron. I expect you mean open circuit.

If you were using the continuity / diode check function on your multimeter, a lot of multimeters have an ohms threshold value which is used to give an indication of continuity. My vintage Fluke 21 gives thumbs up for continuity on a 100 ohm resistor; but, gives a thumbs down to a 10,000 ohm. 5.6 M ohms is probably well above the continuity threshold. The 5.6 M ohm reading could result from electrical leakage across the failure point in the speaker, or, if your fingers happened to be touching the probes when you did the test 5.6 M ohms is within the rather large range for skin contact resistance.
 
An 'open short' is an interesting turn of phrase. The Electrical Engineer in me says that's an Oxymoron. I expect you mean open circuit.

Whoops-Yes, open circuit it is =)

The "new" speaker is now installed and working. Thanks all who helped!
 
Last edited:
Back
Top