DIY In Cabin Air Filter *solved with instructions* cost: $10

Joined
18 January 2007
Messages
170
SOLVED:
If you don't know what this is about, please refer to the older thread below.

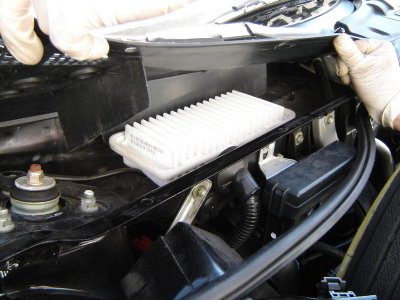
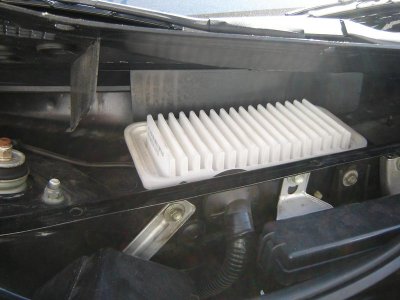
Here is the solution: Cut a Fram or cheapo equivalent 1998 Buick Regal GS (supercharged) engine (not cabin) air filter in half and it fits perfect.

*flows plenty of CFM, this was designed to keep up with a 3.8L supercharged engine, it has no problem keeping up with an a/c blower moter.
*filters out large particles (dust and pollen) without increasing resistance noticibly
*large paper filter media area, goes a LONG time without getting clogged
*secure rubber to plastic seal, no rattling around
*easy to vaccuum out and cheap to replace
*easy install

No pics, sorry, no questions until you try it yourself! I used a hacksaw to cut it in half, but a dremel or grinding wheel might make for a more pretty finished product. Tested and it flows real well. As a note, the placement of the air intake was engineered to be in an area that pulled in a minimal amount of large debris, so I expect this filter to be of great utility in the dust and pollen filtration department. Here's to your health!
 
I was changing out my lexus cabin air filter, and realize our nsx dont have one,anyone done this diy lately.
 
I have and it does indeed work quite well. It does seem that there are multiple versions of the same filter (don't recall what the exact part number is and will try to look it up). What I mean by this is that the rubber border/gasket on some can be separated and trimmed separately while others have the rubber border/gasket fused into the filter. I happen to buy one of the cheaper off-brand versions with the fused gasket. I simply measured the opening and trimmed off the excess from the end. Dropped the filter into the opening and I was done.

One tip, though, you need something really sharp that is capable of cutting smoothly through fibrous material. I happen to have a scalpel lying around and it worked like a charm. If you happen to have a capable pair of scissors, that may work as well.

The reason I did this "mod" was that leaves & debris were getting into the HVAC system thus creating a bad smell. I cleaned everything out and THEN installed the filter to keep things clean.
 
Thanks nsx 2k for the info, did you ask for the 1998 buick regal gs air filter? Or something else at the auto parts store?
 
I don't get it - This requires cutting where the air would get sucked in, ie' as in the SOS location, right?

I was planning to cut it open and install a Honda OEM cabin air filter from another car..
 
Nice!!..I've been searching for an actual cabin filter that would fit vs using and engine air filter. Found the cabin filter for the Audi R8. The dimensions after cutting it in half would fit perfect, but it's pretty expensive. I'm going to use this Buick engine air filter method for now..better than nothing.
 
Sorry for confusion guys, i put that picture to show where the filter goes, that one in pic. Is the One sos sale, but aDIY require us to use buick regal filter or the Frame filter to make it fit since if i remember correctly its measure is 4x6 only.
 
The above link is the one I used (didn't have it bookmarked).

I personally didn't reattach the two ends, for the filter I had had the gasket fused to the filter material. I just cut one end off to make it fit. I had simply let a small portion hang over the outer end (IIRC). It seems to work pretty well and I've had no issues with it rattling or coming out.
 
I went to purchase the Fram CA9115 air filter to use as a cabin filter and they must have changed the manufacturing of them, as the rubber gasket (that was removable) was not included. I found a Purolator air filter A34717 that I believe worked even better than the Fram CA9115 would have. As with the Fram, the width is fine; you just have to shorten the length. I personally cut from the middle; therefore when putting both ends back together and reinstalling the gasket, it fits perfectly. I also used some reinforced packaging tape to join the both halves together. I didn't take any additional pictures, as they would be the same as the Fram operation, but I used tape to join the filter elements back together.
 
I went to purchase the Fram CA9115 air filter to use as a cabin filter and they must have changed the manufacturing of them, as the rubber gasket (that was removable) was not included. I found a Purolator air filter A34717 that I believe worked even better than the Fram CA9115 would have. As with the Fram, the width is fine; you just have to shorten the length. I personally cut from the middle; therefore when putting both ends back together and reinstalling the gasket, it fits perfectly. I also used some reinforced packaging tape to join the both halves together. I didn't take any additional pictures, as they would be the same as the Fram operation, but I used tape to join the filter elements back together.

Djr, thanks for the info on the Purolator, i was wondering instead of taping was stapling it an option to join the two halfs since with tape over time with the heat it will become undone
 
I didn't have a stapler small enough to fit between the filter folds, so I used packing tape. I will check it after some time and report! Don
 
Ok Guys, Here ya go
installed on a 2005,customer car , so easy it wasnt funny, just gently remove the cowl clips and drop it in , NO cutting , fits perfect and snug, no one will see it after the cover is back down,
My only concern is if it were to get wet on the few of us who drive in the rain?
I used a napa p/n 6646 , also checked the air flow and it was nearly the same.
I made a VERY small "cabin filter installed " sticker on my graphics machine for future reference.
Any prime members need one let me know , free plus postage :smile:
 

Attachments

  • DSC04441.jpg
    DSC04441.jpg
    69.1 KB · Views: 2,129
  • DSC04442.jpg
    DSC04442.jpg
    54.6 KB · Views: 1,689
Ok Guys, Here ya go
installed on a 2005,customer car , so easy it wasnt funny, just gently remove the cowl clips and drop it in , NO cutting , fits perfect and snug, no one will see it after the cover is back down,
My only concern is if it were to get wet on the few of us who drive in the rain?
I used a napa p/n 6646 , also checked the air flow and it was nearly the same.
I made a VERY small "cabin filter installed " sticker on my graphics machine for future reference.
Any prime members need one let me know , free plus postage :smile:

This is awesome no cutting and direct fit! Thanks for sharing I might do this myself :)

Canadian P/N looks the same as well:
http://www.napacanada.com/en/PartsAccessories/PartsSearch/SearchByPartNumber.aspx#Detail
 
Back
Top