Clutch interlock

Joined
29 October 2004
Messages
3,035
Location
San Diego, CA (formerly Portland, TX)
It was only a matter of time. I went to start Lucille today and got nothing when I rotated the key to start.
Since I’ve replaced the brake and cruise bumpers, I figured it was the bumper for the clutch interlock. I pulled out the lower panel and removed the interlock wiring connector. I jumpered it and, of course, she cranked and started right up.
I will say a novena before attempting replacement of the bumper button.

May God have mercy on my soul!
 
We love St Ann...
 
Unless you are younger and flexible. I might be inclined to just fashion a more permanent form for the jumper and be done with it. A matching plug that is shorted would be the ideal sanitary arrangement.

All of the Euro cars that I have owned with standard transmissions did not have clutch interlocks. When I purchased the NSX it was the first more modern standard transmission Japanese car that I had driven. I don't recall a clutch interlock on early '70s Datsun 510s or the 240 Z. I remember that when I went to take it for a test drive I could not get it started and the salesman said ' have to disengage the clutch'. Then I remembered that my '80s vintage Honda VF 750 F had a similar interlock on the clutch lever which I by-passed rather shortly after purchasing. None of my earlier motor cycles had this feature. The other clutch and brake switches have mission critical functions that you cannot eliminate. No operational down side to by-passing the clutch starter interlock switch unless you want to remain 100% OEM.
 
Unless you are younger and flexible. I might be inclined to just fashion a more permanent form for the jumper and be done with it. A matching plug that is shorted would be the ideal sanitary arrangement.
That's a great idea. Is there such plug available or perhaps information relating to the parts required to make one? Thx.
 
That's a great idea. Is there such plug available or perhaps information relating to the parts required to make one? Thx.
For the immediate need, I fabricated a short piece of paper clip wrapped with electrical tape, and once inserted into the connector, wrapped all of it with electrical tape to cover any exposed metal. If I go this route, I’ll either tape or zip tie the connector to the switch so that it isn’t moving around.
 
For the immediate need, I fabricated a short piece of paper clip wrapped with electrical tape, and once inserted into the connector, wrapped all of it with electrical tape to cover any exposed metal. If I go this route, I’ll either tape or zip tie the connector to the switch so that it isn’t moving around.
Will I be able to unplug it without taking off the panel? I had difficulty removing the panel years back. thx.
 
Will I be able to unplug it without taking off the panel? I had difficulty removing the panel years back. thx.
I took the lower panel out before even trying. I removed my knee bolster a long time ago, so all I had was the lower panel screws and the thin metal bracket from left to right in the area.
I think the 2 screws to remove the lower panel would give sufficient room to get to the connector. But it is easier to see with everything removed.
 
That's a great idea. Is there such plug available or perhaps information relating to the parts required to make one? Thx.
Try using the contact link at Cycleterminal.com. They specialize in wiring for Japanese motorcycles; but, he is an NSX owner and member on Prime. Tell him what you want to do and he may be able to supply you with the correct plug body and terminal.
 
I think the 2 screws to remove the lower panel would give sufficient room to get to the connector. But it is easier to see with everything removed.
Are there any additional clips to remove the lower panel? I noticed there is small stud like on the other of the panel. So, I've removed the 2 screws, and I couldn't get the panel off. It seemed something is holding it to the knee bolster. Thx.
 
No additional clips. If you go to the NSX Prime library link in the red banner at the top of the web page you can find a link to .pdf version of the service manual. Page 20-44 shows the lower dash panel.

At the very front edge of the lower panel there are two pins which fit into holes close to the base of the steering column. With the two screws removed at the back edge of the panel, the back edge of the panel should pivot down and you should be free to pull those pin out of the holes and the panel should come free. There is a wire harness to the courtesy light that may be holding things up a little bit.

The lower panel does not overlap with the knee bolster pad. If it does something else is out of place. Is it possible that a previous owner double side taped some stuff together?
Got it. Let me try again when my headache is gone after lying upside down in that tight space :)

Thank you for your help as usual.
 
I don’t remember if this panel is above or below the knee bolster. It might be captured between them, which would require some wiggling to get out.
It does not sit above the knee bolster pad where it attaches to the knee bolster (in Honda speak the knee bolster is actually the bracket like thing that all of this stuff including the pad attaches to). The edge of the panel with the holes for the attachment screws sits just slightly forward of and almost flush with the bottom edge of the knee bolster pad. The two screws on the bottom of the bolster pad are on extended tabs that I think are mostly above and hidden by that lower panel. That is why the service manual says that you have to remove the lower panel first before you can remove the two screws that hold the lower part of the bolster pad in place.

If somebody snapped off one or both of the two tabs on the lower part of the knee bolster pad they may have got in there with double sided tape or worse glue which is why nis350 might be having some difficulties. If you tighten the screws that hold that lower panel in place too much you can crack the plastic around the holes which can also require the double sided tape treatment.
 
This panel is the first off, last to go back on. Be gentle as those ears/prongs on the back are not real strong, same on the passenger side - i broke one off without even trying. Working under there is a bitch, unless your back is made of rubber, you may find you have to remove the seat and the wheel.
 
Thank you all for the detail and pictures. I now have a better understanding of how this panel secured in place. I will give it a try later, perhaps after a visit to the chiropractor. :)
That is an outstanding idea to get your chiropractor to do it for you.
 
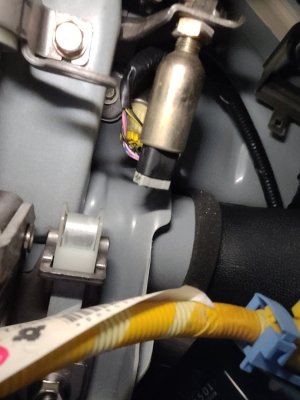
I was able to remove the panel successfully!!! I took a picture of what I could see. There are 2 plugs. One with a metal cylinder like and a smaller yellow plug above it. Is the yellow plug I need to jump to bypass the clutch switch? I couldn't really tell, and I suppose it has two wires? Thanks.
 

Attachments

  • nsx clutch switch.jpg
    nsx clutch switch.jpg
    127.8 KB · Views: 13
I was able to remove the panel successfully!!! I took a picture of what I could see. There are 2 plugs. One with a metal cylinder like and a smaller yellow plug above it. Is the yellow plug I need to jump to bypass the clutch switch? I couldn't really tell, and I suppose it has two wires? Thanks.
Yes. The small, yellow connector is the clutch interlock. Here is a pic of mine, with the jumper installed. It is hanging towards the right. IMG_7730.jpeg
 
Thanks for the confirmation.

Any tips about getting it unplugged without breaking anything? I only removed the lower panel, and it appears to be quite a task getting it unplugged, let alone jumping it. :-(
There is a lock on the connector which requires squeezing at the same time as pulling. Squeeze first, and wiggle as you pull the connector out.
 
There is a lock on the connector which requires squeezing at the same time as pulling. Squeeze first, and wiggle as you pull the connector out.
Task completed. I used a thin wire to jump the plug instead of a paper clip. I don't have to worry about getting stuck somewhere with that plug. Well worth the headache and neck pain. Thanks again.
 
Back
Top