Cluster needle removal

Have you any updates on this? Is the gauge working for you ok?

I have done the needle removal in the past and have been successful, there is a very special way to doing this though and I use a few unique tools for the job; so I'm curious and I would be surprised, if your method of just pulling it straight out worked. if it did work, then your very VERY lucky lol

revive from the dead Do you or anyone offer this gauge face swap service I wanna use someone with proper tools not a kitchen fork and guess calibration method:rolleyes:
 
Last edited:
Ok heres a bit more info.

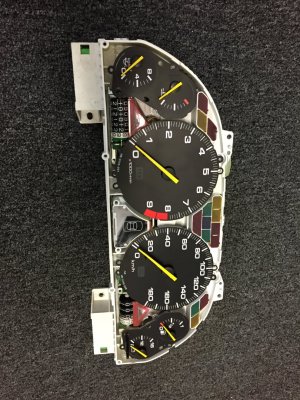
The needle goes down through a white plastic casing which you can see parts off in the above pic by "sweetchuck", inside the casing is a small weighted/balanced magnet, this magnet sits inside a very VERY small circular track. The white casing is surrounded in copper wire, which again you can see in the above pic, this copper wire generates eddy current that allows the needle to sweep.

So what basically happens is, when the needle is pulled incorrectly, the magnet is pulled up out of its track, it stays risen until the needle is pulled all the way out, at which point, the magnet falls freely back to where its supposed to be, but its upon this motion that what usually happens is, the magnet looses its original position or misses that small track and the balanced end of the magnet, goes where ever it likes; this in 98% of cases renders the speedo useless.

Hi Sudesh, I'm in DIRE help of removing the tach needle because I messed up the dial trying to clean it! I understand using fork method from the motor base by SweetChuck. How should I keep the tiny magnet from being displaced? Should I wrap magnets around the motor or at the base? ANY HELP MUCH APPRECIATED!! Thanks.
 
Do not use the 2-fork method, not worth screwing up a US$750 part.

It is best to use a small but "grippy" set of needle-nose pliers. Use the pliers to secure the motor spindle/axle below the needle, twist the need left/right, and pull up. You will need to power up the cluster before replacing the needle.

However, it is time to have your cluster rebuilt and recalibrated at this point. Heineken has made a neat cluster calibrator tool and I've documented how to use a cheap PWM to send a test signal.

I'm not sure who is doing cluster services right now...probably Kaz and Heineken.

Also [MENTION=7588]Briank[/MENTION] in the US. He did my cluster.
 
Thanks guys, seems not touching the needle myself and let pros handle is the best choice. As per the forums I got in-touch with POP!Design and T3Tec in Japan.
They have confirmed Honda no longer produce gauges for my 91NSX =(
 
FYI, DIY nirvana or for those wanting to start a business

The NSX cluster can be repaired by robbing parts from the KA5-KA8 Legend cluster. The stepper motors are the same, which is the part that gets broken. There were hundreds of thousands of such Legends produced, so plenty of spares in the world. I recommend every NSXer buy a Legend cluster for future repair parts...costs between $40-$120....get them before they are all crushed. This was hard-won information as I spent a lot of time in the boneyards investigating Honda clusters. I've actually performed the repair on the NSX cluster and it works well...sadly only the 4x stepper motors and lamps can be salvaged from the Legend.

The cluster fascia/faces are most excellently reproduced by Lockwood for a very reasonable price:

https://lockwoodinternational.co.uk...le/dials-mph-scale-honda/honda-nsx-mph-dials/

MT here: https://lockwoodinternational.co.uk/product/nsx-type-r-kmh-dial-part-no-8407/

Procar has an 2002+ NSX-R complete face overlay that DOES NOT require removal of the needles and looks great for US$600.

And [MENTION=30613]Heineken[/MENTION] has created an excellent cluster calibrator tool here:
http://www.nsxprime.com/forum/showthread.php/213974-Gauge-Cluster-Calibrator

and for those folks where spending money is painful (because grew up poor), I managed to use a $2 PWM to drive the gauges...

Do be aware that these gauges are US$750 EACH, so be careful.

ALL NSX's will need their clusters rebuilt. The cabin fire you prevent will be your own.
http://www.nsxcb.co.uk/showthread.php?15679-gauge-cluster-fire-issues

http://www.nsxcb.co.uk/showthread.php?11827-Speedo-problem&p=115142#post115142
 
Last edited:
Small update. After 2 weeks at POP!Design Japan, my gauge cluster came back and the new replacement tach dial looks 99% like the original. The font/color/reflection/size looks like the original, perhaps they did install an original for me! lol Given they were able to remove the needle and re-install everything; props for that. Haven't plugged it back into the car yet, hopefully nothing broke during shipping. And they also serviced the capacitors.

Side note about replacing gauge lights with LEDs, my 91 annunciators ENG/ALB/TCS/CRZControl/Handbrake didn't accept LED bulbs. These 5 lights would remain ON after engine start, and reverting back to incandescent bulbs resolved the issue. By replacing the Top 2 Dome lights with LEDs (with red silicone cover) made the cluster much brighter and sharper. And I kept the backlit bulbs as incandescent for even-light distribution.

Red LED Top Domes ON
View attachment 169697

Top Dome Lights OFF
View attachment 169698

Thanks again for the members here who help get out of a SOL situation!
 
Wouldn't it be easier to just use a paintbrush and carefully paint them yellow without disassembling the cluster? After removing it from the car and removing the lens of course.

Seems like that would be relatively easy to do or am I missing something?
 
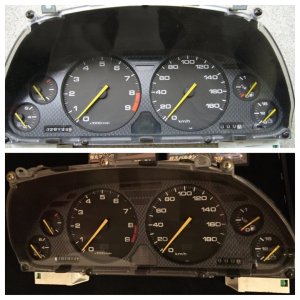
It is desirable to change the gauge faces under the needles. Which generally require the needle to be removed, which is a nerve wracking process.

The AT tach has a PRNDL and lower redline than the MT. The R tach reuses a couple of the PRNDL lamp indicators for shift lights.

There are at least a dozen different speedo faces with higher limits. And different clocking primary/secondary in metric or freedom units.

Painting a needle in situ can be a challenge.
 
Ah I see. I only want the yellow needles. Should be relatively easy to use a touch up paint brush to just paint the needles in situ? My car is JDM.

1736911562451.png
 
I recommend a very light hit of spray paint.

The needles are balanced and super light for good response. I fear that brushed on paint would be too heavy and thick.

Your car, so your decisions.
 
I'm worried it might be difficult to mask everything besides the needles for spray painting.
I did that 10 yrs ago lol. Tedious but worth it. I was going to post a pic of how I masked it, but there was sensitive personal info on some of the scrap paper I used lulz whoops
 

Attachments

  • 287.JPG
    287.JPG
    277.7 KB · Views: 10
  • 300.JPG
    300.JPG
    169.2 KB · Views: 10
I did that 10 yrs ago lol. Tedious but worth it. I was going to post a pic of how I masked it, but there was sensitive personal info on some of the scrap paper I used lulz whoops
That looks amazing! What exact type of paint and color did you use?

You used the masking and spray painting method?

See if you can cover up the sensitive info and post a pic, would love to see how you masked it!
 
Back
Top