I finally dug in and fixed the infamous aspirator fan. In fixing it, I think that I found a new way to make it stop that obnoxious noise. The first step in pulling apart the dash was helped a lot with previous posts where a driver's license was used to release the air conditioning vent clips. This was the most nerve wracking part of the whole process.
After pulling out the aspirator fan I found that the fan did have a lot of gunk built up in the bearings and housing. I cleaned it all out, reassembled it and tested it before putting everything back. The bad news was as many others have posted - it still made the same rattling sound as before!
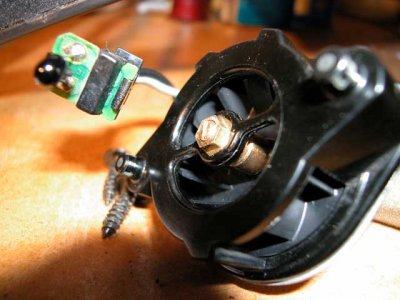
That's when I noticed an adjustment screw right behind the temperature sensor. It had an inner screw with an outer lock nut. To get at it, you need to gently pry off two star washers (like the ones used to hold kids toy wheels on). This separates the assembly into the sensor part and the fan part. Now you can get at the adjustment screw while it's running - very important to be able to do this. I then plugged the fan assembly into the connector in the dash and loosened the outer lock nut - a 1/4" socket fit it best (non-metric in a Japanese car?). Then I tightened the adjustment screw until the fan stopped running then backed it off a tiny bit (just like adjusting a bicycle axle). Tighten the outer lock nut and reassemble. The star washers are the toughest to get back on - I used the 1/4" socket to push it on.
It's so quiet, I kept checking to see if it was still turning. A great way to save a $400 part!
I'll try to attach a picture of the adjusting screw. This picture is after separating the fan part and the sensor part.
After pulling out the aspirator fan I found that the fan did have a lot of gunk built up in the bearings and housing. I cleaned it all out, reassembled it and tested it before putting everything back. The bad news was as many others have posted - it still made the same rattling sound as before!
That's when I noticed an adjustment screw right behind the temperature sensor. It had an inner screw with an outer lock nut. To get at it, you need to gently pry off two star washers (like the ones used to hold kids toy wheels on). This separates the assembly into the sensor part and the fan part. Now you can get at the adjustment screw while it's running - very important to be able to do this. I then plugged the fan assembly into the connector in the dash and loosened the outer lock nut - a 1/4" socket fit it best (non-metric in a Japanese car?). Then I tightened the adjustment screw until the fan stopped running then backed it off a tiny bit (just like adjusting a bicycle axle). Tighten the outer lock nut and reassemble. The star washers are the toughest to get back on - I used the 1/4" socket to push it on.
It's so quiet, I kept checking to see if it was still turning. A great way to save a $400 part!
I'll try to attach a picture of the adjusting screw. This picture is after separating the fan part and the sensor part.

")

 so I got a new replacement...but what I wanted to let you all know is that Larry's supplier said mine was the last new unit in the US as of 3 months ago, so take heed and learn how to repair these pesky critters....
