- Joined
- 27 June 2003
- Messages
- 4,618
So a friend and I spent the entire day yesterday overhauling my brakes and installing my new set of Tein RE's! 
We Replaced the brake lines with Stainless Steel lines, painted the calipers with the G2 silver caliper paint, replaced the rotors with cryo treated Powerslot x-drilled and slotted rotors.
(This is the aftermath of the long day of work)

It took us about 2 hours and 3 trips to autozone to get the first OEM shock assembly out. Come to find out, we didn't need the spring compressor as it didn't give us any more clearance.
We used the 2x4 trick on the rotor, which you don't need a 350 lb man to sit on it as if you push down on it all the way, it will force the shock back into the cup. What we found is, as I put pressure on the 2x4, pushing about half way down, my friend was able to pull the bottom of the shock out of the cup. One thing that really helped is moving the brake cable stay that sits at the bottom of the shock. Move this bracket up to the top so its out of the way. This gave us enough room to pull it out! The first one took us about 2 hours of yanking, pulling, pushing and cursing, the last 3 took us about 15 minutes a piece!
The result is a nice ride with (I think?) 1.25-1.5" drop. The ride is firm and smooth as opposed to my 15 year old OEM shocks!
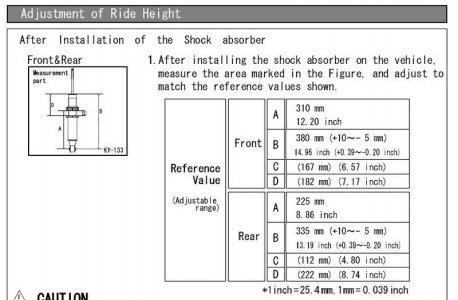
Seeing as how the RE's are fully adjustable, I have all shocks set to full soft for now. One thing I did notice though is that on the road, I'm getting a significant amount of bounce.
What can I do to fix this? I know the RE's have a way of changing the spring pre-load, but how do I know what to change it to? right now I just left it snug where the spring is not loose between the upper pillowball mount and the lower adjustment perch. Any input here would be great!
So for now I'm enjoying the new braking performance with the new handling performance!
I was going to do a DIY writeup but the entire day took us about 12 hours from start to finish!
We Replaced the brake lines with Stainless Steel lines, painted the calipers with the G2 silver caliper paint, replaced the rotors with cryo treated Powerslot x-drilled and slotted rotors.
(This is the aftermath of the long day of work)

It took us about 2 hours and 3 trips to autozone to get the first OEM shock assembly out. Come to find out, we didn't need the spring compressor as it didn't give us any more clearance.
We used the 2x4 trick on the rotor, which you don't need a 350 lb man to sit on it as if you push down on it all the way, it will force the shock back into the cup. What we found is, as I put pressure on the 2x4, pushing about half way down, my friend was able to pull the bottom of the shock out of the cup. One thing that really helped is moving the brake cable stay that sits at the bottom of the shock. Move this bracket up to the top so its out of the way. This gave us enough room to pull it out! The first one took us about 2 hours of yanking, pulling, pushing and cursing, the last 3 took us about 15 minutes a piece!
The result is a nice ride with (I think?) 1.25-1.5" drop. The ride is firm and smooth as opposed to my 15 year old OEM shocks!
Seeing as how the RE's are fully adjustable, I have all shocks set to full soft for now. One thing I did notice though is that on the road, I'm getting a significant amount of bounce.
What can I do to fix this? I know the RE's have a way of changing the spring pre-load, but how do I know what to change it to? right now I just left it snug where the spring is not loose between the upper pillowball mount and the lower adjustment perch. Any input here would be great!
So for now I'm enjoying the new braking performance with the new handling performance!
I was going to do a DIY writeup but the entire day took us about 12 hours from start to finish!


