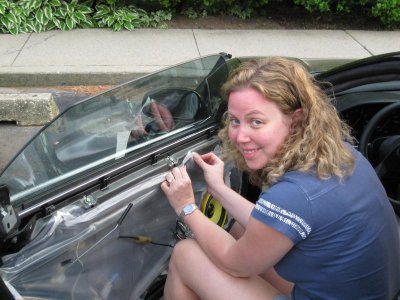
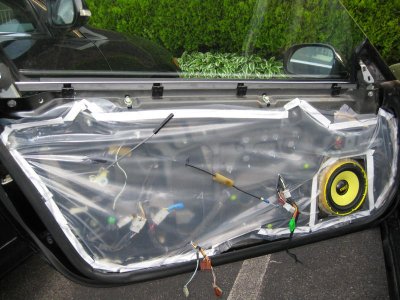
I've moved to my driver side door panel repair and have removed the dynamat that was in the door, as it was completely ripped up and trashed. I was thinking about replacing the plastic vapor barrier that came on the doors originally. Much of the adhesive is still there and (somewhat) soft. Is this worth doing, or is the door ok without the plastic?
Replace Vapor Barrier?
- Thread starter Honcho
- Start date
Great question! My driver's door vapor barrier is terribly torn up and the adhesive is hard as a rock. Go figure: it's only been 18 years. I am sure that the vapor barrier is needed but I wonder what gauge plastic to use and what sort of adhesive.
I will watch the thread for the shared, group knowledge.:smile:
I will watch the thread for the shared, group knowledge.:smile:
I rebuild my window regulators and cleaned up the doors. I decided to spring for new oem parts. I used high temp vacuum bag tape. not sure how it will last long term. The original stuff was shot. I used a plastic razor blade and 3M adhesive remover to get the old stuff off. It was a big job, but worth it.


OEM white seal for the plastic vapor barrier part number 08712-0003
Door vapor barrier
72321-SL0-900 Right Door
72361-SL0-000 Left Door
I just order them to do my doors.
Door vapor barrier
72321-SL0-900 Right Door
72361-SL0-000 Left Door
I just order them to do my doors.
- Joined
- 10 February 2009
- Messages
- 368
How much did they cost and where did you find them?
I'm going to ghetto it up with some 3 mil clear plastic. Trace the pattern with a sharpie and cut slits for the plugs. It's just a vapor barrier after all, it's not under any load or heat. I did a search and I think you can get the adhesive gum from vendors pretty cheap. Though, I imagine double-sided weatherstrip tape would work ok too. If it can stand up to 4 seasons on your house, it should be good enough for your car door too.
Another member here on prime, told me that the "Strip Caulk" by 3M is very similar to the OEM adhesive on the door. But it is pretty expensive.
Earlier this year my 1991's windows simply crawled up and down and the passenger door wouldn't unlock, so I knew it was time to lubricate the door's internals. After removing the door skins, I found over 150 feet of duct tape (yes, I measured it) holding rotten/torn vapor/plastic barrier up on both of my doors. In my quest to keep the car OEM I contacted my favorite parts vendor Tim @ RayLaks Acura and he got me a pair of plastic door liners (vapor barriers). I believe they ran ~$56/each. Personally, I thought it was worth it. Additionally, I used the 3M Strip Caulk to secure it to the door and it has worked great (I got this from another vendor for it isn't a standard Honda item). I realize that this particular repair is hidden from view, but I personally felt better knowing that everything was put together the way it was intended.
I went to my local auto body supply store today. TriCity Auto Paint.
The 3M strip caulk is not as expensive as I thought. $12.00 for 60 feet. They come in 1 feet strips.
They also have a website http://www.tcpglobal.com/
The 3M strip caulk is not as expensive as I thought. $12.00 for 60 feet. They come in 1 feet strips.
They also have a website http://www.tcpglobal.com/
I ended up using 4 mil clear plastic and 3M foam mounting tape. I have to say though that I did little of the work. My fiancee basically did the whole job herself. She traced the template, cut the sheet, scraped most of the old putty, did ALL of the mounting tape and fit the barrier. All I did was hold the sheet for her while she fitted it. It turned out perfect. When I asked her why she did it, she said that she gets bored just watching me, so she figured she would just do it herself. I have an awesome girl who likes to work on my NSX. I am basically the luckiest man on Earth. 
Attachments
I think I'll be replacing the vapor seals very soon. Duct tape in there looks terrible. Anybody think of using hook & loop (Velcro) to make it easily removable?
the parts list for $75.45 each but acura of augusta sells them for about $55/side. the driver's panel has pre-formed pockets for controls so it keeps the plastic from binding. also, the adhesive strips from the paint/body supply work great. it's what i used on both doors. i thought of hook-and-loop also but they told me that defeated the purpose of having a vapor barrier on the door as moisture could get around the porous material.
I'm sure anything will work better than the rat's nest that was hiding beneath the door skin.
I ended up using 4 mil clear plastic and 3M foam mounting tape. I have to say though that I did little of the work. My fiancee basically did the whole job herself. She traced the template, cut the sheet, scraped most of the old putty, did ALL of the mounting tape and fit the barrier. All I did was hold the sheet for her while she fitted it. It turned out perfect. When I asked her why she did it, she said that she gets bored just watching me, so she figured she would just do it herself. I have an awesome girl who likes to work on my NSX. I am basically the luckiest man on Earth.
She did a really nice job!
I replaced mine awhile ago using I think painters drop plastic stuff "the rolls they sell at home depot". I used a clear silicone caulk too. If I could do it again I'd use vacuum bagging tape like Jeff did. It's basically tape that when you push on it, it becomes gummy and molds to whatever you press into it.
The tapes made by air tech and can be sourced anywhere from around $6.80-$10 per roll which is 25 feet.
The tapes made by air tech and can be sourced anywhere from around $6.80-$10 per roll which is 25 feet.
Honcho:
Tell your assistant, she missed the hole for the security light connector (driver's side only ofcourse)
Tell your assistant, she missed the hole for the security light connector (driver's side only ofcourse)
Hey guys, im in the middle of my project. I was advised to use Isopropyl alcohol (90% or more) to remove the adhesive remnants (after using a plastic paint scraper). I noticed, though, that this was stripping the paint in some areas, so I stopped. Despite being an out-of-sight project, I'd like to do it right and have things looking good before putting everything back together.
What did you use to remove the gummy residue after scraping the majority off?
What did you use to remove the gummy residue after scraping the majority off?
Hmm I don't remember. I think mine was so old and it came off in chunks. I think for the rest that wasn't hardened I scraped it off with a plastic scraper too...
- Joined
- 15 May 2004
- Messages
- 6,898
I've used BMW gum-like sealant, expensive but worth it. Getting the old one off is terrible but worth it. Don't use tape it won't withstand water which you'll have in the cabin then. I went with the OEM vapor barrier as I know it lasts around 20 years and I don't want to do this on a yearly base.
Im reinstalling new vapor barriers and plan on using 3M strip calk, just need to finish removing the old sealant without damaging the paint. Still looking for suggestions there.
Similar threads
- Replies
- 4
- Views
- 344
- Replies
- 15
- Views
- 1K


