We put the finishing touches on Shane's audio makeover today.
This is a stock console, re-worked for the new Alpine 9815 Head unit. I cut the slot and profiled the edge, we also removed the ash-tray cover & the Vent surround frame and Shane had them professionally painted. The red is growing on me, now I see it all done.
Today we changed the colours of the clock & A/C screens to match the blue of the Alpine Head - looks a lot better don't you think?

Before:

After:


The speakers are Eclipse SC 8264 Components and the amp is an older model MTX Thunder 4200X - I actually had this exact same model amp in my own car when I first bought it! Nice thing about this amp is it's really compact & light making for a clean install behind the driver's seat with minimal invasion of space.
This location actually worked really well for this small amp - it's also relatively discreet behind teh seat - not terribly obvious from outside potentially inviting theft. It also made for relatively easy hook-up with short runs for the speaker & RCA cables down the centre console & the power coming in from just the other side of the bulk-head (similar to Jonathan's in This Thread but obviously coming forward though the front engine bulkhead, as opposed to through the rear to the trunk.
When we hooked it up initially it was really struggling to drive the speakers in single channel mode. But when bridged the difference was incredible - all the distortion evaporated & once the head was tuned in, the sound is really pretty incredible considering no sub.
Amazing the difference going from 25W to 100W per channel makes! Many people confuse "more power" (as my name-sake Scottie from StarTrek would say) with out & out volume - you need the higher power ouput to be able to drive components & if there isn't enough (like when using the built-in head unit amp) they will clip & distort horribly. I didn't realize it was only 25W per channel until I looked up the specs before we bridged it.


The tweeter install: too bad we didn't take any of the door interior before re-assembling the door panel. Shane put a lot of work into covering the door with Raammat and of course the speakers were mounted with the famous D'Ecosse speaker mounting plates.

You just have to trust us on this one - there's a great looking install behind that panel!

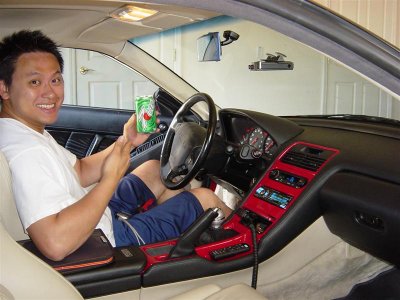
Finally, here's laughing boy himself giving it the seal of approval I think - right Shane? (Or maybe it's just the soda he was appreciative of!)

.
This is a stock console, re-worked for the new Alpine 9815 Head unit. I cut the slot and profiled the edge, we also removed the ash-tray cover & the Vent surround frame and Shane had them professionally painted. The red is growing on me, now I see it all done.
Today we changed the colours of the clock & A/C screens to match the blue of the Alpine Head - looks a lot better don't you think?

Before:
After:
The speakers are Eclipse SC 8264 Components and the amp is an older model MTX Thunder 4200X - I actually had this exact same model amp in my own car when I first bought it! Nice thing about this amp is it's really compact & light making for a clean install behind the driver's seat with minimal invasion of space.
This location actually worked really well for this small amp - it's also relatively discreet behind teh seat - not terribly obvious from outside potentially inviting theft. It also made for relatively easy hook-up with short runs for the speaker & RCA cables down the centre console & the power coming in from just the other side of the bulk-head (similar to Jonathan's in This Thread but obviously coming forward though the front engine bulkhead, as opposed to through the rear to the trunk.
When we hooked it up initially it was really struggling to drive the speakers in single channel mode. But when bridged the difference was incredible - all the distortion evaporated & once the head was tuned in, the sound is really pretty incredible considering no sub.
Amazing the difference going from 25W to 100W per channel makes! Many people confuse "more power" (as my name-sake Scottie from StarTrek would say) with out & out volume - you need the higher power ouput to be able to drive components & if there isn't enough (like when using the built-in head unit amp) they will clip & distort horribly. I didn't realize it was only 25W per channel until I looked up the specs before we bridged it.
The tweeter install: too bad we didn't take any of the door interior before re-assembling the door panel. Shane put a lot of work into covering the door with Raammat and of course the speakers were mounted with the famous D'Ecosse speaker mounting plates.

You just have to trust us on this one - there's a great looking install behind that panel!
Finally, here's laughing boy himself giving it the seal of approval I think - right Shane? (Or maybe it's just the soda he was appreciative of!)

.


