You are using an out of date browser. It may not display this or other websites correctly.
You should upgrade or use an alternative browser.
You should upgrade or use an alternative browser.
New Noise-maker
- Thread starter D'Ecosse
- Start date
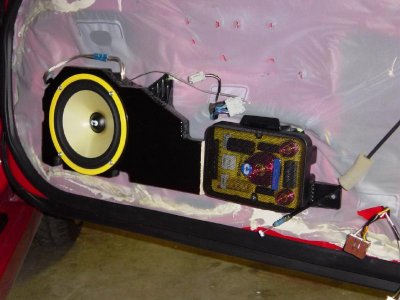
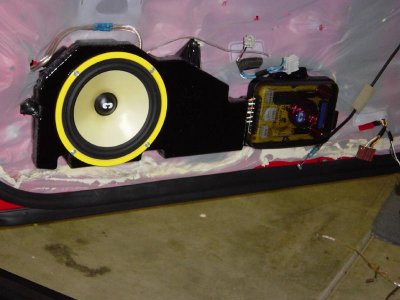
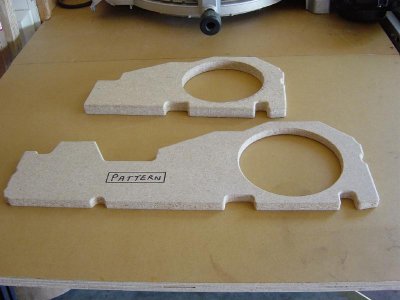
The fun part of the job was making the baffles to mount the speakers - I started by making a pattern in 3/8 mdf by using a pattern bit in my router table & using the bottom half of the Bose clam shell as the original template. Then I cut the mounting hole for the speaker using a dremel with router attachment (full size router too big to make a 5 3/4" hole).
That completed my mdf pattern.
Now I could use my table router again with the pattern bit on the 3/4 mdf with the 3/8 pattern stuck to it with double-sided carpet tape - follow the edge around the outside, then the inside speaker cut-out. Finish up with a round-over bit to ease the edges & inside radius of the speaker cut-out.
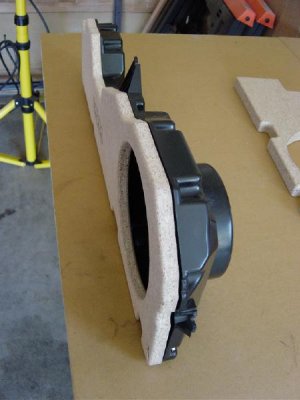
As I found out after I made the full length baffle plate, the c/o was just too big to surface mount - so just chopped it off! A less monstrous c/o would have fit surface mount nicley.
The plate mounts to the original back plate of the Bose clam-shell.
Worst part of t he whole job? Pulling the speaker wires through the door harnesses!!!!!!!
Last edited:
I luv it ken it looks great.. and I hope it sound great toO!
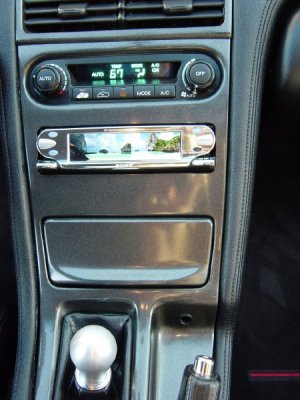
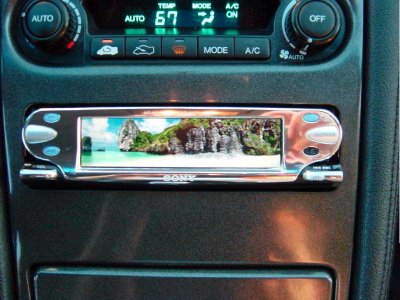
The Sony Head unit - MEX-5DI
Very nice MP3 Player
32000 Color Combinations, Spectrum Analyzer, EQ7 7-band Equalizer with Presets, Dynamic Soundstage Organizer, SSIR-EXA Adaptive Reception Tuner and more, more thinks
It looks great in Acera NSX
Maybe I too bought it
ByyByy
Very nice MP3 Player
32000 Color Combinations, Spectrum Analyzer, EQ7 7-band Equalizer with Presets, Dynamic Soundstage Organizer, SSIR-EXA Adaptive Reception Tuner and more, more thinks
It looks great in Acera NSX
Maybe I too bought it
ByyByy
Is that a golf game you got going there on the display? 
Don't know if you ended up making it to the meet today, but if I had known you had new goodies, I may have made the extra effort to get there myself
Don't know if you ended up making it to the meet today, but if I had known you had new goodies, I may have made the extra effort to get there myself
Hi J
I left you a vm on your cell this am, thought i might see you there - another hot one, nice hospitality from Ted.
No golf game - although you can really load anything you choose via the memory stick. Has some nice stuff pre-loaded already. Maybe a bit gimmicky but it looks neat.
The new speakers are killer!
Hey - on a related note - whats a good mp3 converter s/ware?
Hey Ken, are you looking for software to convert your CD collection to MP3?
If you want something quick and simple, Music Match is a safe bet, there are literally thousands of applications, ranging from very simple and plain, to wildly complicated and customizable.
However, the two I would recommend to start with are:
1) Music Match: http://www.musicmatch.com
2) CD-EX: http://www.cdex.n3.net/
If you are using MP3, I would recommend using no less than 160kbps, leaning toward 192kbps as a good minimum for encoding your music collection.
As for downloading MP3 files online, my two favorite places are:
1) Win-MX http://www.winmx.com/
2) Kazaa http://www.kazaa.com
[coveringmyass]But of course, it is illegal to use the above sites to download music you don't own, and I don't condone or promote the use of these sites and/or applications[/coveringmyass]
Jonathan said:
[coveringmyass]But of course, it is illegal to use the above sites to download music you don't own, and I don't condone or promote the use of these sites and/or applications[/coveringmyass]

hahaha - soemhow the UBB code didn't work! Nice one, very funny!

I guess I don't know as much about mp3 as I thought I did - what is the difference in the bps rate? Does it compress it less or something? I might just have to Google that one ...... (although I bet the sites you referred will tell me about it)
bps is all about quality vs file size
For home / car stereo I would recommend the following as a good balance:
MP3
192 kbps
WMA (Windows Media)
160 kbps (as many hardware devices don't support WMA, of course all of mine do, this is often not an option, but XP offers it as a nice built in option with Windows Media Player)
For portable devices, MP3 @ 128kbps or WMA @ 64kbps is generally good enough, unless you are very particular about quality, if so, you better have good earphones to start with.
This can often be a holy war with many people when it comes to bit rates, codecs, blah blah blah, but the basics come down to (just like everything) the one that's best, is the one that's best for you.
Try some out and see what you like, you may find that MP3 at 128 (or possibly even lower, although not recommended) is worth the extra music you can fit in a particular amount of space (say for example, a 700MB blank CD )
)
Good luck -
JS
For home / car stereo I would recommend the following as a good balance:
MP3
192 kbps
WMA (Windows Media)
160 kbps (as many hardware devices don't support WMA, of course all of mine do, this is often not an option, but XP offers it as a nice built in option with Windows Media Player)
For portable devices, MP3 @ 128kbps or WMA @ 64kbps is generally good enough, unless you are very particular about quality, if so, you better have good earphones to start with.
This can often be a holy war with many people when it comes to bit rates, codecs, blah blah blah, but the basics come down to (just like everything) the one that's best, is the one that's best for you.
Try some out and see what you like, you may find that MP3 at 128 (or possibly even lower, although not recommended) is worth the extra music you can fit in a particular amount of space (say for example, a 700MB blank CD
Good luck -
JS
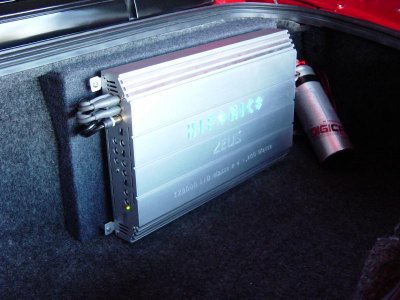
Hi D'Ecosse, Nice Amp and work! HiFonics makes great amps.
After all this work how much weight difference is this compared to the factory bose?
After all this work how much weight difference is this compared to the factory bose?
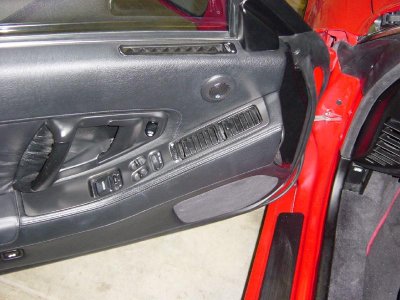
Nice job. I did the exact same thing for the door mounted speakers. I used 3/4" wood and mounted it to the base just like you did. I thought I was the only one  Anyway, I think I might redo mine using 1/2" because I found it to be a very tight fit when putting my door panel back on. Did you run into any fitment problems?
Also, I'm just mouting up my Honda nav pod with Alpine monitor and Alpine 7996 DVD player. It took my a while to hand cut the SOS center console section. I have a question though. Where did you run your power wires for your amp? I'll be wiring up my amp next, but I'm not sure how I'm going to route the power wires through the trunk, or into the cabin if I mount it inside. Also, where are you running you interconnect wires? I've been looking at my Helm for the OEM wire harness routing, but I haven't actually looked for them on the car itself yet. Like you I'm thinking of using the tool kit space for my amp. I'm not sure where I'm going to put the jack and compressor though. Anyway, looking good.
Chris
Thanks for comps, Chris!ChrisK said:.... Anyway, I think I might redo mine using 1/2" because I found it to be a very tight fit when putting my door panel back on. Did you run into any fitment problems?
There is plenty of room for the speaker - the problem I had was with the crossover, which is particularly large on the CDT set-up. I couldn't have surface mounted that even using 1/2"., hence the chop-job!
For the power cable, that is one part I did not do myself - there was a previous set-up in the trunk. The power cable comes directly off the battery & I believe it comes under the car - I need to check that out for you later tonight.[ Where did you run your power wires for your amp? I'll be wiring up my amp next, but I'm not sure how I'm going to route the power wires through the trunk, or into the cabin if I mount it inside. Also, where are you running you interconnect wires? I've been looking at my Helm for the OEM wire harness routing, but I haven't actually looked for them on the car itself yet.
I did run a new rca interconnect however - I got a good quality Monster 4 way cable (much easier than pulling multiple singles or pairs) and it runs down the center console, then up the rear firewall over to the right (passenger side - left as you're looking at it from inside car) at the top - there is a convenient grommet there, above the ECU right in the top corner. From there, into the engine bay, then it tucks behind the fan unit & if you follow it round, you can pick up another grommet feedthrough into the trunk (it ends up being almost directly opposite the one in the firewall from a reference standpoint).
I will take pics later to clarify.
For the speaker wires, they follow a similar route but on the drivers side, before coming back down the center console. The previous installer had just used the new speakers wires back to the stock head wiring, then used the original signal wires to carry the speaker current out to the doors! So I pulled new speaker cable out under each side of the dash, then down through the harnesses into the doors - that is one really tight squeeze but it is worth it in the end if you're pumping any serious power there.
You just have to do that in stages - it's easy to get it to the door bulkhead, so just pop the grommet out & pull the cable through the hole without worrying about the sleeved harness yet; then also pop the grommet off from inside the door - this makes the sleeved harness must easier to work with. I used a fish tape wire to go up through the sleeve from the bottom end, then pulled back down a single wire. I then soldered the speaker wire to the single wire so I could minimize the bulk & pulled it on down through. It sounds easy enough but it is a royal PITA!
Please answer a stupid question for me.
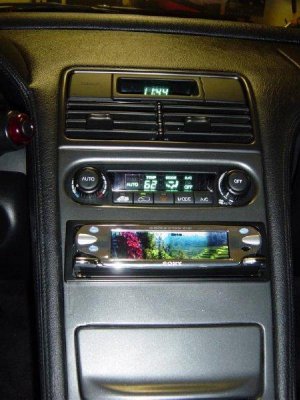
I noticed in the photos that D'Ecosse 93' NSX has "green" lighting for the clock and climate controls.
Is this factory or customized?
All of the lighting in my NSX is red (orange).
Which one is normal and if this is custom, how was it done?
I noticed in the photos that D'Ecosse 93' NSX has "green" lighting for the clock and climate controls.
Is this factory or customized?
All of the lighting in my NSX is red (orange).
Which one is normal and if this is custom, how was it done?
There are no stupid questions (nor stupid people) on NSXPrimeblknsxnoc said:Please answer a stupid question for me.
I have learned so much from this board it is incredible. - & learn something new almost every day from it.
It is more blue than green I would say ....I noticed in the photos that D'Ecosse 93' NSX has "green" lighting for the clock and climate controls.
CustomizedIs this factory or customized?
Yours is normalAll of the lighting in my NSX is red (orange).....
Which one is normal
There are a few articles on this if you search - basically there are just simple colour filters in front of the LCD displays but behind the plastic screen of the faceplate, for both the clock & the A/C control module. It is quite intuitive if you take them apart to see what to do.how was it done?
The A/C one just peels off - The clock one is not so simple to remove (but not impractical) as you have to dremel off some small plastic rivets to remove it - The big part of the job is just removing the console to get to the A/C controller!
There are some more pics here
Update 8-24-03:
I re-did the console - mounted the head behind the console rather than surface (top) mount - got a real clean smooth finish on the Science Of Speed replacement console - think this looks cleaner with the main body of head behind the fascia. It is also much easier to remove the console now, leaving the head unit installed (similar to OEM)
I also removed the perimeter frame from the vents & painted them to match the main console.
Attachments
Last edited:
Great Job. I like the new look better. It looks much cleaner and doesn't scream "aftermarket" as much!
I agree.
Ken, now it looks perfect!
Ken, now it looks perfect!
werd
And to think my console started it all and is still the one used as the primary mold for all the ones sold! (Hey should I get some royalties? Naw im just playin)
Stereo looks real good, and I dig the color removal of the AC/Clock. I was going to do this myself but feared it would look too white and clash against the guage panel/speedometer (which im never takin apart again because its a pain in the ass).
-BZ
And to think my console started it all
Stereo looks real good, and I dig the color removal of the AC/Clock. I was going to do this myself but feared it would look too white and clash against the guage panel/speedometer (which im never takin apart again because its a pain in the ass).
-BZ
Similar threads
- Replies
- 0
- Views
- 94
- Replies
- 2
- Views
- 242


