Need a kind user for ref pics :)

Joined
27 May 2007
Messages
15
Hi there NSX people ^^!

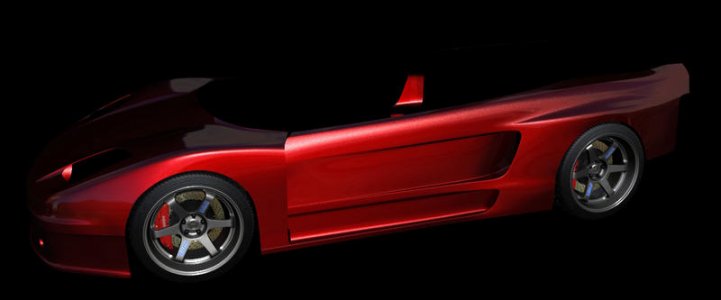
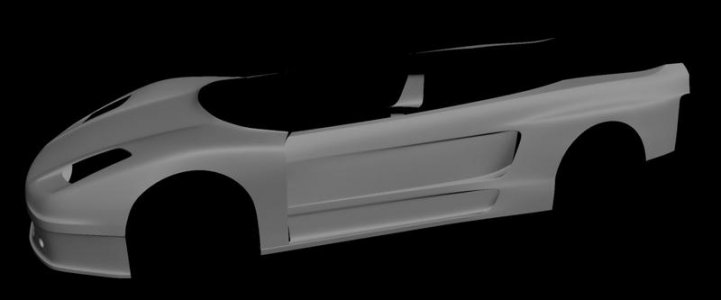
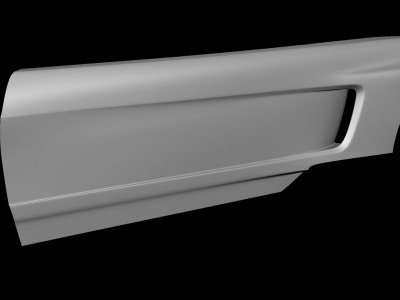
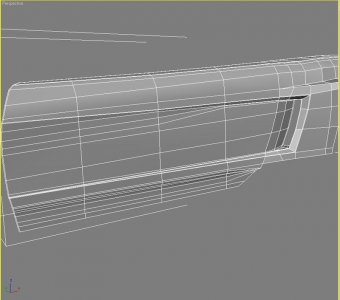
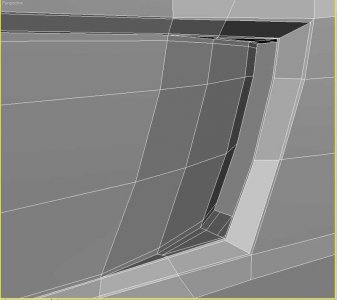
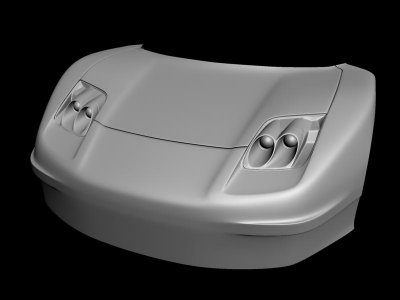
To put it very simple, im modeling in 3d a '92 NSX, with a front mod
to get the new nsx headights, and a whole widebody kit to give it
a jgtc look, the hard thing is that there are no blueprints haha

I've asked the modder (Science of speed and cantrell) but they didnt
reply :l

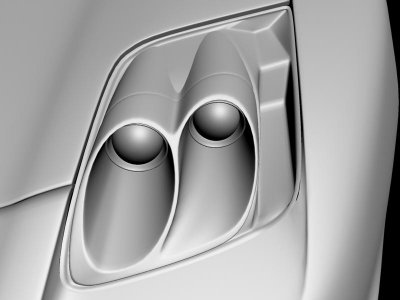
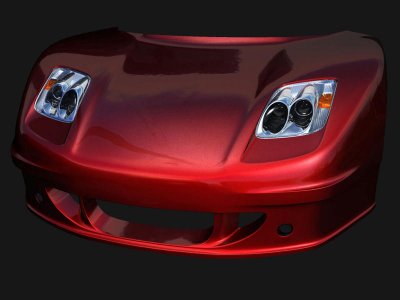
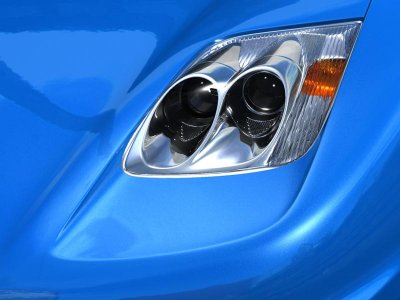
I'd need a closeup of the new NSX front lights (cant really find any on the net),
and also the '92 NSX rear lights, thank you very much

-BB-
 

Attachments

  • 130_0405_01_z+1992_acura_nsx+front_left_view.jpg
    130_0405_01_z+1992_acura_nsx+front_left_view.jpg
    82.7 KB · Views: 358
  • 130_0405_03_z+1992_acura_nsx+rear_view.jpg
    130_0405_03_z+1992_acura_nsx+rear_view.jpg
    74.2 KB · Views: 247
Haha, you're sort of right!

I often forget to resort to my grammatically correct english, so It's ok,
I'll take the effort of having it properly polished. :)

Basically, I'd be happy if one of you, happy owners of a multitude of NSX's,
would be as kind as it takes to provide a closeup (or more :p), of the new
NSX headlights (2003? I don't know for sure, those in the attachment in
the first post), and also a closeup shot of the NSX '92 rear lights (same, as
you can see in the attachment).

It's pretty hard to randomly find good closeup pics of healights, I often try on
e-bay, but I would only come up with silly super lights! And I doubt there
even are NSX in Italy to look at them myself! The photos aren't for scam purposes (I accidentally
readt the thread about that dude selling someone elses NSX on ebay), they
are just to give me a good idea on how the car lights are composed-tasselated, so I can model this beautiful car with more fidelty.

cheers

-BB-
 
Ryan's car:
whitelight.jpg

headlights2.jpg

latest1.jpg

1.jpg


Detlef's car:
Procar_NSX-RR_4.JPG

Procar_NA2_headlight.JPG

Procar_headlight_3.JPG

attachment.php


i think these are enough, no?? :biggrin: :biggrin:
 
Yeeeaah! Very good pics! Thank you very much, my life is definately
easier, when i'll get to about completing them I might consider posting them
here for some sort of feedback about fidelty. :)

Now I need precious rear lights, What i am looking for is how the glass cover
is made, those lot of small squares&dots in the plastic that make the glass
red cover not see-trough, so i can get the same pleasing effect. :)

-BB-
 
Spent quite some time on the headlight and front shape, will need a lot of
fixings tho :p

The "inside" of the light is sort of tricky to guess, since the upper glass cover
has plastic stripes which distort glass refraction, hope that they are coming
out right.

-BB-
 

Attachments

  • closeuphl.jpg
    closeuphl.jpg
    29.7 KB · Views: 154
  • Front 1.jpg
    Front 1.jpg
    18.4 KB · Views: 183
Very nice. Looking forward to seeing more. Check my gallery link below if you need more widebody reference. :smile:
 
Wow, that is some amazing work you have there! I await to see the final product!
 
Thanks for the pics ty a lot! will be very useful when I get
to the rear lights later on, btw, heres progress, the light bulb glass is
too dark, i cant get many good reflections on the inside of the 2couple
headlight thing, so i'll either make them brighter, or make the 2couple thing
not chrome.

anyways, ill finish the headlights properly later on, now time to model ^^)

-BB-
 

Attachments

  • frontred.jpg
    frontred.jpg
    41.9 KB · Views: 152
  • head.jpg
    head.jpg
    46.8 KB · Views: 150
Looking very good. I like the blue. :wink: :biggrin:


Will these help for the inside of the light.


DSCF0210.jpg


DSCF0208.jpg


Looking at both pic's, you need more of the orange from the signal and the headlight bulbs are closer together. I can send these pic's to you if you pm me your e-mail. I have them in high quality (1.5 meg each) that you can zoom in on the light.
 
Last edited:
Yeah, i dont understand much whats behind that waved glass, i think i placed
the "orange" stuff at the right place, just that in your pic it gets relfected,
in mine it doesnt, it can be because the original shape of the chrome
is more inwards rather than going slope down, or a matter of angle of view,
or simply, the inside of the thing is different from how i did it O_o)

i mean, in some pics it looks like the whole chromed part inside is orange,
while in other pics it seems only the part far inside is orange, pretty
tricky!

comtec it says you dont receive pm's! o;

-BB-
Sorry about that BB, I just changed to a new email address and when i updated it on prime i was locked out a little while :rolleyes: . It works now.

I wish i could just look at my car and tell you exactly how much orange is there but it is still in the shop. :frown:
 
Its ok no problems :)

this whole thing will get completed inprobably months (as im doing it
in my spare time), so im not really in a hurry :p

Working on the side now, damn thing is hard to guess from just some ref
pics bleh, will post progress later on.

-BB-
 
If you are really in no hurry my car should be finished in the next couple weeks (please,please,please
bowdown.gif
) and i would be more than happy to get measurements and pics for what ever you need. But i won't be able to help with the widebody parts :tongue: .
 
Trying to get the side to look right but its not so easy bah

i just noticed the air itakes are completely wrong, will take sometime
to make em right but after them i think the side is mostly done (just need
to cut the door and lower sideskirt), then can move to back, trunk
and finally top ^^) then detailing kicks in >.<

-BB-
 

Attachments

  • red.jpg
    red.jpg
    22.4 KB · Views: 168
  • stucco.jpg
    stucco.jpg
    10.9 KB · Views: 145
all i can say is... holy crap
you're doing an awesome job - basing it off pictures :eek:

PLEASE do the takata dome nsx too :smile:

are you using catiaV5?

keep up the good work :biggrin:
 
Fixed the main side air intake, i've done the lower one 3 times and i still
cant get it to look right, will spend more time on it tonight bah

I dont know how the takata looks >_> can give a link ? ^^)

I'm using 3d studio max, doing it via polymodeling, i basically drag
those polies you see in attachment one by one and adjust vertex accordingly,
then via an algorith of smoothing i get the desidered result.

-BB-
 

Attachments

  • airintakestucco.jpg
    airintakestucco.jpg
    13.3 KB · Views: 74
  • airdoor.jpg
    airdoor.jpg
    57.9 KB · Views: 66
  • airintakeclose.jpg
    airintakeclose.jpg
    42.2 KB · Views: 77
I was also lucky i modeled the rims for a previous car, and accidentally
this car mounts (almost) the same rims!

Materials arent perfect, like the brakedisc or the brake caliper, and yes
the tiretread is a toyo but the sidewall is a pirelli :x

Lucky me, will just have to make it white and adjust it a bit

volkte37optimizedwq5.jpg


-BB-
 
some update, i'd need someone to snap just 1 shot on whats
between the hood and the front windshield, i tried to find on the net
to not bother peopl here, but like you'd guess theres not many people
shooting pics at that kind of stuff :p

nsx80tuo9.jpg


-BB-
 
Nice job, I am working on a Maya Version right now.

I will post when done. :biggrin:
 
Back
Top