my 1991 won't start

Joined
9 July 2022
Messages
21
Hey guys, I've been daily driving my NSX with minimal issues for a while. Now that the weather is starting to turn (I live in Chicago,) some starting issues have arisen.

It started two weeks ago when I drove my car to Home Depot. When I was trying to leave the store, the car would not start and I had to get a jump. I made it to the intersection of the main road, and then the car stalled. It did start right up again but oh God, I was scared. I was able to complete a very long drive of over 45 minutes without issue.

Similar instances occurred a couple more times, and thankfully I haven't been left stranded. But the car became more difficult to jump start each time, requiring revs from the donor vehicle and my foot on the gas pedal to get it going. Now, I am left in quite the predicament because the car will not start at all, even with a jump start.

Everything electronic in the vehicle is working just fine, and the starter seems to crank pretty strong. The alternator seems to be okay, because the car doesn't have much of an issue running once it gets started up. The on-dash gauge also indicates over 14v while driving- if that is even something to rely on. Battery is only a year old, but the terminal clamps are very corroded and the wires underneath may be just as bad.

The engine runs like a top in most conditions with a very steady idle. It sometimes misfires slightly when it was wet/humid outside.

I'm starting to suspect the ignition system based on a few of the posts I've seen here. Does my experience seem in-line with an ignition problem? I have never had to replace the ignition system on any of my cars, and these issues seem so weird to me considering the car was running so well and was having no mechanical issues.

If you have any experience with a similar issue and/or needed to replace your ignition, please, help!

Edit: I am including this awesome list from Mitchell ProDemand that has many documented cases of NSX no-starts and tiers them based occurrence. It is a pretty awesome tool that and can give you a good starting point when diagnosing common issues with the NSX.

nsxnostart.png
And here, a list of document diagnosis for engine stalling.
nsxnostart2.png
And finally, a list of documented diagnosis for misfire or rough idle.
nsxnostart3.png

Update- After evaluating these, I'm going to take a look at my fuel filter and see if it might be a little clogged up- then I will look into more expensive fixes like the ignition relay/switch.
 
Last edited:
Once the engine is running, the voltage in the vehicle electrical system is established by the alternator and in fact all load is supplied by the alternator. At that point the battery is just along for the ride and in fact, the vehicle (with a little fiddling) can be operated just fine without the battery. However, until the engine is up to idle speed, the battery is doing all the work. Given your problems with jump starting the car, I suspect that your problem may be battery related. When you were doing the jump starts, were you doing the jump starts from jump start terminal in the engine compartment? If so, that should eliminate the battery related problems when starting. If you were doing the jump starts by connecting to the battery posts, then it may be battery related.

You comment on the battery post clamps being in poor condition. That is where I would start checking. The OEM battery post clamps are flimsy. If they have been overtightened the metal will start tearing and the clamp will no longer grip the post even when the bolt is completely cinched down. On my car, I discovered that with the bolt tightened to the max I could still rotate the clamp on the post leading to poor performance during starts. The clamps were flakey enough that sometimes the car would start and sometimes if the clamps had moved a bit it would fail to start. I could actually pull the positive clamp off the post without loosening the bolt.

I ended up re terminating the cables with new clamps. Examine the wire at the clamps for breakage / signs of over heating. Cleaning and re termination may be able to fix that. Check the battery negative cable where it bolts to the body. That point has a reputation for oxidation / poor connection. A completely new negative cable is not overly expensive and is moderately easy to replace. If the termination is in poor condition replacing with new or having a replacement fabricated is reasonable. The OEM positive battery cable is the opposite. Very expensive and a lot of work to replace. You will want to do everything you can to salvage the existing cable. I had to cut mine back a couple of inches and use a compression fitting to add a 2-3" stub with a new heavy post clamp. The battery positive cable is #1 or #0 gauge so you need a big ass crimper to do the repairs (hand held crimpers need not apply!!!).

The typical 'tell' for a weak battery or bad battery connections is to watch the dash voltmeter when you engage the starter motor using the vehicle battery, not boosting from an external source. If the voltmeter is dropping to 10 volts or less then the battery is at its end of life or you have bad electrical connections - most likely at the battery. Start with checking the battery connections.

Since your engine runs 'like a top' I don't think it is the ignition system. The provision being that if your voltages are really low during starting because of a bad battery connection then that will reduce the spark energy which will lead to weak ignition performance during the starting phase. That is an ignition problem where the cause is not the ignition system.

If your starting problem is only for hot starts or only for cold starts, you may have a fuel mixture problem or auxiliary air flow problem which is a completely different problem.
Thank you for the extensive reply, and I am definitely planning on replacing the terminal clamps because, as you said, they are very bad and cannot be tightened. I will follow your suggestions with that when I get home today. One other thing I forgot to mention was the fact that my car alarm has randomly been going off a bunch- and I'm not sure if this car's Viper alarm system would disable the ability to start somehow. I didn't automatically assume this because the starter is still cranking. Perhaps it could be a fuel cut if that is the case?
 
I think the correct Viper implementation is that it uses a custom harness to integrate with the vehicles security system and disables the starter motor circuit. However, an installer could have got creative and added a fuel pump intercept relay. Turn the key to run; but, do not engage the starter. You should hear the fuel pump run for about 2 - 3 seconds as it primes the fuel system. If you hear the pump run through the prime cycle then there is no fuel cut or it is not causing a problem at that particular moment. As an observation, either because of deterioration of the electronics or poor quality installs. aftermarket security systems seem to be a significant source of vehicle electrical problems. I would be inclined to remove it and restore the wiring to original condition. You can find a number of posts on Prime discussing the problems that ageing aftermarket security systems have caused.

Since your car is a 1991, if the pump is original the fuel pump may be approaching the end of its useful life unless the vehicle is low mileage. When you have a starting problem, listen to make sure that the pump is running. Fuel pumps may suffer intermittent failures for a short period before they go completely dead. Do you know whether your main relay is original? Being a 1991, I would normally expect that it has been replaced or at least had a solder reflow. When the main relay on my 2000 died two years ago there was no intermittent operation. It died and stayed dead which does not really match with your problem. However, if the relay is of undetermined age it is relatively easy to remove the relay, open the case and reflow the solder joints which is the common point of failure (much easier than replacing a fuel filter).

I would be dis inclined to replace the fuel filter unless you know that it has a lot of miles on it. The fuel filter is not the only horse in the low fuel pressure race. Use your diagnostic check connector to trigger the display of any stored ECU error codes. If the fuel filter is clogged enough to cause starting problems I would expect that it would be causing fuel mix out of range error codes. Absent any error codes, the better way to evaluate this problem which includes the fuel filter, fuel pump and the fuel pressure regulator would be to carry out a fuel pressure test as described in the service manual.

If the check engine light illuminates for 2-3 seconds when you turn the key to run and you hear the fuel pump prime, your ignition switch is probably not the problem. However, my car had a badly done security system install which really butchered the pigtail on the ignition switch
IMGP4077.JPG

The badly done connections would cause intermittent electrical outages that caused the engine to stop. I fixed this up by using uninsulated closed barrel butt connectors with separate heat shrink sleeves. While the switch is out, carefully pry off the white cover which will expose the electrical contacts. In most cases the contacts will just be dirty, not pitted. Clean the contacts with a swab and some IPA and then apply something like Caig De Oxit or some Ox-Gard grease to the contacts. Do not use dielectric grease. IMGP4082.JPG
 
Last edited:
So, I recently did an oil change and put in 5.3 qt. But it says to only use 4.5? Could this be the problem?

Edit: I checked the oil and it is reading high; confirming too much oil. Inspecting spark plugs for fouling next.
 
High oil level can create problems. Get it high enough and above the baffle and you can get foam forming leading to all kinds of bad things including wiped bearings due to lack of oil pressure if the foaming is really bad. Problems with hard starting are not one of the problems associated with over filling unless the engine has seized.

If you have overfilled the oil, take you oil filter off and drain it (maybe more than once) to get the oil level to the correct value.
 
Agree- I'm a little perplexed about the fill level though. I don't know where you saw 4.5 qt, but the correct fill amount (roughly), assuming you drain all of the oil and replace the filter, is 5.3 qt.

Did you fill 4.5 and then add 5.3? That would result in a HUGE overfill situation. I would completely drain the oil again (as if you were doing an oil change) and remove the filter. Put the filter back and add 5 quarts. Check the dipstick and top off as needed.
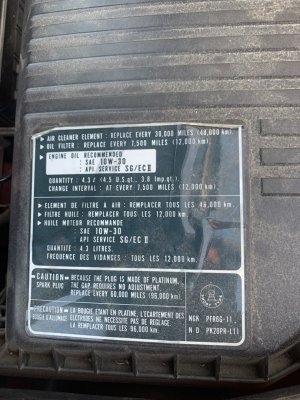
There is a sticker on my air cleaner box that states that an oil change should be 4.5l.... I am pretty confused as well because everything I have read here, and in the service manual says 5.3l.
 
You need to look at the specifications in the 1991 service manual carefully. In particular, you need to pay attention to where the brackets are and the applicable units. If you are using a .pdf scan of the SM the scan has distorted the image slightly.

oil spec.JPG

For an oil change, the correct values are:

5 l
5.3 US qt
4.4 Imp qt

Those values are consistent with what the owner's manual specifies. If you are in the UK the legislation that compelled metric measure did not occur until 1995 (different than the 1985 act). If you have a 1991, perhaps there is an imperial measure sticker which should really be 4.4 qt, not 4.5 qt.

If you poured 5.3 US qt into the engine and you changed the oil filter you should be OK. When I do an oil change I add about 4.5 l and then start checking as I add more. 5 l will on occasion get me a nudge above the high level mark on the dipstick. That will depend on how long I let the oil drain out of the engine and the angle of the car when I did the oil change.

If you added 5.3 US qt and didn't change the oil filter or you pre filled the new oil filter and then added 5.3 US qt then you have overfilled and need to remove some oil.
 
You need to look at the specifications in the 1991 service manual carefully. In particular, you need to pay attention to where the brackets are and the applicable units. If you are using a .pdf scan of the SM the scan has distorted the image slightly.

View attachment 175301

For an oil change, the correct values are:

5 l
5.3 US qt
4.4 Imp qt

Those values are consistent with what the owner's manual specifies. If you are in the UK the legislation that compelled metric measure did not occur until 1995 (different than the 1985 act). If you have a 1991, perhaps there is an imperial measure sticker which should really be 4.4 qt, not 4.5 qt.
I definitely thought this might have been the case but I looked again last night and confirmed these different numbers on my car. I can only assume the number might be lower because my car is an automatic.
 

Attachments

  • 19D0097C-65E1-41BF-8DF3-3E18D35B8C54.jpeg
    19D0097C-65E1-41BF-8DF3-3E18D35B8C54.jpeg
    240.8 KB · Views: 20
Interesting and confusing sticker because neither the service manual or the owner's manual make a distinction for auto equipped cars . If you think its overfilled based upon the dipstick unscrew the oil filter and drain some out to achieve the correct level and next oil change fill with 4.3 l and then adjust to get to the correct level on the dipstick. However, absent grossly overfilling your engine the oil level is not relevant to your starting problem.
 
Interesting and confusing sticker because neither the service manual or the owner's manual make a distinction for auto equipped cars . If you think its overfilled based upon the dipstick unscrew the oil filter and drain some out to achieve the correct level and next oil change fill with 4.3 l and then adjust to get to the correct level on the dipstick. However, absent grossly overfilling your engine the oil level is not relevant to your starting problem.
Obviously, I have a super rare limited edition car :oops:
I will do what you are saying and drain some oil out until the dipstick reads correct.
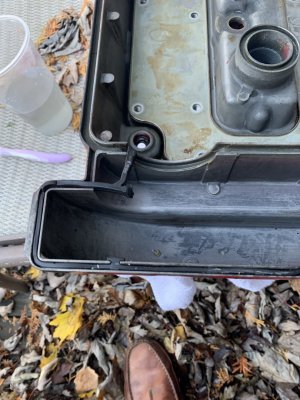
Anyways, with the overfill, the lower viscosity, and the fact that my tech told me that my valve cover gaskets had a slight leak, strongly believe that I have oil in at least a couple of my spark plug tubes. I went ahead and ordered a new set of plugs and a new set of seals, grommets, and gaskets and I will install them Sunday. I also ordered a pretty decent set of new battery terminals. As for the electronics- all the relays seemed to be fine, I'll leave those be for now and try to undo the Viper system.
Any tips for the job? I've seen lots of arguments about anti-seize.

Thanks!
 
It's all about the torque specifications!
The service manual calls for anti seize to be applied to the spark plug threads on installation. The spark plug torque specs provided in the service manual are based upon using anti seize. If you elect to not use anti seize, you need to increase the final torque value on the spark plugs. Anti seize, especially the goopy stuff that is brush applied, is a thread lubricant. I use anti seize because I find it makes the spark plugs easier to thread in by hand on the first few turns. When the engine is in the car, you are threading in all of the plugs blind. With anti seize on the threads, if the plug is not going in smoothly and easily you need to stop, back it out and try again. Perhaps I am overly paranoid about cross threading the plugs. If you want to trust in the NGK trivalent plating with no anti seize just remember to increase your torque value. You will have to figure out what that appropriate value is.

When replacing the covers over the coils, make sure not to exchange the front and back coil covers. The front and back can be switched and they will bolt in place; but, the gaskets will not seal properly. The covers should be marked FF and RR on the bottoms. If the gaskets are original, you might want to order new gaskets for the coil covers (if not included in the order) because they do tend to get beaten up. I like to use a little Hylomar Blue or Permatex Permashield (85420) to hold the gaskets in place during the installation. Both the valve cover gasket and the coil cover gaskets are squirmy and can pop out of place during installation. Both Hylomar and the Permashield are non hardening dressings / sealants and are moderately expensive.

While the coils are out, check for corrosion on the metal surface on the coil that contacts the heads. Also, check the long coil nose for any signs of spark tracking on the surface. Light corrosion on the metal surface can be buffed off. Severe corrosion that has caused swelling of the metal laminations or tracking on the nose is cause for replacement.

Before you yank off the valve cover give consideration to the following:
- since the car is a 1991, it would have been equipped with the original hydraulic lost motion assemblies in the valvetrain which are prone to becoming noisy. Unless you know that the car has been converted to the later design, you might want to plan for LMA replacement. I have a 2000 which has the later design so I have not had to deal with this. I don't know whether the cams have to come out for this.
- when was your last timing belt change? Unless the oil leak is significant I would delay the valve cover gasket change so that it coincides with the timing belt change
 
Any tips for the job? I've seen lots of arguments about anti-seize.

Thanks!
There is a fairly robust debate on Prime about this (dry or anti-sieze). Both sides have some fairly heavyweight NSX experts. My method is to coat the threads with copper anti-seize and then use a clean shop towel to remove the excess, leaving a thin coat on the threads. Torqued to 18Nm per the 97+ manual and Kaz. Never had a problem and the plugs always come out easy when inspecting or doing compression tests.
 
You need to look at the specifications in the 1991 service manual carefully. In particular, you need to pay attention to where the brackets are and the applicable units. If you are using a .pdf scan of the SM the scan has distorted the image slightly.

View attachment 175301

My 92 manual has the same sticker/values on the air box. Also in English/French.

Everywhere else I see the 5.3 US qt value including my copy of the service manual. Perhaps 4.3 US qt is the value without changing the filter? I searched the entire PDF manual for 4.3 and there is no mention of it at all.

@zdorsen Did you also change the filter with your oil change? If not, and adding 5.3 qt could be the overfill issue?
 
Oil on my threads?

Two spark plugs in one bank pretty much just came right out after one very minimal torquing with the ratchet and have oil on the threads. The third was a little more difficult and has some dry corrosion on it but for the most part is still looking a little toasty
 
Last edited:
Oil on my threads?

Two spark plugs in one bank pretty much just came right out after one very minimal torquing with the ratchet and have oil on the threads. The third was a little more difficult and has some dry corrosion on it but for the most part is still looking a little toasty
Oil on your threads are the least of your spark plug issues. The insulator of the spark plug is covered in soot indicating that the fuel mixture is grossly out of range. After 10 years in my car the sparkplug insulator came out looking pretty much exactly like a new plug with only slight color change and deposits. In order to get plugs looking like that I would expect that your car must have fuel mixture out of range error codes unless that soot build up is all the result of your recent hard starting problems.

The plugs have definitely exceeded their best before date. After you get your valve cover back on, new OEM spec plugs are in order and then see how it starts. After a little use, pull the plugs to check the insulator tips. If they don't look new then you have a fuel mixture issue of some kind.

Aside from the spark plug insulator soot problem, the plugs do look nasty. I have never seen anything like that on the metal body of the plug; but, I guess I have never had a serious oil leak problem in that area. I have no clue what is going on with your valve cover seals. A little bit of bunching in a new seal is normal (which is why I suggested the hylomar to hold stuff in place prior to assembly). That first photo is beyond normal and the second photo - I don't have a clue..
 
My car has 155k miles on it- this might be one reason the plugs look so bad. They could have 80k+ on them. Also, my coils looked pretty bad and were all covered with electrical tape. I ordered 6 new ones. Also ordered the correct seal for the front of the cover. Not sure why it wouldn’t be the correct one because this car was serviced by an Acura dealer. It obviously doesn’t fit. Perhaps it is for a c32. It looked like they tried to force it to stay in place with some silicone. Hopefully I’m not having an issue with valve stem seals because I don’t have much experience replacing those.

Are there any issues with the pcv valve on these cars? The area underneath the grille where the pcv connection to this valve cover was absolutely nasty looking. I don’t really know how to remove the grille but I can replace the pcv valve if you think it could br a potential issue.
 
Last edited:
I believe the valve cover seal is the same part right through the complete production run of the NSX.

I don't understand your reference to the PCV valve and the area under the grille. If you have removed the valve cover you have already removed the PCV valve

PCV.JPG

The fresh air inlet (breather pipe) to the crankcase can be a bit of a treat to get at. I am not aware of any particular issues with the PCV valve or normally driven cars. If you have any doubt, just replace it. Less than $4 from Rockauto.
 
My car has 155k miles on it- this might be one reason the plugs look so bad. They could have 80k+ on them. Also, my coils looked pretty bad and were all covered with electrical tape. I ordered 6 new ones. Also ordered the correct seal for the front of the cover. Not sure why it wouldn’t be the correct one because this car was serviced by an Acura dealer. It obviously doesn’t fit. Perhaps it is for a c32. It looked like they tried to force it to stay in place with some silicone. Hopefully I’m not having an issue with valve stem seals because I don’t have much experience replacing those.

Are there any issues with the pcv valve on these cars? The area underneath the grille where the pcv connection to this valve cover was absolutely nasty looking. I don’t really know how to remove the grille but I can replace the pcv valve if you think it could br a potential issue.
PCV valve can become stuck on the NSX, but it never ends up looking like that on the plug. I'd change it, given the low cost of the part, mileage and condition of your upper heads. But, it's probably not your main issue, as @Oldguy said. Oil can also make it into the plug well if the small rubber spark plug seals around the well are not installed correctly. They are a little fiddly and fall out of position fairly easily. Given how badly your valve cover gasket was installed, how are those plug seals? Are they even there?

You definitely have a fuel mixture problem, which could be caused by a bad O2 sensor or, more likely, clogged, dripping or failing fuel injector(s). There is no way to really inspect a fuel injector, but with 155k miles I'd send them out to RC Engineering for a cleaning and balance- they will give you a report. I'd also replace the fuel filter, as it's probably original.

I'd also run a microfiber with acetone into the spark plug holes to get all the oil and crud out of the threads before you install new plugs. Finally, I'd check the valve seals for leaks. NSX engines tend to get a little drippy/weepy around 100k miles. On both my NSXs, the tops of the valves were wet. If you are dripping oil into the combustion chamber, it would contribute to fouling your plugs.
 
Just wanted to update the post while I'm waiting for parts. and just quantify the things I have done/am doing for myself and anyone else that is following. Listing in order of progression. I'm basically throwing darts, but I'm having a lot of fun and enjoying working on the car.

Replace battery
Clip back starter wires and replace battery terminals
Replace spark plugs
Replace ignition coils
Replace valve cover gaskets and spark plug seals
Replace fuel injectors
Test/replace various sensors (O2, IAT, CTS, MAP, TPS, CKS, KS) Might just replace them all because they're so cheap and easy to replace.
Replace main relay, power relay, fuel pump resistor (MITA 4 relay kit)
Replace fuel filter
Replace fuel pump
Replace rear engine mount

Maybe- remove cylinder head and replace valve stem seals and head gasket. At this point I would probably get a valve job done and replace LMA.

Any other suggestions welcome (especially cheap/easy ones!)
 
If you are doing the injectors, either new or having them cleaned, given the age of your car replace the O rings / seals on each injector. Chances are that once they are disturbed they will not reseal. There are 4 O rings on each injector, parts #2, #3, #20, #21

54dc540b75839a3e1da461d61d96d00c.png
 
Back
Top