Installed rotors and pads, now too much vibration, wear pattern is odd, help needed.

Joined
8 July 2002
Messages
2,492
I installed new Stoptech rotors and new OEM pads prior to my trip to NSXPO.
They've now got about 8500 miles on them.

The set was broken in according to the Stoptech procedure
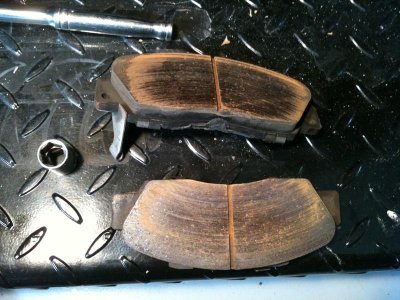
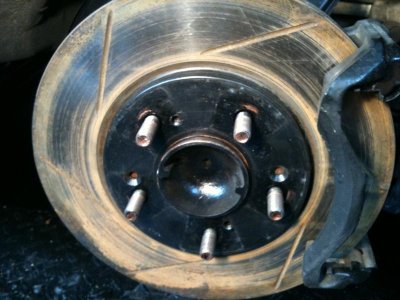
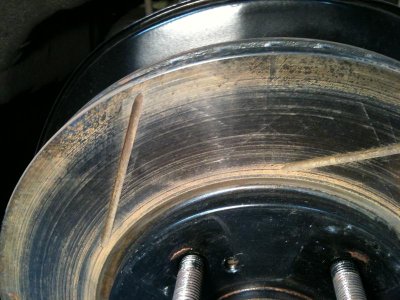
I found high speed vibration when braking on my trip so have taken the brakes apart and attached 3 pics showing what things look like

The pads are not meeting the rotor evenly as seen by the wear pattern.
What steps should I take next?

All guidance appreciated
 

Attachments

  • Right front OEM brake pads.jpg
    Right front OEM brake pads.jpg
    86 KB · Views: 300
  • Right front Stoptech rotor.jpg
    Right front Stoptech rotor.jpg
    63.1 KB · Views: 312
  • Right front rotor 1.jpg
    Right front rotor 1.jpg
    75.2 KB · Views: 277
interesting....now my experience may or may not help you because I have a front bbk but oem rear..and I now have the 2000 newer abs system..but back some years ago i was having uneven pad contact and inconsistent brake shudder with pad drag and premature rotor wear......since replacing the master cylinder all is well.btw I always had fresh fluids and bedded pads properly ect.
 
Could be a sticky or seized caliper piston or pads that are binding in some respect.
 
It looks like the phillips screws that hold rotor are missing, it should have two holding the rotor to the hub.
 
Is this wear pattern on all four, just the fronts or just this one, ? The pads looks like they are making contact evenly, where it is, just not over the whole area. I don't think that you have a binding piston or it would be heavier wear under the functioning piston. I would lay a straight edge on the pad, both the face and the back and see if it is true. Maybe you have just one pad that is bad. The vibration could be coming from the uneaven friction between the inside and the outside pad. The paint on the back of the pads may not be smooth, you may need to sand them a little.

Flushing the brake fluid is a good idea and I do that annually, but I don't think that is your smoking gun.

The screws that hold the rotor to the hub are optional, some people don't put them on. The screws just keep the rotor secure while you are installing the caliper. If you choose not to install the screws, the wheel when installed, does the same thing. (80 ft/lbs on the wheel lug nuts)

Just another thought, did you clean the caliper bracket mounting surface and the hub bracket surface with a wire brush and then wipe with brake cleaner prior to installation? Did you apply anti-seize to the bracket bolts? Did you torque them down? Did you clean the bracket where the pads float? Did you make sure that the pads float in the bracket? Look at the ends of the pad that fit in the bracket for a smooth clean surface.

I am trying to think of any possible solution.
 
Last edited:
On the Philips screws, the countersunk holes in the Stoptech rotor didn't line up with the holes in the hub otherwise I would have reinstalled the screws.
The ATE Blue brake fluid was changed with the rotors.
All surfaces were cleaned all bolts anti-seized and torqued to spec, and new silicone grease on the sliding pins.

The wear pattern is slightly worse on the front right than the front left.

Following the manual I mic'd the rotors.

The right rotor thickness measures thinnest at 27.99 mm, thickest 28.02 mm for a variation of .03 mm
The left rotor is 28.00 thin to 28.06 thick - variation .06 mm
The manual says the thickness variation should not be more than .015 mm so the rotors would appear to be off spec.- too much diff between thick and thin.

Would refinishing the rotors to bring them into spec be the next step?
 
On the Philips screws, the countersunk holes in the Stoptech rotor didn't line up with the holes in the hub otherwise I would have reinstalled the screws.?

If the rotors are Stoptech and they are for an NSX, they should line up. They will only line up in one position due to the offset of the holes. My Racing Brake two piece rotors weren't even drilled for the countersink screws.

Would refinishing the rotors to bring them into spec be the next step?

I would hate to think that with as few miles as you have on them that you have a warped rotor, but it isn't impossible. Did you do track days at NSXPO this year? If you do have them turned, be sure to take them to someone that knows what they are doing, not Schucks, O'Rileys, Wal-Mart etc.

Did you clean all of the rust off of the spindle before installing the new rotors? If there was something under the new rotor, that could be your warpage. Maybe sand the inside surface of the new rotor looking for any high spots.
 
Last edited:
I would hate to think that with as few miles as you have on them that you have a warped rotor, but it isn't impossible. Did you do track days at NSXPO this year? If you do have them turned, be sure to take them to someone that knows what they are doing, not Schucks, O'Rileys, Wal-Mart etc.

Did you clean all of the rust off of the spindle before installing the new rotors? If there was something under the new rotor, that could be your warpage. Maybe sand the inside surface of the new rotor looking for any high spots.

No track time on the rotors and pads.
Only highway miles to NC and back and the vibration was only at highway speeds.
Low speed stops in the city were normal.

From my measurements the rotors are off spec so I'll ask my Acura dealer tech to true them up then make sure everything is cleaned up and try again.
Thanks for your help!
 
Last edited:
the rear rotors are thinner maybe they are in the front vs the rear. maybe check that. also the holes should line up sometime you need to take rotor off and turn them one time to see they are lined up.
 
No track time on the rotors and pads.
Only highway miles to NC and back and the vibration was only at highway speeds.
Low speed stops in the city were normal.

From my measurements the rotors are off spec so I'll ask my Acura dealer tech to true them up then make sure everything is cleaned up and try again.
Thanks for your help!

You are welcome, glad to help. Just a final thought. Is the vibration noticed during braking or cruising. If it is braking look at the brakes, if it is during cruising (no braking) look at a possible loss of balance weight on a tire /wheel assembly. If so, I would recheck the balance on both front wheels.

I don't think that the front and rear rotors are interchangable, that shouldn't be the problem.

Brad
 
Last edited:
I'm with OLDMNSX here. There wear pattern on the rotor and pads makes it look like the pads are not flat. I would put a straight edge across the pads before I did anything that involved money.
Gary
 
You are welcome, glad to help. Just a final thought. Is the vibration noticed during braking or cruising. If it is braking look at the brakes, if it is during cruising (no braking) look at a possible loss of balance weight on a tire /wheel assembly. If so, I would recheck the balance on both front wheels.

I don't think that the front and rear rotors are interchangable, that shouldn't be the problem.

Brad

I had new tries with a road balance for the trip and no vibration at any speed while cruising.
But whine I put of the brakes the whole car would vibrate.

I'll check the pads for trueness, and a friend with new unused Stoptech front rotors will do a thickness check new week so we can compare.

For those interested in the screw holes, here's a pic of the rotor screw holes
The correctly placed Acura holes are drilled but not countersunk
Two other holes are countersunk but won't line up.
Rotor screw holes.jpg

Thanks to all

- - - Updated - - -

the rear rotors are thinner maybe they are in the front vs the rear. maybe check that. also the holes should line up sometime you need to take rotor off and turn them one time to see they are lined up.

Shawn
Perhaps you missed my post of my rotor thickness measurement showing 28 mm. Rear rotors are 21 mm.
See my pic of the screw holes in the Stoptech rotors and you'll see the screw holes problem
 
1) the non-counter sunk holes are for a 13mm bolt to help remove the rotor if it is stuck
2) the counter sunk holes are for the "optional" philips head screw to hold the rotor in place.

They should line up and since they don't,

I wonder if you received a left and a right rotor and/or if they were installed correctly.

Look at the pictures on the auto-anything link from above. There is a left and right rotor- that could explain
why the holes don't line up and I'll only speculate here, but the directional cooling vanes could be backwards,
or opposite or mismatched and affect cooling.

1) What does the left front look like? and 2) is that a pad imprint at around 7 O'clock on the rotor in the second picture of
post #1? If so, that may be a high spot.

First of all please excuse the rust in the pics. it rains a lot here in BC and rusty rotors are the norm.

Here's pics of the axle hub plus front and back views of the rotors
The parts installed were Power Slot rotors 126.40028SR and SL which are correct for my application
They were installed according to the instructions on the Stoptech website with the slots pointing the correct way.
The cooling vanes are non-directional.

If you look at the screw pattern on the oem hub you'll see the Philips screw holes are drilled slightly inside the wheel lugs and the marks left by the 10 mm removal screws are inscribed in the same circle.
Now if you look at the holes drilled in the rotor you will see the removal screw holes are in the correct position but the countersunk holes are drilled in the same circle radius as the wheel lugs, not slightly inside in the oem hub.
This was pointed out when I received them and I was advised that because the mounting screws are optional to ignore it.
Hope this clears up whether the parts are correct and whether I installed them correctly.

You are right there is evidence of pad deposits on the outside of the rotors despite using the Stoptech break-in procedure.
AT NSXPO several owners advised me to try to breaking them in again which I did twice on my trip back from Raleigh but to no avail.
Also the inside of the rotors are much cleaner and show more factory crosshatching than the outside, suggesting more pad pressure on the outside than the inside.

The oem brake pads are flat so warped pads are out as a cause.
My thickness measurements (shown in a previous post) show the rotors to be out of spec for thickness variation so I'll have them trued up first.

NSX hub.jpgNSX disks outside view.jpgNSX rotor inside view.jpg
 
Last edited:
It looks like , from the pictures, if you rotated the rotor 180 degrees the countersunk holes should line up.

Humor me here, try this.

Clean one of the lug studs real well. Mark it with some kind of marker, red paint, sharpie etc. Mark one of the holes in the rotor the same way. Put the rotor on the hub, check for countersunk hole alignment. If not, remove the rotor and rotate it (i.e. move to the next lug position, put it on, check for alignment, continue through the 5 possible positions. I bet you will find the one that matches up.
 
It looks like , from the pictures, if you rotated the rotor 180 degrees the countersunk holes should line up. Humor me here, try this.
Clean one of the lug studs real well. Mark it with some kind of marker, red paint, sharpie etc. Mark one of the holes in the rotor the same way. Put the rotor on the hub, check for countersunk hole alignment. If not, remove the rotor and rotate it (i.e. move to the next lug position, put it on, check for alignment, continue through the 5 possible positions. I bet you will find the one that matches up.

Here's the pics
First pic, the marked hub showing the threaded screw holes circled in red
Second pic rotor on and showing that the countersunk holes don't line up
Third pic showing the removal screw holes that do line up with the drilled screw holes in the hub.
It appears Stoptech has countersunk the wrong holes.
Does this make sense?

Marked hub.jpg
Countersunk holes don't line up.jpg
Non countersunk holes line up.jpg
 
Last edited:
I'm curious as to how this works out. Subscribed.
 
From my view point I think that you have figured it out! Look at one of your old rotors and see if you can confirm this.

One of my mistakes was recycling my old rotors which still had some wear left in them.
I'd have them back on now but alas they are gone and can't compare them to the StopTech's
In any event in the future I'll stick to OEM.

Meantime I'll get the StopTech's milled to bring them into factory thickness specs and try again.
Will be dropping the rotors off at the dealership next week
The NSX tech who has worked on my car for 18 years offered to mill them for me.
Won't get the rotors back on the NSX until late January but will post an update once they've been tested on the road

Many thanks for your help on this
 
Last edited:
I suspect the vibration is due to uneven pad deposits. FWIW, I have never "bedded in" my brakes. I daily drive my NSX and that itself defeats the purpose of bedding in.

As for the screw holes, I have a set of Stoptech cross drilled rotors. The countersunks line up and I put the OEM screws back in. I have a feeling Stoptech slotted rotors are just drilled wrong. From the pictures, you could put the left rotor on the right side and vice versa, but that would mess up your vent direction.
 
As mentioned in a previous post the rotors are straight vented so there is no vent direction only slot direction.
As also mentioned previously and if you look at the last pictures you will see the countersunk holes in the rotor are drilled further away from the center than the oem hub holes.
Look at the pic of the hub alone and see where the oem holes are. They are slightly closer to the center than the wheel lugs.
Now look at the pic of the countersunk holes in the rotor.
Are they also slightly closer to the center?
No they are in fact the same distance from the center as the wheel lugs.
Because the countersunk holes are a further distance from the center they won't line up with the hub holes, backward or forward, right or left, inside or outside not now or not ever!
 
could they be for another car like the S2000?:confused:....
 
could they be for another car like the S2000?:confused:....

It's possible Doc but the part numbers on the box were the same as shown on the StopTech website for the NSX.
The StopTech product selector on their website isn't working so I can't check the S2000 part numbers.
I sent an email to StopTech explaining the problem and I'll report what I receive from them
 
Last edited:
Back
Top