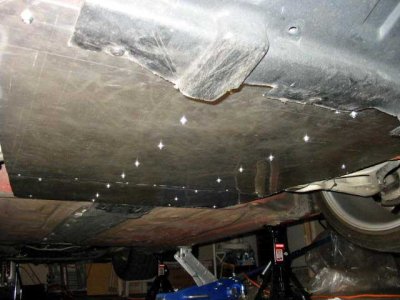
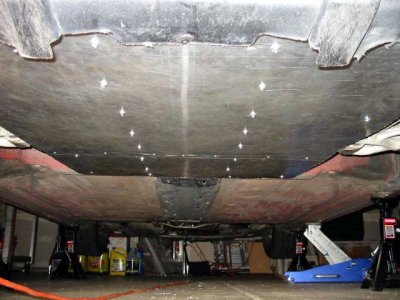
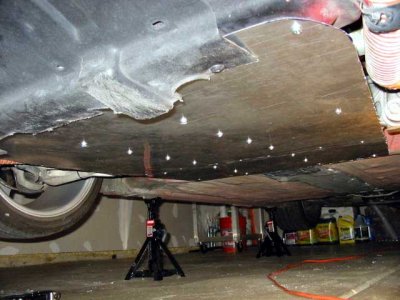
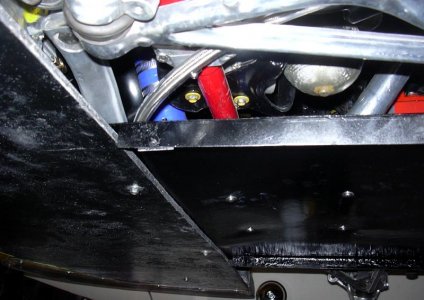
This is a project I've been wanting to do for about a year now. It's not really a pure undertray, but it covers up everything under the hood area. I figured there HAD to be a way to do this yourself, so I went to the hardware store and bought some 25 gauge sheets of aluminum, screws, and rivets. I made a template, and after about 8-9 hours of cutting and drilling holes, it finally is finished. It ain't the prettiest fabrication I've done, but I think it'll be quite functional.
You are using an out of date browser. It may not display this or other websites correctly.
You should upgrade or use an alternative browser.
You should upgrade or use an alternative browser.
Homemade undertray...sort of
- Thread starter Q
- Start date
Do a writeup!
Looks good and functional. Granted i'm sure you wont feel a difference but it definately will clean up the airflow from the turbulant underside of the car.
Make sure you have a hood vent or somewhere for your radiator 'exhaust' to go :wink:
I see brake ducts. I take it you track your car...? Have any pics of the brake ducting?
But seriously, do a writeup!
Looks great what vented hood did you use? Any air ducting?
Very nice project.
Looks a little similar to the under cover I made for myself last year, but mine is simply styled after the NSX Type R under cover which is much narrower than the one you've created.
However, I don't have a Type R hood so the air has to go somewhere.
I am interested in the results you are getting, specifically, if the nose feel more stable at high(er) speeds.
Thanks for the encouraging comments! Yes, I do have functional radiator ducting. I have the SOS NSX-R style hood and radiator duct. I wouldn't suggest performing this modification unless you have the same setup, as there's no place for the exhaust air to go otherwise. I'll try to do a writeup and see what you guys think.
I'll find out how functional it is when I track it in a few weeks. :biggrin:
I'll find out how functional it is when I track it in a few weeks. :biggrin:
I see brake ducts. I take it you track your car...? Have any pics of the brake ducting?
Yes, I do track the car. I can take some photos when I do the writeup. Thanks!
Thanks for the encouraging comments! Yes, I do have functional radiator ducting. I have the SOS NSX-R style hood and radiator duct. I wouldn't suggest performing this modification unless you have the same setup, as there's no place for the exhaust air to go otherwise. I'll try to do a writeup and see what you guys think.
I'll find out how functional it is when I track it in a few weeks. :biggrin:
Which NSX-R style hood exactly do you have ??
I am wondering, are you going to cover up the fuel tank as well?
And what about the underside from the engine to the lower rear valence?
BTW, the original Type R under cover has two longitudal vins to channel the air under the car, just like the rear diffuser.
I have the VIS hood as listed here with the complimentary radiator duct.
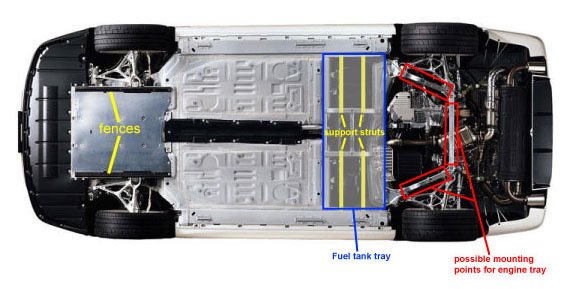
As I was finishing the project, I was looking at the fuel tank area as the next project. It doesn't look to be too difficult, as there are some nice mounting places for the cover. The biggest hurdle is to fabricate some support struts that would span the side sill and the center support bars. It looks like a straight shot so it shouldn't be too difficult.
The engine tray would be my "holy grail". That one would take some serious thought, but not out of the question. Before I attempt that, I think I'm going to finish up the front tray. I'd like to fabricate a piece that attaches to the front splitter and then ties into my current front tray for a real front undertray solution.
I didn't know the NSX-R had those vanes. I suppose one could rivet some aluminum square tubing to replicate that. Perhaps that'll be my next modification, thanks!
Here's a pic of the NA2 NSX-R from the bottom:

It shows the front undertray and the channels (in plastic) that run lengthwise. FWIU, the more channels (within reason) that run lengthwise the more uniform and less turbulent the air becomes. Downforce has a CF fuel tank tray that is semi-modeled after the old Mugen version. The only minor issue with it is that the channels run across the width and not the length. But it's better than nothing, I guess.
Good job on the fab work! I'd be interested to hear about the results!
What exactly is the benefit of this mod?
Better/smoother air flow, create sucktion for additional downforce. More and more, exotic cars are made with flat bottom, like the F1 race cars.
This is a project I've been wanting to do for about a year now. It's not really a pure undertray, but it covers up everything under the hood area. I figured there HAD to be a way to do this yourself, so I went to the hardware store and bought some 25 gauge sheets of aluminum, screws, and rivets. I made a template, and after about 8-9 hours of cutting and drilling holes, it finally is finished. It ain't the prettiest fabrication I've done, but I think it'll be quite functional.
Looks good Sean. It should prove adequate coupled with a good radiator shroud/vented hood. This is an area whereas you can the first 85% pretty easily but the last 15% takes a lot more work.
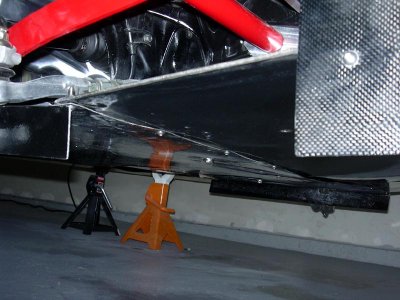
Here are some pics of mine on jack stands. Mine extends full length, but in the battery/engine tray sections the most visible difference is that I molded in some fins along the leading edge near where the tires are to help keep that higher pressure area from bleeding into the low pressure zone and disrupting the primary stream. The trays are also tapered back slightly which is an improvement over my v1.0 from last year; I really worked hard to maintain the proper leveling, grade, and shape by putting more time into brackets and tapping for riv nuts along the frame rails when needed to get everything just where I wanted it and sufficiently rigid.
I also added in a handful of removable service panels, which makes it easier to get to adjustment bolts for alignments, fluid changes, bleeds, etc... I used some smoke with a fan to see the affects, and in turn decided to mold in raised sections just ahead of service panels and leave over-lap between panels so the air flows over and doesn't get caught on the leading edges- which seemed to be a trouble spot in my case just aft my fuel cell cover near the drain bolts.
Attachments
Last edited:
@John,
Looks very good. What material did you use for the undertray??
I just used a 1.5mm sheet of aluminium and manufactured what is basically the NSX Type R undertray and folded the sides down to create the fins. Was very easy to do.
Since you are seriously tracking your car, do you notice any difference at speed?
@John,
Looks very good. What material did you use for the undertray??
I just used a 1.5mm sheet of aluminium and manufactured what is basically the NSX Type R undertray and folded the sides down to create the fins. Was very easy to do.
That's fine AL works well too. Mine are composite. Every piece is slightly different.
Those two trays are 1/16" fiberglass with spaced graphite foam reinforcement strips on the top-side for ribbing. I got the idea to use them from a co-worker that used to work in aerospace. Due to the cost per pound to get building materials into space, specialized foams are increasingly being used for walls and such, as the stuff weighs like 2lbs for a 4X8 sheet. Once cured with an added layer of mat, they can be more rigid than aluminum across a span.
Since you are seriously tracking your car, do you notice any difference at speed?
Of course.
The best answer I can give is that if you make enough changes, and make your vehicle fundamentally faster as a whole, you're absolutely going to notice when you have to now think 3-4-6 seconds a lap faster when you are out there. Aero is a part of that absolutely- most production cars have relatively crappy aero (usually positive lift) being designed with an all together different set of objectives. Look at the minor aero tweaks between an Elise and Exige.
A little under panel here or there is a minor change and by itself isn't seat of your pants noticeable nor would I ever expect it to be. It's akin to adding an NSX-R front chassis brace versus a whole roll cage. The hood, shroud, and cover combination is noticable at the limit.
Vehicle prep is an area whereas big changes will net bigger results. Much depends on chassis setup, tire, ride height, driver, circuit, etc...
Personally I separate car from driver and just plan in stages and 'mod with intent'. I'll thus pick 5-10 setup items each year and work on those during down-time no different than I pick a handful of driving goals to work on while I am lapping on session.
A lot of people think of 'mods' as distinct improvements, but really so many aspects of car setup are inter-related and inter-twined it is best to move away from that as soon as you can.
Especially with aero. For example running a high spring rate and stiffly sprung suspension just means the chassis will give more, which means more cage. Coupled with less weight it also means substantially less nose dive under braking. This then lends itself to more consistent under body airflow during threshold braking which means more down force will make more bite available on the front tires for turn-in. However, generate too much in the rear at just the right moment and you'll get under-steer right after the front pitches in leading one to think of adjusting the sways.
It's all a balancing act.
John, thanks for those pictures. It really gives a good view as to how the various pieces come together. More importantly, I appreciate you sharing your experience on how those pieces all work together. I agree, it's definitely a balancing act. You have some great insight and it's already got me thinking ahead.
My goal with this project is to create a well thought out system the works functionally together. I'm starting at the front and moving back, and hopefully learning some things along the way.
Sean
My goal with this project is to create a well thought out system the works functionally together. I'm starting at the front and moving back, and hopefully learning some things along the way.
Sean
Last edited:
Similar threads
- Replies
- 38
- Views
- 4K
- Sticky
- Replies
- 22
- Views
- 8K
- Sticky
- Replies
- 74
- Views
- 30K


