Hard Wire Valentine1

Joined
6 September 2002
Messages
4,239
Location
Northern VA
Gents?
Which wire, what color, and where can I find this particular wire to tap into for a little juice to power up my V1? and I am not talking about my cigarette adapter. :D
 
From memory, there are 4 connectors that Honda supplies next to the fuse panel so "splicing" into any existing wires is unnecessary. I think there are 2 that power on when the key is on and power off when key is off... which is what you want. If you have a voltmeter you can check.

I mostly used the write-up in the FAQ when installing my V1: http://www.nsxprime.com/FAQ/DIY/detectorinstall.htm

Good luck
 
When I did not use a remote display I used switched power from the dome light. Easy access and a short run of rg-45. I don't have the wires that I connected to but ground should be easy to find, power you can check with a test light.

HTH
 
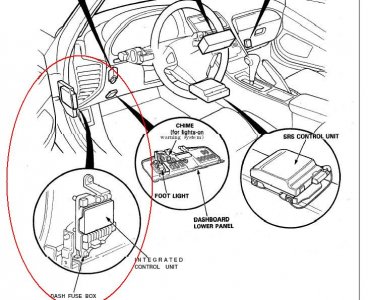
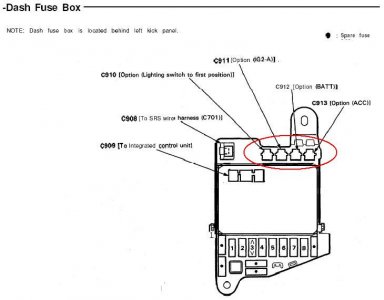
Honda has provided four "option connectors" for accessories right above the interior fuse panel (by the drivers left leg). These are documented in the Electrical Troubleshooting Manual, which is why I always buy those manuals when I buy a car I'm going to modify or maintain myself. A couple inches above the top of the fuse panel is a row of four 1/4" male terminals, as follows:

C910 (rear-most): hot with running and headlights
C911 (second from rear): hot with ignition
C912 (second from front): hot all the time (i.e. battery)
C913 (front-most): hot with accessories

Guys,
Help!!! How can I connect to this "option connectors" ? Is it the FOUR boxes that is right on top of the fuse box? if so, what do I need to do to hook it into one of those boxes. V1 hardwire kit sure doesn't go in:D

http://www.nsxprime.com/FAQ/DIY/detectorinstall.htm

Thanks....
 
OOOOOMG!!!! now i know for sure that I looked at the right box. so all i need to do is get a female spade terminal from radio shack...yes? you know? if you were a lady, i would kiss you. but since we are gents here, I SALUDE YOU!!!! I learned something today.
 
Yes, just crimp a female connector onto the wire and slide it on. I figured it was better than trying to splice into an existing wire. I can't remember the size of the connector though.
 
First, I would make sure the connector you used has juice. You will need a voltmeter or a test light to do this. When I did mine, I made sure to use the one that does NOT have power when the key is off.

If you have power at that connector, then it has to be in your wiring. Did you crimp the female connector on? Maybe you could take a pic of the wiring sequence you used, it might help for troubleshooting.

Good luck
 
here is what i have done:
1. cut off the V1 kit and clipped on the female thing
2. insert the female thing to the male
3. ground the wire
4. hook v1 on
5. turn the ignition on
6. nothing happens

grrrrrrr....if i can't even do this, i better thing twice about installing a nav. kit myself.:D


hlweyl said:
First, I would make sure the connector you used has juice. You will need a voltmeter or a test light to do this. When I did mine, I made sure to use the one that does NOT have power when the key is off.

If you have power at that connector, then it has to be in your wiring. Did you crimp the female connector on? Maybe you could take a pic of the wiring sequence you used, it might help for troubleshooting.

Good luck
 
Did you check your crimp to make sure it crimped on the bare wire and not on the insulation - sometimes it is too easy to push the wire in a little too deep & just get insulation. Check same for the ground wire terminal - where are you grounding to incidentally?
 
I was thinking that I crimped on the insolation, but i verified it replaced it 3 times....and I know this is that the issue. In regards to grounding, i tried everywhere that has metal....even the ground place toward the fuse box. I will try again tomorrow and see if i can get it to work.

thanks everyone for the tips

D'Ecosse said:
Did you check your crimp to make sure it crimped on the bare wire and not on the insulation - sometimes it is too easy to push the wire in a little too deep & just get insulation. Check same for the ground wire terminal - where are you grounding to incidentally?
 
Mr. Malibu Rapper came to the rescue. I gave up and asked for help!! :biggrin: :tongue:

SPA_S2000 said:
Almost two years too late, but I bet you didnt put the fuse in the box to provide power to this terminal.
 
Pooh - how on earth did you attach the female spade terminal to those plugs? I spent 2 hrs under there tonight, cutting up my hands, and was not even close to being successful at tapping into any of the terminals. I cant physically attach the two!

It looks like there may be a plug or something that would position the terminal. Is there? Im holding the female end with my fingers, and it isnt working at all!

Thx
 
All I know is that Mr. Malibu Rapper didn't use the terminal. Rather he tapped it somewhere else below the radio head unit. Maybe he can chime in on this.....

SPA_S2000 said:
Pooh - how on earth did you attach the female spade terminal to those plugs? I spent 2 hrs under there tonight, cutting up my hands, and was not even close to being successful at tapping into any of the terminals. I cant physically attach the two!

It looks like there may be a plug or something that would position the terminal. Is there? Im holding the female end with my fingers, and it isnt working at all!

Thx
 
When I give it another go tomorrow, Ill go after C911. But if I remember correctly, I could barely get my fingers close to the front most terminal and I remember thinking that the more rearward terminals were even less accessable.
 
I've FINALY tackled this myself today and CAN NOT believe how easy it is and what a big difference it makes for the interior. I am VERY happy that no more wire is dangling in the middle.

After reading through the V1 install in FAQ and all the threads that came up with search, I was still not clear on what to do. Finally I PMed Mr. Malibu Rapper and he kindly share his “secret” with me and it was right on the money! Here are my steps.


1. Remove the A-Pillar, open the door and pull the insulation strip that runs along the A pillar off the rail.
2. With a little (not too much) force, pop out the pillar cover. It’s a clip-on, so be gentle.
3. Remove the sun visor screws and remove the sun visor.
4. Pull open the headliner. Not too much though, enough for the phone cord head to go through.
5. Run the V1 phone cord through the headliner and the A-Pillar. You can use a letter opener to push the cord head through the corner.
6. I have my V1 mounted below the rear view mirror, so the cord comes down from the center visor area and circled around the mirrorstay so it won’t dangle around.
7. Secure the other end of the phone cord with a straight wire using tape.
8. Run the wire down at the corner of dash.
9. Once you got the phone cord through the left food dash fuse box area, remove the tape and wire.
10. Open the dash fuse box cover and identify Option terminal C911 above the fuses.
11. The V1 comes with a direct-wire adaptor kit. The red wire has a MALE spade disconnector. Cut it and replace it with a FEMALE one, you can get it from Radio shack or Home Depot, either the red/pink or blue one will work.
12. Plug the red wire to the C911 terminal and mount the adaptor below it with letters facing you.
13. Find a good place to connect the ground wire. I use the top screw point for the dash fuse box cover.
14. Connect the phone cord to the adaptor kit and tight up all the wires.
15. Turn the car on first and connect the other end of the phone cord to the V1 and make sure it turns on.
16. Put the fuse cover back on and then A-pillar cover with the insulation strip next.
17. Remove the cigarette lighter power cord and close the cover in the center console.
18. You have a clean center console!!:biggrin:

The whole process should take less than 10 min.
 
Last edited:
Back
Top