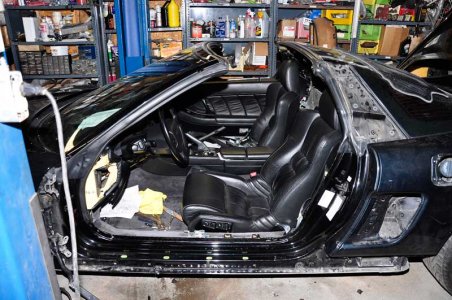
Full door removal issue

Joined
19 October 2007
Messages
15
I have to replace the driver door because of body damage. (Picture attached)

I am at the last stage of removal, with the door actually off the hinges propped up by the car. The problem is I can’t seem to locate the door harness ends inside the car, and the manual is no help.

I have a replacement door with the wiring harness intact, and shows that the harness goes approximately 10 inches into the body before terminating with 2 connectors.

Anyone ever done this? Short of removing a lot of wiring under the dash there does not appear to be any way to get to the connectors.

Is it easier to remove the full harness from the door, and leave the dash alone?

Comments welcome.

Thanks,

John
 

Attachments

  • door-damage.jpg
    door-damage.jpg
    32.2 KB · Views: 183
Last edited:
Well, in answer to my own question, I elected to extract the wiring harness from the door while it sits next to the car rather then mess with the under dash wiring. I will thread the existing harness into the donor door in the same way, while it sits next to the car. You need the door off the car for this to work, as you need room to work the harness in or out.

I’m still interested if this should have been done another way.

John
 
I was going to sugest that yesterday but wanted other to chim in but they didnt. sorry about that.

anyway did you look in the service manual for the door removal process.
when I get home I will look thru the books and post some pics or something.
 
I did look at the manual and it suggests disconnecting the harness in the footwell area but that area is tight and full of wiring. The extraction of the harness from the old door took about 30 minutes and threading it into the new door only about 10, so I think that’s better than lying on your back trying to work in the footwell area.

I may post some pics in the builds section, although it’s more or less a stock rebuild. I am taking this opportunity to repaint the whole car and fix some problem areas from when I bought the car 3 years ago. All in all, I am putting on a new front bumper, door, roker cover and both rear quarters. Then I am having it painted Crystal Galaxy Black, a McLaren SLR color.

Here it is, sans door and with the “new” quarter panel.

John
 

Attachments

  • _DSC4923.jpg
    _DSC4923.jpg
    82.2 KB · Views: 127
Last edited:
00919821000_20091010080113799


I found this tool for past door realignment very good to add to ones arsenal of tools.

http://www.sears.com/shc/s/p_10153_...21x00003a&ci_src=14110944&ci_sku=00919821000P

So for future door removal can you post a pic of of the plug end and location. I will be int he process of doing this as well.

Thanks.
 
I have a similar tool that I bought from Harbor Frieght when I was doing my door. How do you use it? It didn't come with any instructions.

What does it exactly do?

1. Insert the reversible latch pin for the car being repaired.

2. Connect the Door Aignment Tool to the door latch.

3. Place a 3/4" socket and your breaker bar onto the hex on the E-Z Store Tool.

4. Secure the open end of the E-Z Store Tool against the latch pin or loop on the door frame.

5. Raise or lower the breaker to adjust the door.

6. Un-latch the tool from the door and close the door to test the alignment.

7. Continue adjusting until proper alignment is achieved.

300350.jpg


Best bet is to align the tool with the door on to get the hang of it for those whom have never used this or have never aligned a door.

This is also a helper for those wanting to remove doors.

900220.gif

EZ Rest Door Hanger


--------------------------------------------------------------------------------
You were looking for an easier way to hold the door while repairing the door hinges? Here it is! Use your existing floor jack to safely hold the door in place.
--------------------------------------------------------------------------------
The EZ Rest Door Hanger enables a single person to quickly remove and/or install vehicle doors. The padded, removable side rails allow for accurate positioning of door, and the easy on/off design quickly adapts to most floor jacks with removable saddles.
--------------------------------------------------------------------------------
Reduces labor time. Padded, removable side rails. Easy on/off design and fully adjustable. Quickly adapts to most floor jacks with removable saddles. Hang bumpers, store glass, many other uses.
--------------------------------------------------------------------------------
Fits jacks with saddle hole dimensions of 1.17 inches - 1.19 inches.

Can be located here>>> http://www.top-downsolutions.com/product_info.php?products_id=162

Hope that helps

=g=
 
Last edited:
Awesome. I was wondering how that thing works. Nice picture. I couldn't figure it out so I returned it.

When you turn the breaker, does it move the loop on the door frame or does it move the door latch on the door panel? Are you suppose to keep any of the bolts loose while you do this?

When you lift the breaker it is suppose to keep the door alignment on par to the striker. Adjustments are usually done in incriments. The main door hinge bolts are tightened snug but not tight. Enough to make the door stay in position but adjustable. Hard to explain without showing someone how it's done correctly. Hope that helps.

=g=
 
Back
Top