Drive Axle Slinging Grease = Cut Boot?

Joined
25 October 2007
Messages
820
Location
Saint Johns, FL
So I was crawling under the back of the car and noticed what appears to be grease or oil caked in the area around the left rear axle/hub. Below is a picture. Does this look like it's from a tear in the CV boot, or a leaking shock, or something else?

The black gunk was spattered heavily on the inside of the left oem wheel when I took it off months ago to put on these BBS wheels. At that time, I looked at the boot and didn't see any tears, but maybe I missed it? If it's still spattering on the new wheels, it's hard to tell because there aren't many miles on these wheels yet.

Any thoughts on where the grease/oil is coming from?

<img src="http://www.nsxprime.com/photopost/data/1087/medium/DSCF0061arrow.jpg" />
 
Looks like the boot needs to be replaced. I had a small tear in one of my boots, and it looked similar to that picture.
 
Remove the wheel and rotate the rotor..crack may have been small and facing the floor. While you are at it change out the inner boot as well since the axle will be out anyway. If you do it yourself, there is a lot of good info on prime and in the old NSXDriver. How many miles on the car?

Jeff
 
That axle needs new boots. I would do both inner and outer boots. The boot kits are about $28, 42017-SL0-000 is the part number. If you do this yourself you will need the band tool KD 3191, about $16:).

HTH,
LarryB
 
How many miles on the car?

Jeff

Wow, thanks for the quick response guys! I figured it was going to be the boot.

Jeff, Mileage is 65,000 as of this week.
 
That axle needs new boots. I would do both inner and outer boots. The boot kits are about $28, 42017-SL0-000 is the part number. If you do this yourself you will need the band tool KD 3191, about $16:).

HTH,
LarryB

Larry, is the "band tool KD 3191" you referenced basically the same thing as Oetiker stepless clamp pliers? My Sea-doo has those clamps on the fuel system so I have the Oetiker 1099 straight and side pincing pliers that are used to close down the clamps. I've noticed in auto parts stores these pliers are sometimes called CV boot pliers, so I'm curious if it's the same type of tool you're referring to. Thanks,

David
 
At 65k miles, I would just do both sides (4 boots) for maintenance purposes. I am doing all 4 within the next 2 weeks ($22/boot from Ray Laks Acura...888 RAY-LAKS...ask for Tim). You just have to drain the tranny fluid (likely a good idea at 65k miles anyway) when you do the left side.

Jeff
 
have fun, remove alignment bolts instead of the factory recommended procedure.

I skimmed the factory service manual and it has you taking off the brake lines and ball joints, then swinging the knuckle away from the lower control arms to make clearance for the driveshaft to come out.

In contrast, you're saying to drop the lower control arm from the inboard side, leaving all the outboard suspension components still attached, basically right?

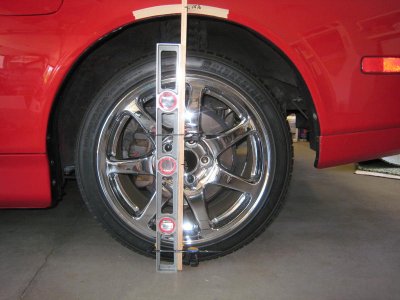
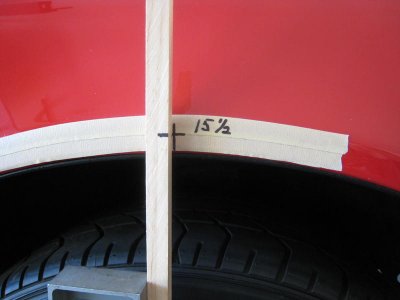
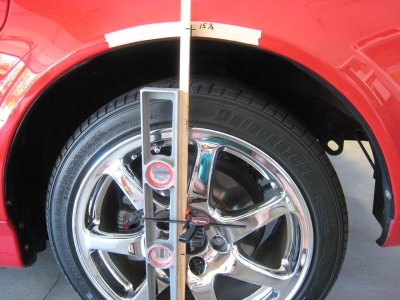
You can just take out the four bolts that holds the lower A-arm to the support. DON'T EVEN try to remove the lower A-arm ball joint!!!!! Mark the adjustment of the rear toe link and remove it. BUT first, measure the distance from the center of the wheel to the fender with the car sitting on the ground. You can even use a small piece of masking tape for your index on the fender. You will want this measurement for the reinstallation. You will want to raise the rear axel hub to this measurement before tightening the bolts that go thru the toe link. This keeps from having a constant twisting pressure on the elastimeric bearings if you tightened them with the rear hub just hanging down.

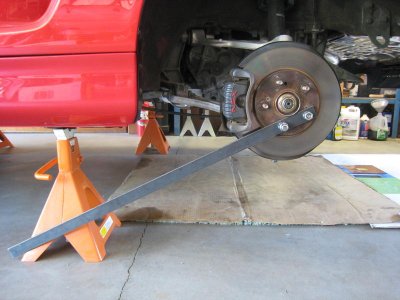
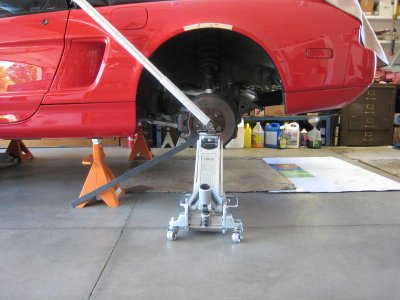
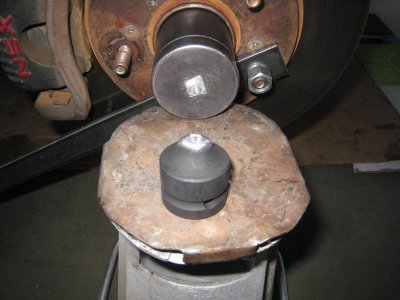
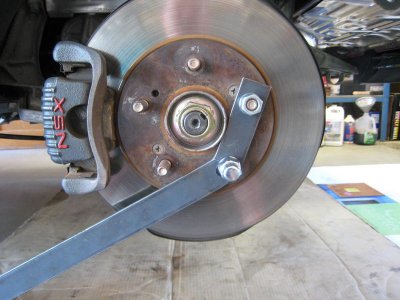
When you break loose the nut that holds the axel to the hub you will think that you broke something, that is normal. It sounds like a 38 Special gun firing. Just be ready. I use a 3/4 inch breaker bar on the end of my jack handel. I went to Home Depot and picked up a 4 ft piece of 1/8th in thick by 1 in steel bar stock. I then drilled two holes in one end to go over the wheel lug bolts, install the lug nuts and that holds the hub so that you can break the 32 mm nut loose. It works for torquing the new nut also, just reverse it. My car is up on jacks if you need a picture. I will be working on it tomorrow.
Brad
 
You can just take out the four bolts that holds the lower A-arm to the support.

mmm...... That would be the upper a-arm no??

You need to remove the two bolts that the lower a-arm pivot on, one is the camber adjuster, which you can mark BEFORE removal.
 
You can just take out the four bolts that holds the lower A-arm to the support.

mmm...... That would be the upper a-arm no??

You need to remove the two bolts that the lower a-arm pivot on, one is the camber adjuster, which you can mark BEFORE removal.

Larry, You are right. I was looking at it upside down, (in other words I was all screwed up). I looked at again yesterday. I was incorrect on the socket size also. It is a 36mm or 1 7/16 in. Here are a couple pictures of how I do it, also the hub center measuring.

I ended up breaking the 3/4 to 1/2 in adapter and the axel holder. I thought that the adapter would work so I could use the 1/2 in drive 36 mm socket, NOT. I found my 3/4 in drive 1 7/16 in socket so will use it direct with the 3/4 in breaker bar and a short extension. I use the jack to support the breaker bar and extension.
I have some old bed frame angle iron that I will drill for a new axel holder. I think that angle iron will work better than the flat stock.
If someone else has a better method I would love to hear/see it.

Brad
 

Attachments

  • Hub Center Measure 1.jpg
    Hub Center Measure 1.jpg
    62.3 KB · Views: 311
  • Wheel to Fender Measure.jpg
    Wheel to Fender Measure.jpg
    32.5 KB · Views: 272
  • Hub Holder.jpg
    Hub Holder.jpg
    64 KB · Views: 310
  • IMG_3034.jpg
    IMG_3034.jpg
    64.2 KB · Views: 308
  • Broken adapter.jpg
    Broken adapter.jpg
    58.9 KB · Views: 338
  • Broken Hub Holder.jpg
    Broken Hub Holder.jpg
    68.1 KB · Views: 315
  • Hub Center Measure 2.jpg
    Hub Center Measure 2.jpg
    77 KB · Views: 287
I had a clicking noise in the rear area of the car on launch. It seemed to go away at faster speeds. I figure that was just from the increase of engine and road noise. After doing some research on "THE PRIME" I figured that I would investigate starting with the CV axels. None of the boots were torn, or was there any grease leakage. I already had the car up on jacks to replace the headers and exhaust anyway. I was waiting for the exhaust to arrive from Washington state. So, I took off some more parts. I was able to remove the passengers side axel by just disconnecting the bottom "A" arm and pulling it out. I couldn't get the axel out on the drivers side without removing the lower, upper and hub assembly. It is only four more bolts and you have to disconnect the brake line. This wasn't a problem since I have some braided stainless lines to install anyway.

After getting both axels out I disassembled the 4 CV joints. If you are going to do this service refer to the factory service manual page 16-7 for the axel assembly diagram. Here is what I found:

1. The passengers side axel had the inboard joint spider vs outboard joint spider stagger off one spline. Probably not a big deal, just not right. (Refer to the bottom left corner of page 16-7)

2. The drivers side axel had the inboard joint spider vs outboard joint spider inline with each other for a ZERO degree, rather than the 60 degree stagger. Not good.

3. The Roller bearings that go on the spiders have a square holder that slides up and down in the joint. Two of the parrellel sides are square cut, and two of the sides have a chamfer. The chamfer sides are what slide up and down in the joint. Remember when you are reassembling the joint if it doesn't slide in easy, check the roller holders. DON"T POUND ON IT WITH A HAMMER OR YOU"LL WILL BE SORRY!!!!!!

4. The boot clamps that come with the HONDA boot kit are aluminum. I prefer the stainless steel clamps. I think that is why some people are reporting of broken clamps. I am not going to use the supplied clamps. I will use stainless steel clamps. This is the first time that I have found a Honda supplied part to be inferior.

5. The grease that is supplied with the kits specify "INNER JOINT GREASE", and there is no quantity indicated on the bottle of grease or the packaging. The service manual specifies that the inner joint should receive 120-130 grams of grease and the outer joint 170-180 grams. I don't have a scale and so makes it kind of hard to put in the correct amount. I guess that Honda decided that it was not necessary to have different grease for the inner vs outer joints. So I just put it ALL in!

6. Notice that there is a circlip on the outboard joint , but not one on the inboard joint. Don't forget to put it back in.

7. I will also apply a liberal amount of anti-sieze compound to the splines on the OUTER joint before attaching it to the rear hub and bearing. Also a dab of grease on the seal race on the INNER joint. Be sure to clean the seals on the transmission and regrease them with Honda Hi Temp grease. A Q tip works good to clean the dirty grease off of the double lip seal.

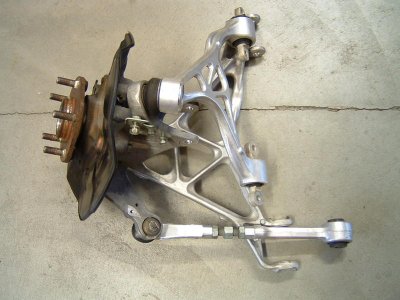
I added this picture of the left rear hub assembly as I remove it from the car to remove the axel.

Brad:smile:
 

Attachments

  • Left Rear 1.jpg
    Left Rear 1.jpg
    73 KB · Views: 427
Last edited:
I am following the Larry B DIY write up CV boot replacement. Have the right axle shaft off, both boots removed and removed/cleaned the inner CV joint. I am now stuck at removing the OUTER CV joint bearings...INNER bearings slipped right out. I take it the outer CV joint bearings should be removed to clean out the old grease as well. Any tricks/tips?

THANKS!
Jeff

The outer CV has a large circlip holding it all together. It comes out easily, then the joint will come apart like the inner one. It also has a large spring inside.

HTH,
LarryB
 
The outer CV has a large circlip holding it all together. It comes out easily, then the joint will come apart like the inner one. It also has a large spring inside.

HTH,
LarryB

LarryB

I must be missing something. I cannot remove the large circlip. Got a couple of retaining clip pliers and I cannot "grip" the clip with the pliers. In other words, there is no hole for the pliers to hold onto. Any tips? Getting frustrated :frown:

Jeff
 
Last edited:
LarryB

I must be missing something. I cannot remove the large circlip. Got a couple of retaining clip pliers and I cannot "grip" the clip with the pliers. In other words, there is no hole for the pliers to hold onto. Any tips? Getting frustrated :frown:

Jeff


Use a really small flat head screw driver and carefully pry circlip out of its groove and up
 
Last edited:
I finally figured it out...was barking up the wrong tree. I was trying to remove the wrong clip (on the axle shaft). The correct clip to remove is MUCH larger (about 4" O.D.) and is EASILY removed. It is the snap ring. I missed it in the DIY but it's there. It was hidden by all the old grease so I couldn't see it. Another tip, I didn't look at the parts in the rebuild kit...they supply you with NEW circlips (thick & thin) that keep the spider in place. So, when removing these there is no need to be gentle...thought I had to re use them.

Jeff
 
Last edited:
Finally completed all 4 CV boots! Man, what a mess. I plan on getting an alignment so I didn't mark the alignment bolts in the LCA. After test driving the car, the steering wheel was quite a bit off center (I didn't touch anything up front). Otherwise, it drove smoothly...just a little squirly due to off alignment. Any idea why?

Thx

Jeff

I just received my 4 CV boot rebuild kits, so I'll be tackling this job perhaps this weekend or next. Any tips or pitfalls I should look out for (other than what's already posted in this thread)?

How much time overall would you estimate for both sides? I have some headers coming in this week, so I'll be installing those as well as changing my oil pan gasket. I was planning on doing everything all at the same time while the car was in the air. But now I'm wondering if that's too much work for one session?
 
Back
Top