Define "professional" installation...

R13

Experienced Member
Tech Expert
Joined
15 May 2005
Messages
1,420
Location
Knoxville, TN
Exhibit 1: The "Professionally" installed radar detector that the previous owner of my car kept touting after I told him I wasn't going to pay him what we agreed on because he didn't disclose stuff...

Note the "professional" use of zip ties to anchor the radar detector to the radiator shroud (mercifully not the bumper itself).

DSCF4285.jpg


Also, please observe the small gauge speaker wire our "professional" utilized in connecting the thing.

DSCF4343.jpg


I know he is not a member here, nor does he read this site, but I hope he appreciates the lengths that I am going through to un-screw his former car :biggrin:
 
Speaking of not disclosing stuff:

I'm not sure the following could quite have resulted from "rolling into a parking curb". I don't know the sheer strength of aluminum off the top of my head...but yeah.

DSCF4332.jpg


Amazingly, as precisely as I can measure without an optical device, the frame is straight, albiet a little worse for wear around the missing tow-hook area.
 
I'll have a little work to do I think before that would fit correctly. The bolt holes on that side are more than a little out of line with the other side, and although the fram rail is "straight" from a chassis geometry standpoint (from what I can tell) the metal where the tow loop bracket used to be is deformed.

If I can get that all sorted out though, I will definately consider that bar.
 
even though that mount is indeed terrible on the detector, it doesn't need any larger wire to install it. that's what comes with it. larger wire is for larger current.

you are still very correct that is was done terribly.
 
Professional = expert in a certain trait………………..I believe the work done on your car = Shade Tree Mechanic. :tongue: Wire ties, unfortunately are common fasteners with a radar detector though. Back in the day even a $1200.00 “K40” detector use to come with ties to mount the front, rear and side units. Although, I'm not sure of the practices today. Personally I would never use them but it’s not uncommon…
 
Last edited:
Professional = expert in a certain trait………………..I believe the work done on your car = Shade Tree Mechanic. :tongue: Wire ties, unfortunately are common fasteners with a radar detector though. Back in the day even a $1200.00 “K40” detector use to come with ties to mount the front, rear and side units. Although, I'm not sure of the practices today. Personally I would never use them but it’s not uncommon…

Funny you should mention that brand. I'll have to look at the paperwork again, but this might have been a K20, which I think predated the K40 IIRC.
 
Speaking of not disclosing stuff:

I'm not sure the following could quite have resulted from "rolling into a parking curb". I don't know the sheer strength of aluminum off the top of my head...but yeah.

DSCF4332.jpg


Amazingly, as precisely as I can measure without an optical device, the frame is straight, albiet a little worse for wear around the missing tow-hook area.

Actually.... there is a better chance that a parking curb did that than anything... Honda designed the tie down brackets to do exactly what happened in this event... the flanges inside the frame rail are "floating" so in the event you were to hit a curb... the steel tie down and the flange inside the frame rail will move... this avoids major frame damage but also provides protection or the radiator bracket and other major componets behind the tie down

So your right... chances are your frame is straight.

I had this happen to me a little over a year ago... So the assumptions of..

Frame straight - highly possible...

frame stregnth - more than likely it has been weakened

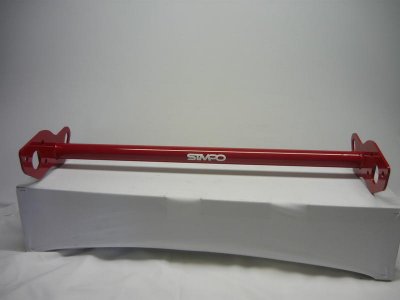
Chopsjazz (Ken) is also correct... The front chassis bar we make will help you out... and if it doesnt fit... estimate how much to shorten it and well make a new one and send it out.

Regards
 

Attachments

  • P1000440.jpg
    P1000440.jpg
    21.1 KB · Views: 50
Thanks for that info. I am going to try to get it as close to its original spacing as possible so a shorter bar may not be necessary, but we will see how that goes.

How difficult do you suppose it will be to pull that flange back into position and either squeeze (with a clamp or something) or pound the side of the frame member mostly flat.

I figure I can get some flat bar stock, drill a couple of holes and make a longer lever to try and pry the flange back into the proper bolt holes. After that though, I'm hesitant to just hit it with a hammer. I thought about trying to get a large vice around it and try to press it back into shape, but I haven't really experiemented with that too much yet.

I am going bring into the loop a fellow I know who is an experienced fabricator from the hot-rod world (builds his own frames, etc.) and see if we can figure something out.

I think your buddy is a great idea... but the fix should be supper simple...

Get a bolt in the top location as a center point... then a bolt into the bottom right... tap the lower bolt towards the front of the car. The flange you are trying to move supposed to float and its made of steel and should go right back into place... I think our bar will fit right in without modifiication and more importantly... it will fix your current problem :)
 
Professional = means that the person does it for a living.

It DOES NOT mean that the person knows what he is doing or is even capable or even cares.

Drew
 
Update:

I threaded a couple of junk bolts into the top hole and the forward lower hole and managed to crow-bar the flange back into its proper orientation relative to what used to be the original holes in the frame.

I tried with a standard-issue claw hammer and a block of wood to make some headway with the defomation...I need a bigger/plastic-coated hammer. (the wood plank in the picture is to keep me from accidentally hitting the radiator...seen it done)

I don't think the original picture quite got across what I am dealing with, so I took a couple more:

DSCF4409.jpg


DSCF4410.jpg


I should be able to put some real time in on it this weekend, so hopefully I can get something done.
 
Last edited:
Professional = DIY :biggrin::rolleyes:
 
Joe, you lost a lot of weight and grew a beard too!!!!:eek::biggrin:

Datsa me!:biggrin: Just got a fresh roll of duct tape and I'm ready to rock!
Professional tip (yes here it is!): a length of string is better than a ruler when measuring.
 
Last edited:
Back
Top