Changing out rotors and painting calipers

Joined
15 February 2015
Messages
4,471
Location
Coral ridge, Ft. Lauderdale
As title states,
I will be changing my rotors on my 91 to the stop tech drilled rotors and painting the calipers to make a clean look for my new Advans which will arrive on Christmas Eve in the SOS sleigh!
A few questions,
If I need to drill the retaining screws out of the rotors, do I really need to replace the screws?
Should I be doing anything else while I am working on this section of the car?
Should I remove the ugly splash guards for the rotors?
I already changed the pads and flushed the fluid last year and plan to flush the lines again.
I already have stainless steel brake lines and calipers will be 100% removed and thoroughly cleaned prior to painting.
Oh yeah, calipers are already red. Any advice on removing the paint?
Thanks in advance.
 
The retaining screws can be reused. No drilling required as they are phillips head. No need to remove the rear splash guards since you are maintaining the original stock diameter rotors. They may be unattractive but are'nt really visible through the wheel spokes. That is strictly a personal choice. Mine were a PITA to remove. Get yourself a spray can of Aircraft paint remover for removing existing paint. Very potent so don't breathe any in accidently but works excellent.
 
The retaining screws can be reused. No drilling required as they are phillips head. No need to remove the rear splash guards since you are maintaining the original stock diameter rotors. They may be unattractive but are'nt really visible through the wheel spokes. That is strictly a personal choice. Mine were a PITA to remove. Get yourself a spray can of Aircraft paint remover for removing existing paint. Very potent so don't breathe any in accidently but works excellent.
Thanks for the input David. My rear rotors are already aftermarket winner power 2 piece floating rotors. So those rotors are staying put. The car did have a winner power front big brake kit prior to purchase but it leaked fluid so they were swapped back to Oem prior to purchase. Aircraft paint remover is available at which stores?
Thanks and Merry Christmas,
AJ
 
If I need to drill the retaining screws out of the rotors, do I really need to replace the screws?
If you can't remove them unscrewing and have to absolutely drill them out to remove the rotor then YES you need to replace them. Use impact screwdriver when installing new screws: apply rotational force (twist it) and lightly hit it with a hammer.
 
If you can't remove them unscrewing and have to absolutely drill them out to remove the rotor then YES you need to replace them. Use impact screwdriver when installing new screws: apply rotational force (twist it) and lightly hit it with a hammer.
Will do,
Thanks man. Merry Christmas.
 
Are you going to have the calipers power coated or are you going to to do it yourself?
Do you plan on disassembling all of the internals before you paint - and if so did you get the rebuild kits yet?
There are a few tools needed for the disassembly - if you are doing that and have you sourced the tools?

I did my calipers two years ago - everything removed and cleaned then new kits installed.
I disassembled - used brake cleaner - and boiled - then used rattle can VHT caliper cleaner and paint - then baked in an oven we have at work.
I think they came out OK - but I have a some small imperfections - on my part.
I made the mistake of handling the parts until they were fully cooled and the paint is still tacky at that point.
Parts ended up touching themselves and the contact points ended up pulling off some small points of paint.
Let the parts cool off - leave them alone - wait as long as possible - before handling them.

The dust seals are a bit tricky to get right.
You need the right tools and patience and it will be fine.
I got the Honda 07HAE-SG000100 compressor tool.
I got the Motion Pro 158279 / 08-0279 snap ring pliers
I got the Bike Master 150600 for installing the rear pistons.
I also made a thing to allow dis-assembly of the rear piston to press down on the innards in my drill press to disassemble the rear piston.
It was just a circular C that allowed me to press down on the innards and remove the retaining clip (and reverse the process after cleaning).
The rear piston dis-assembly might be unnecessary, but I was shamed into doing it (thanks Prime).

For my 94 I got:
2x front kits 01463-SL0-010
2x rear kits 01473-SL0-010
Rear kits may be hard to find - maybe not.
I had a friend send them from Japan as I could not find them locally
The kits have nice lube packets for each of the unique points - in contact with brake fluid or not (and some I'd need to think about).
The parts - individually - may be orderable - I just had trouble with the kits.
I also ordered some Centric kits for the rear - 143.40021 - but they do not come with the lubes or brake line crush washers.
(Did not use these since I managed to get the Honda kits)

I should have made a post - sorry - I have a number of photos.

Let me know if you need any help / suggestions.
 
Last edited:
Are you going to have the calipers power coated or are you going to to do it yourself?
Do you plan on disassembling all of the internals before you paint - and if so did you get the rebuild kits yet?
There are a few tools needed for the disassembly - if you are doing that and have you sourced the tools?

I did my calipers two years ago - everything removed and cleaned then new kits installed.
I disassembled - used brake cleaner - and boiled - then used rattle can VHT caliper cleaner and paint - then baked in an oven we have at work.
I think they came out OK - but I have a some small imperfections - on my part.

The dust seals are a bit tricky to get right.
You need the right tools and patience and it will be fine.
I got the Honda 07HAE-SG000100 compressor tool.
I got the Motion Pro 158279 / 08-0279 snap ring pliers
I got the Bike Master 150600 for installing the rear pistons.
I also made a thing to allow dis-assembly of the rear piston to press down on the innards in my drill press to disassemble the rear piston.
It was just a circular C that allowed me to press down on the innards and remove the retaining clip (and reverse the process after cleaning).
The rear piston dis-assembly might be unnecessary, but I was shamed into doing it (thanks Prime).

I should have made a post - sorry - I have a number of photos.

Let me know if you need any help / suggestions.
I will not be powder coating. I have the G2 brush on kit. I will be removing the calipers to get them nice and clean. As far as a 100% finish, I am slightly less concerned about as the car will be on brembo's by next year. But any tips, comments, or tricks are most certainly welcome.:smile: I am sure I will find something else that needs replacing upon disassembly.
Thank you for your insight and Merry Christmas.
 
When I've had to deal with the retaining screws on my Honda cars I use a Craftsman Impact driver to get them out. When that does not work a bit of heat usually will do the trick. Also spray a bit of PB Blaster on there (not too much). The G2 kits look nice and hold up very well by the way. I like them.
 
I will not be powder coating. I have the G2 brush on kit. I will be removing the calipers to get them nice and clean. .

Is the G2 brush on kit a two part epoxy paint? If so, I used a two part epoxy paint finish (can't remember the brand) on some calipers on another car that I was doing a restoration on. It was a disaster! The paint was very difficult to use because it was fairly viscous and set up quickly. If you didn't get the coverage perfect when doing the first brush stroke, going back and touching up just messed up the surface. Getting a nice even coat without strokes was very difficult. The fourth (last) caliper was a complete disaster because the coating had started setting up making application exceedingly difficult. I was so unhappy with the result that I ended up sandblasting it all off and just recoating with VHT brand caliper paint in an aerosol can. Three years later and the VHT appears to be holding up well.

If you are going to try two part epoxy paint, make sure that you have everything laid out so that you can work really fast. I estimate that the total working time on the paint that I had was less than 30 min from the time I started mixing the hardener and resin until it was totally unworkable.

Just my experience.

- - - Updated - - -

When I've had to deal with the retaining screws on my Honda cars I use a Craftsman Impact driver to get them out. When that does not work a bit of heat usually will do the trick. Also spray a bit of PB Blaster on there (not too much). The G2 kits look nice and hold up very well by the way. I like them.

Is that a C72/C77 Honda Dream in your avatar photo? Is it yours? Wow, that brings back memories!
 
Last edited:
I will not be powder coating. I have the G2 brush on kit. I will be removing the calipers to get them nice and clean. As far as a 100% finish, I am slightly less concerned about as the car will be on brembo's by next year. But any tips, comments, or tricks are most certainly welcome.:smile: I am sure I will find something else that needs replacing upon disassembly.
Thank you for your insight and Merry Christmas.

Jinx, you might want to PM Honcho (or get him to post here). He did this on his/my car - rebuilt the calipers, painted them NSX-R red. He may have some helpful ideas.
 
Is the G2 brush on kit a two part epoxy paint? If so, I used a two part epoxy paint finish (can't remember the brand) on some calipers on another car that I was doing a restoration on. It was a disaster! The paint was very difficult to use because it was fairly viscous and set up quickly. If you didn't get the coverage perfect when doing the first brush stroke, going back and touching up just messed up the surface. Getting a nice even coat without strokes was very difficult. The fourth (last) caliper was a complete disaster because the coating had started setting up making application exceedingly difficult. I was so unhappy with the result that I ended up sandblasting it all off and just recoating with VHT brand caliper paint in an aerosol can. Three years later and the VHT appears to be holding up well.

If you are going to try two part epoxy paint, make sure that you have everything laid out so that you can work really fast. I estimate that the total working time on the paint that I had was less than 30 min from the time I started mixing the hardener and resin until it was totally unworkable.

Just my experience.

- - - Updated - - -


Is that a C72/C77 Honda Dream in your avatar photo? Is it yours? Wow, that brings back memories!

Yeah. That's my 1966 Honda Dream. I really love it. Amazing how it runs being close to 50 years old. They are not terribly expensive. You should get one!!!!
 
Yeah. That's my 1966 Honda Dream. I really love it. Amazing how it runs being close to 50 years old. They are not terribly expensive. You should get one!!!!

My high school buddy had a Dream. I found the operation of the leading link suspension a bit disconcerting so I secretly lusted for the Hawk.

I think that engine family set the gold standard for the ability to endure the abuse of idiots. The guys with the BSAs and Triumphs sniffed at it. I think the fact that you could just press a button and drive off without any drama really irked them.

I'm 48 now and have been riding for the better part of 30 years. This is the first vintage bike that I've ever owned. I've ridden this Dream up to 70 mph with no drama. It does not like going that fast but it did it. The suspension did not cause me to feel unstable at all. It's mostly an around town bike for me. If anything the brakes are the weak link in the chain. I wonder if maybe there was something wrong with the one you were riding to make you feel disconcerted.
 
I'm 48 now and have been riding for the better part of 30 years. This is the first vintage bike that I've ever owned. I've ridden this Dream up to 70 mph with no drama. It does not like going that fast but it did it. The suspension did not cause me to feel unstable at all. It's mostly an around town bike for me. If anything the brakes are the weak link in the chain. I wonder if maybe there was something wrong with the one you were riding to make you feel disconcerted.

It was the strong anti-dive effect on braking that occurs with the leading link suspension, something that you have to get used to. Just felt strange when you are used to the conventional telescopic front suspension.
 
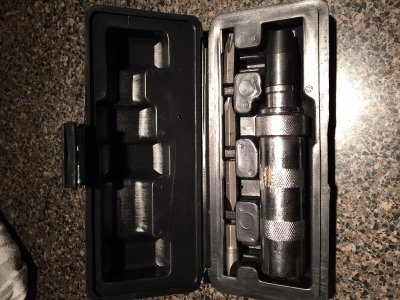
I'll bet you'll need an impact [screw] driver to take off the Phillips head screws. An inexpensive must have tool. Use anti-seize when you put the screws back in. You may have to hold driver with vise grips and really whack it with good hammer.
 

Attachments

  • impact screw driver.jpg
    impact screw driver.jpg
    90.5 KB · Views: 174
Last edited:
I'll bet you'll need an impact [screw] driver to take off the Phillips head screws. An inexpensive must have tool. Use anti-seize when you put the screws back in. You may have to hold driver with vise grips and really whack it with good hammer.
Thanks, I have several impact drivers for my job.
 
I will not be powder coating. I have the G2 brush on kit. I will be removing the calipers to get them nice and clean. As far as a 100% finish, I am slightly less concerned about as the car will be on brembo's by next year. But any tips, comments, or tricks are most certainly welcome.:smile: I am sure I will find something else that needs replacing upon disassembly.
Thank you for your insight and Merry Christmas.

G2 is great stuff! I used it on my Prelude over 15 years ago and it has held up very well! I actually did it twice because I did not clean the calipers well enough the first time and the paint flaked off pretty quickly. The instructions said to spray the calipers with the cleaner that was included (brake cleaner IIRC) and you're good but it took much more than that to actually prepare the surfaces for paint. The second time, I used a rotary wire brush in my cordless drill to abrade the caliper surfaces thoroughly and remove the failed paint, then I used the brake cleaner and blew the calipers dry with compressed air. That did the trick and the paint has stood the test of time. I found a paint pen at Michael's that matched the color (blue) pretty well and I use that to touch up the occasional nick. Works great :-)
 
Back
Top