Can rear engine mount be damaged when tilting engine during timing belt change?

Joined
9 September 2006
Messages
928
Location
Orange County, CA, USA
13sl00_b47.gif


I have the side (3) and transmission (1) engine mounts out, and tilted the engine to more easily remove the timing belt covers.

Then I noticed 1/2" of clear space between the strut (13) going through the rear engine mount (2) and the rubber material inside the mount.

Can this be caused by tilting the engine too far? It's not more than the 5 degrees mentioned in the manual. I watch the side mounting point in relation to the car while jacking up the engine and it isn't over the limit.

So is it a sign of long term damage due to excessive engine vibration?
 
The mount has an impression with a through hole. No Worries. Make sure you get your timing marks correct, and you should be fine:).

HTH,
LarryB
 
The mount has an impression with a through hole.
OK, but please elaborate.

I saw daylight instead of rubber between the bottom of the rod going through the mount and the ring surrounding the rubber. You mean that's normal? I thought the rubber inside the mount is supposed to completely surround the rod. That's what the side mount looked like. I suspect the engine is raised too far so the mount is squeezed completely out of shape.
 
Yes, the mount is not solid, it has two holes if I recall 180 degrees apart, I speculate so the mount will flex and minimize carry over of vibration into the chassis.


Regards,
LarryB
 
I'm also in the process of changing my timing belt, and have just completed step 17 on page 6-17 of my '96 NSX-T manual. So, it was easy to take a peek at the transmission mount. As usual (about 110% probability), Larry is right. There are at least 2 holes going through the main rubber mount on my 96. They are clearly molded, not from a tear or mouse nibblings.

I've been using the pdf file as my guide, and found the tips very useful. To me the worse part of the job is getting at some of the cover bolts. I indeed had to remove the passenger side sway bar mount to get at the top left bolt on the rear middle cover.

Frank
 
To me the worse part of the job is getting at some of the cover bolts. I indeed had to remove the passenger side sway bar mount to get at the top left bolt on the rear middle cover.
I admire you for having finished the job so quickly.

I am stuck on the final bolt to remove: the rear bolt on the rear middle cover.

On my OBD-II car there are two electrical connectors carried on a bracket tied to that bolt, and they just get in the way. I see you got it out from the bottom. Did you ever try it from the top? Maybe I need one person to place the socket onto the bolt from the bottom, and another to dangle the ratchet handle from the top.

Did you disconnect those two electrical connectors first? Space is so tight in there I couldn't even get enough leverage with my fingers to disconnect them.
 
I got at that bolt from the bottom, by removing the passenger side sway bar bracket. I had to put the tire back on and have both wheels on the ground so there was no twist on the sway bar.

In any case, I then had to remove the connectors - also from underneath. First, separate the connectors (push on the release tab until you hear the click, then they come apart easily). There is a similar tab holding one of the connector bodies to the metal clip, and you need to find the tab and press it in, then the connector body comes off the clip. Look at one of the other connectors for above to see how the clips work first. On the install, I put the bolt and clip back first, then reinstalled the connectors onto the clip and then joined the connector bodies together.

This @$#! bolt was the hardest one to remove on the whole job. It and the large adjuster bolt on the alternator were the only two bolts I couldn't get a torque wrench on during the reinstall. I had to do them by feel.

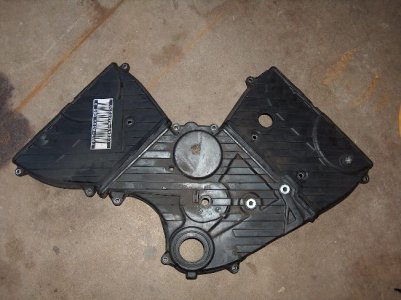
I attached a picture of the timing covers to this post. @$#! bolt is the one in the upper left.

I absolutely recommend you pull the 25 page PDF file on timing belt replacement by Gary Kentosh off of NSXprime and follow his step 27 procedure of marking the old timing belt & gears then transferring the marks to the new belt. It took all the guesswork out of making sure the belt/gears were timed. I used "whiteout" to mark the belt and a black "Sharpie" marker to mark the 5 gears (crank plus 4 cams).

On reinstalling the engine and transmission mount bolts. "Untilt" the engine and completely lower the jack. Then try to install the transmission mount through bolt. I installed the side engine mount first and found the transmission end was still too low. So, I undid the side engine mount again. the engine dropped about an inch on that end, and it was easy to get the transmission bolt back in.

Frank :biggrin:

PS My total time was about 20 unrushed hours. I could easliy cut 4 or 5 hours the second time. I had a few day break in between due to other events and because I only had 12" (8" + 4") of extension on my 3/4" socket set for un-doing the crankshaft pulley bolt. I borrowed a 12" extension to get 20" total extension, and that cleared everything perfectly. You might get by with a little less, but when tightening the bolt, you are working with the torque wrench next to the passenger door, and I didn't want to risk getting too close and scratching the door.
 

Attachments

  • HPIM3490b.JPG
    HPIM3490b.JPG
    72.9 KB · Views: 176
Last edited:
Thanks, ftuhy, for the instructions. Yes, I have Gary's write-up on timing belt in pdf format and have read it many times.

Today another knowledgeable Prime member came by and helped me with that last bolt. It turns out there was another bolt on the lower rear corner of the rear cover. Two of us took more than two hours to loosen those two bolts, but without disassembling anything else, as follows: one person dangles the ratchet from the top, and another person steadies the socket from the bottom and put it over the bolt. The top person turns the ratchet until the 6 point socket locks onto the bolt. After breaking it loose, the bottom person holds the socket steady while the top person rewinds the ratchet. After a few revolutions, the bolt was loose enough to remove by finger pressure. On one of them, only one finger can reach the bolt, without gloves, so you need bionic hands with strong skin on your finger tips.

For installing the new belt, we purposely kept the camshaft sprockets stationary after the old belt slipped off, and without using any markings, we managed to put the new belt on at the exact alignment. The plastic ties with the click stops were very helpful for tying the belt onto the sprocket. Without those, it would have required six hands to steady everything. We both checked the alignment of the sprockets many times with the old belt still on, and concluded that it's aligned properly already, so that was a big plus.

Another curious thing happened: the crankshaft pulley was hard to put back on. Slipping it off was easy, probably because of the penetrating oil I used. But putting it back on shows how little clearance it had. So I'm not sure how I can push it back completely into the crankshaft once the timing belt covers are on. It's off now, since I only had the pulley on partially so I can turn the crank a few times to check for proper alignment and valve/piston clearance.

So I have a long way to go yet, and I dread those two rear bolts on the rear cover and wriggling all the covers back on with new gaskets, especially the rear upper one. Without the help of that Prime member who gave me badly needed psychological support by parking his fully operational 99 Zanardi in my garage, I would have been lost.

Maybe that was a first for SoCal: two Zanardis in the same garage, albeit only one was operational.

I have found that after days and days sitting in front of the computer typing non-stop for my day job, an hour or two of physical labor once every week is very refreshing and good for my health. I'm quite sure this won't fix the problem in my car's engine, so I'm already planning the next logical step of dropping engine onto a cradle and doing a complete disassembly. But first I have to put the car back together again.

Here's an invitation to all SoCal Prime members: come by this weekend to take a look at my car's timing belt alignment and check whether it's correct or not. I think it is. And you can also see how the engine looks with this many parts disassembled. Just email me your phone number and I'll call you to arrange it.
 
I didn't have another person to help, but it sounds like the two-person approach is an alternate solution to my "favorite" bolt. My wife did hold the AC belt in place at the crankshaft pulley while I worked it onto the compressor and adjustment pulley from the top, and helped me with the removal/installation of the engine compartment cover. I don't think she would have put up with the fun on the "favorite" bolt.

Note that the "middle" bolt on the rear middle cover is easy to do with the engine tilted, but also takes bionic fingers with the engine in the normal position.

Instead of the plastic cable ties, I used medium size binder clips to hold the belt onto the camshaft pulleys. Its amazing how office supplies also come in handy for car repairs!

As to the rubber seals on the covers, I used silicone grease on the sides touching the engine block. I also used it on the upper edges of the lower cover seal that go into the middle covers. They just slipped into place, and the silicon will help extend the life of the rubber.

I also used Never-Sieze on every single bolt (and the spark plugs, of course). I've done that for years and it sure makes future dissassembly easier.

As to the crank pulley, mine slid back on easily. I just had to make sure the key & slot were aligned. I would try cleaning the inside of the pulley and the spline on the crank using some WD-40 and a plastic kitchen scrub pad. It should only take a light touch to remove any surface crud or corrosion. Be sure to not get any over-spray on the belt or crankshaft gear. And wipe it off completely before installing the pulley. Also, per the manual, be sure to lubricate (again, I used Never-Sieze) the threads of the crankshaft pulley bolt and between the bolt head and its washer. That made the bolt tighten very smoothly.

You mentioned that you didn't think this will fix all of your engine problems. What else is ailing your engine?

I've heard the Zinardi ride is rather stiff. However, I also have an '84 Z51 Corvette, which set the definition of stiff. Compared to that, my NSX ride feels soft. What's your opinion on the Zinardi ride?

Frank
(NE region - NJ)
 
I just replaced my rear engine mount. As you can see the rubber damper isn't solid. It's designed that way to absorb the fore-aft movement of the engine. However on this old mount it is cracked. Once I clean it, it will make a pretty paperweight. :smile:

rearmount.jpg
 
I did a no-no today that set me back some:

I turned the crank clockwise with the tensioner pulley loose, with new belt on, and that caused the crank to slip two teeth on the timing belt. So I removed the new belt, and heard a distinct "clunk" sound as the rear exhaust cam rotated slightly and the valves hit the piston. So I turned the crank counter-clockwise to approximately where it should have been, and plan to reinstall the belt, rotate everything back to TDC, and start the alignment from scratch.

I did consider loosening all the valve adjustment screws, and I do have the special tool to do that, but I think that might be unnecessary. I'm quite sure there isn't serious damage, as everything was turned gently by hand, and the crank now isn't pushing piston against valve.

I just hope that I get the approximate crank angle close enough so that the whole assembly can go back to TDC without interference.

If it does not, then I suppose I have no choice but to loosen all the valve adjustment screws to realign everything back, although I suspect that may be more difficult than it seems.

The reason I was still fiddling with it even though it ain't broke was that the paint marks on the sprocket was really hiding the [ -- marks, so when I looked at it some more, it really seemed like the rear exhaust cam was off by one tooth: the classic mistake. So now it's all back to square one, and I have forever lost any proof that it was already wrong when I took it apart.

I want to use some paint thinner to remove those paint marks from the factory, and put on my own marks based on the [ -- markings on the sprockets.

What do the seasoned experts think? There's 95% chance the camshaft/crankshaft alignment is off by no more than 1 tooth right now, so I should be able to slip the belt back on and take it back to TDC with no interference. But is this the time to drain the coolant and oil, and then remove the camshafts and cylinder heads? I do have all the tools for that, and I even have the 1% accuracy Snap-On torque wrench to put the cylinder heads back on with new gasket and all. I've even spoken to Portflow Design, in person, about them doing a head refresh for this C32 engine, and I feel they can do a good job, since I did check the quality of their finished work right there at the factory. Although, what do I know about what constitutes good cylinder head work? Not much.
 
OOoooh noooo!

Since you only moved things a small fraction of a revolution, you should be able to put the crank back to TDC without being 1 revolution off. I would ever so gently move it and the cams back a few degrees at a time. Then, I would insert a 3/16" punch in the rear exhaust cam and 5 mm (or 13/64") punches in the other 3 cams to get them all back in place. Assuming the 3.2 crank gear are marked like my 3.0, you can then align the crank gear mark with the mark on the block. (but note, my crank was off by a "smidge" - about 1/16" from the marks aligning dead-on).

Of course, I'm not sure how you keep the cams from turning without backing out the tappet adjustments - unless you have a few helpers to slowly move each cam back into place with a box wrench and drop in the pin punches while you align the crank. :biggrin: Hmm - back out the tappet adjustment!

At the same time, if you are thinking about head work to get more performance, and not cringing at the $$$, go for it!

Gook luck.

Frank
 
The thing that really scares me is that you turned the crank back after the cam slipped. How did you know you weren't pushing the piston into the open valve? Coulda went either way. I wouldn't consider pulling the head just yet though. :)
 
The thing that really scares me is that you turned the crank back after the cam slipped. How did you know you weren't pushing the piston into the open valve?
My rationale was that since I knew the direction the crankshaft slipped (clock-wise), I wanted to restore that alignment , so I rotated crankshaft backward after removing timing belt. The camshafts did not rotate that much once the belt came off. Only the rear exhaust cam rotated slightly. The rest were held in place by friction. Remember, some lobes are pushing it one way and other lobes pushing the opposite way. Also, the valve springs aren't that strong, and the friction on the camshaft bearings are quite high in my case.

I read recently that the mechanics at Ramon's near here always loosen the tappet adjustments completely before removing the old timing belt.

Also, all this turning back and forth was done very gently, by hand on a 12" ratchet, and very slowly, so even if it did hit slightly, it was a very slow and mild hit.
 
Back
Top