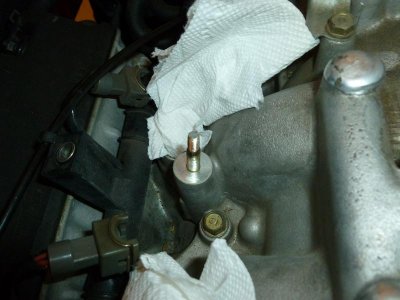
c30 fuel rail stud snapped, extractor?

Joined
17 February 2010
Messages
25
Location
Bethesda, MD
Yes I was using a torque wrench, but I snapped a fuel rail injector stud for the rear right side. Is the stud molded into the intake casting? Or can I pull it out with an off the shelf stud extractor? There is plenty of the stud protruding from the intake.

Poking around in the svc book, I can't find a part# for the stud, so I'm not sure if this is possible.
 
Last edited:
Well for starters, you should have only been using a 1/4 drive socket and lightly snug them up.

You can just pull it out with vise grips if it's sticking out enough, just go to a wrecker and pull a stud out of a civic or integra they are all about the same
(use double nut method) , you can also buy a new one (#15 on this diagram):

http://www.acuraoemparts.com/delray...catcgry5=FUEL+INJECTOR&ListAll=All&vinsrch=no
 
Well for starters, you should have only been using a 1/4 drive socket and lightly snug them up.

Thanks; that wisdom is hard won. 9ft*lbs as specified in the manual is nothing like 9ft*lbs on the dial of the wrench. Nothing like that sinking feeling after the ratchet goes mushy; after trying to do it by the book.
 
Reviving this old thread for the same exact thing happened to me. I was using a tiny torque wrench when reinstalling the rails but it was apparent someone else had mucked with this stud before as well. The remnant of the stud is irregular and I cannot get a nut on the remaining stud to perform the double nut removal. My question is can I use a dremel tool to remove the irregular end while I have some of the fuel line unattached? I will admit that I have the fuel lines covered up with cloth, but am not certain whether using a dremel tool under such circumstances is safe. I'm sure this dilemma has surfaced before. Anyone have thoughts on how to remove the stud? I did try to utilize vise-grips and it would work.

- - - Updated - - -

Alright, as an update, I took a chance and "dremeled" the irregular end off. Fortunately, no fire. Now a nut can spin down onto the stud but something is distorted, for about half way down the nut meets resistance as though the threads are distorted. I can gently force the nut further down, but would I be causing more damage? Thoughts?

- - - Updated - - -

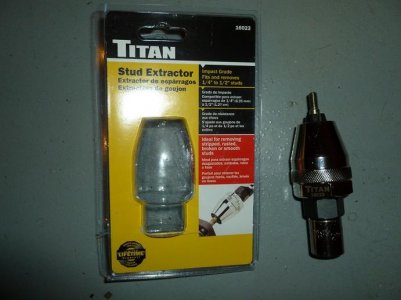
Well after a fair amount of cursing and frustration, I went online to read up some more on how to remove these darn studs. Many stated what angus recommends above and seem to have good luck. I attempted that maneuver and failed. I tried multiple attempts and all were failures. Ultimately, I found a reference to an unusual tool call Titan Stud Extractor. This little $25 gem easily extracted the pesky stud with no drama. It was nicer than other stud removers for it allowed symmetrical delivery of torque to the whole study instead of one side; thus, prevent breakage of the stud.

Honestly, I was freaking out for I feared that I was going to have to replace the intake components just to get the stud out or shamefully have to have the car trailered to a dealer to clean-up my mishap. I wanted to share my experience for undoubtedly someone may sadly succumb to the same misery of having a broken stud.
 

Attachments

  • FuelInjectorStud.jpg
    FuelInjectorStud.jpg
    52.6 KB · Views: 31
  • StudExtractor.jpg
    StudExtractor.jpg
    40.1 KB · Views: 16
Last edited:
The stud is shouldered. Are you hitting resistance before the nut runs into the shoulder? If so, you need to make a judgement on how much resistance. If excessive, then you should consider chasing the stud with the correct sized die to clean up the thread. If its not excessive, then don't fret too much since you are extracting and replacing the stud anyway. You just need to be able to run the two nuts right up to the shouldered area to minimize the total twist on the stud when you do the extraction. Spray the base of the stud with some PB blaster or similar penetrant to facilitate removal. You need to ease the removal process since it would appear that the stud has already been fatigued by some previous strong arm. You don't want it snapping a second time flush with the head surface.

When you install the new stud, apply some anti seize to the threads to help installation and future removal. I worship at the alter of anti seize compound when doing any work requireing installation of threaded stuff on my NSX!
 
Last edited:
The stud has been removed with the aid of the tool...fortunately. I did in fact utilize PB blaster a few times to help with the removal but failed to mention it in my early post.

During the removal process, I did go very slowly and gently once for I was in constant fear of it breaking off flush to the head surface!

I like the idea of anti-seize compound. For some reason, I thought it wasn't recommended for it could unintentionally result in over torqueing of the nuts/studs. Am I wrong in thinking that?
 
It is true that lubricating threads will result in additional axial stretch compared to a nonlubricated thread when tightened to the same torque. For a stud, though, the relevant thread is the nut on the stud, not the stud in the block. There should be no reason not to use antisieze on the stud in the block. (And I doubt the nut is tightened anywhere close to the yield point of the stud, so using antisieze on the nut should be fine too.)
 
Back
Top