Bilsteins Shocks

Joined
9 March 2002
Messages
1,029
Location
California
I just received my Bilstein Shocks. The blue colored "boots" have a different feel (and material) between the front and rear set. Anybody know why this is the case? From first glance. All four shocks look identical, but the fronts have one additional welded piece to each of them.

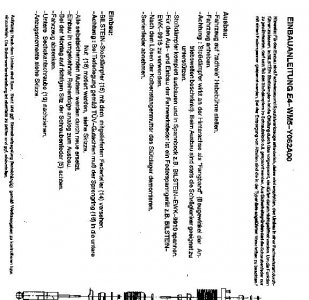
The instructions and diagrams are all in German!
 
juejaimon

Sorry for the delay. I could not read everything in the pictures, but here is a free translation as far as I could read.

Disassembly:
- Put the car on a bridge (jackstands) with the wheels hanging freely.
Warning: The rear suspension acts as a delimiter on the angle of the drive-shafts. Make sure to support the lower suspension-arms when removing the shocks.
- Remove the shock&spring assembly and put it in a shock-vise (example given for a Bilstein-shock-vise).
- Disassemble the shock. Use a spring-compressor, for example the Bilstein EWK-9915.
- After removal of the top lock-nut, remove the damper mounting base
- Take off the spring

Assembly:
- But the spring-seat on the shock body
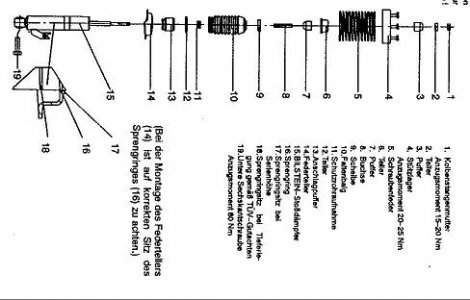
- Warning: When lowering the car according to the German TUV-rules, you have to use the lower nut to mount the spring-seat (see drawing)
- Replace all self-locking nuts
- Put shock together in reverse order as when disassembling
- When mounting the shocks, please make sure the springs are seated correctly
- Lower the car
- Tighten the lower mounting-bolt nut
- Use the required torque settings for all nuts and bolts according to the drawing.
 
The boots are different. The front shocks are a rubber type whereas the rears feel more like pliable plastic. The fronts should fit snug over the shock body whereas the rear fits loosely with a gap between the shock body and the boot. I called CGI motorsports about this and he said that is normal. He also said that the NSX guys are the most anal people on the planet :D

I told him I agreed.

Cheers.

Jeff
 
MvM- Thanks for all your time in translation of the instructions. It is very helpful. The shocks came with 2 washers (Items 12 and 9 on the picture?), perch (Item 14), and a plastic tie strap. Can you make out what items #12 and #9 are from the pictures?.. I'll try to get a picture of the parts tonight.

Hiroshima - Thanks for the confirmation!...
 
I went thru that same Bilstein dust cover (boot) thing you are talking about as well. I ended up getting 2 extra front dust covers and used them instead of the ones that were for the rear shocks. Can't say why they (the rear dust covers) didn't fit snug around the base of the shock in the first place, like the ones on the front did. So far I have had no problems your MMV.
 
I had the same question when I received mine. After talking to a few vendors and Bilstein, it seems that they are designed that way for a good reason, I just can't remember what the reason was!!!

DanO
 
All - Thanks for all your help.... i will be attempting the install tonight... i'll be using the nsxhelp guide and will appreciate any other pointers that you might have.

DANO- there are two different size washers given in the package... do you know which one goes where?... it's hard to tell from their picture.
 
juejaimon said:
DANO- there are two different size washers given in the package... do you know which one goes where?... it's hard to tell from their picture.

My memory is pretty bad regarding this install, which is too bad because I took video of my install and was planning on doing a complete DIY write up :( (maybe I can still…someday…). Anyway, all I can remember is that there is a conical-shaped washer which I believe fits right over the top of the strut and I really can’t remember the other washer…

Sorry about the bad memory, I’m sure other DIYes will chime in here who have more recent experience with this install!

DanO
 
Forgive my ignorance, but when one speaks of the "lower" perch settings....it is the setting that ultimately be closer to the ground when installed correct?

I've done a search and found that one should tighten the lower mounting bolt when the suspension is loaded?... can someone please explain to me why this is? I assume that this lower mounting bolt is the one that holds the shock in the lower socket.:confused:
 
Like you say, there are two possible spring perch settings: upper and lower, which indicate which groove the perch snap ring is in, upper being the upper groove and lower being the lower groove when looking at the strut in its installed orientation. Using the upper perch setting on all four struts, the car will remain at near OEM height (this is most likely the way your Bilsteins are currently configured), the lower setting lowers the car about 7/8”. You can change from the upper setting to the lower setting by moving (or vice versa) the snap ring that holds the perch into the upper or lower groove on the strut body. Don’t confuse the upper or lower snap ring setting with the perch orientation—always orient the perch in the same way as shown in the instructions and on the dali website. It is difficult to change the snap ring setting once the struts are installed.

Once the strut is installed, only tighten the bolts (all of them) hand tight. Next, take your floor jack and a block of wood carefully jack up the suspension “load the suspension” as much as you can (be careful not to unbalance the car too much if it is on jack stands!!!). Then tighten the bolts to torque spec.

HTH

DanO
 
Thanks DanO,

I was confused after looking at dali's website regarding right and wrong.... because it seems like they both depict the "upper" grove setting on both of their examples.

Do you see the lower snap crevice setting that is unused?
 
juejaimon said:
Thanks DanO,

I was confused after looking at dali's website regarding right and wrong.... because it seems like they both depict the "upper" grove setting on both of their examples.

Do you see the lower snap crevice setting that is unused?

Yes, on that site, the "right" and "wrong" way only has to do with the spring perch orientation, not the snap ring position. There is no "wrong" snap ring position as long as all the struts are set up the same way. In my case, I used the lower setting to lower the car 7/8".

DanO
 
Back
Top